LESSON OVERVIEW
What you're going to learn in this lesson, how you're going to do it and what you're going to get out of it.
LESSON OVERVIEW
In this lesson we will run through some of the basics of 3D modeling. Which tools you will most commonly use and how to use them, to create a simple model.
MODELLING OVERVIEW
One of the most fundamental steps in creating games, is modelling the assets that will go into the game world. Most of what you see in game has been modeled by a talented artist, right from basic barrels, to characters, to gigantic buildings or shiny weapons! The modelling often happens in a separate program from the game engine - sometimes referred to as DCC (Digital content creation tool).
Once an asset has been modeled, depending on its type, it will have to go through several other steps before it's fully ready for the game. This includes texturing, rigging, animation, collision creation, shaders, and optimization. So it’s important that your models have good topology and are clean. Especially when it come to the performance of the game, but it is also a lot easier for your colleagues to work with your models when you have done your part well.
RECOMMENDED PROGRAMS
Most 3D artists that create models for games use either Maya, 3ds Max or Blender. You might have heard of other programs like, ZBrush, or Houdini. But those are used for more specialized tasks, like digital sculpting, or procedually generating entire scenes.
Maya, 3ds Max and Blender, are all more than capable of modeling anything you can dream of for your game. But of course, there will always be a heated discussion on which program is best, and the ‘industry standard’. This disussion doesn’t make a lot of sence, since all of the softwares are used professionally in the industry, and it’s more about personal preference as well as the history of the studio you want to work at, that decides which one you should focus on. All you need to know, is that no matter which you choose, you can model anything with them using a standard workflow.And that most of the stuff you learn in one program will cary over to another. So even if you start with Blender, and you want to work for a studio that exclusively work in Maya, you can do the switch in only a couple of weeks.
Blender is usually recommended to beginners as it's free to use. But that does not mean that it's not used in professional studios, in fact many do. Both Maya and 3ds Max are paid subscription, but you can get student versions for free if you are currently enrolled in any program.
PICKING A GOOD ASSET
When you pick your first object to model, there are a few things you should keep in mind.
First of all, keep it simple! It’s much easier to simplify an object to it’s basic shapes if it’s not made of too many complicated parts. Start with a single solid prop, something like a table, bottle, lamp or kettle. Preferably the object should not be too complex. Cameras, bikes and cars are are very exciting but difficult to model, and should be something you can look forward to after you have done several models. Furry and organic soft objects can also be difficult to model.
So maybe hold on with creating a tribute scene to your family’s pet relaxing under the largest leafiest plant in your home.
Like mentioned in the REFERENCE GATHERING lesson using real word reference is going to be the best, to understand the shapes of that object. So if you have a household object in front of you, it could be a good challenge to replicate it in 3D. If you don't have a physical object in front of you, it's good to have a solid collection of references to work from. Once you get familiarized with the basic workflow of modelling, you can choose more advanced objects, and even create entire scenes.
I'll use my teapot as a base for this tutorial.
SIMPLIFY THE OBJECT
It is always good to break down your prop into its most basic shapes before you start on the model. This can turn a complex object into many simple primitives, and this is much easier to work with. If we look at my teapot, it consists of several simple shapes that are combined into one complex teapot. It's essentially a bunch of cones, cylinders and cubes.
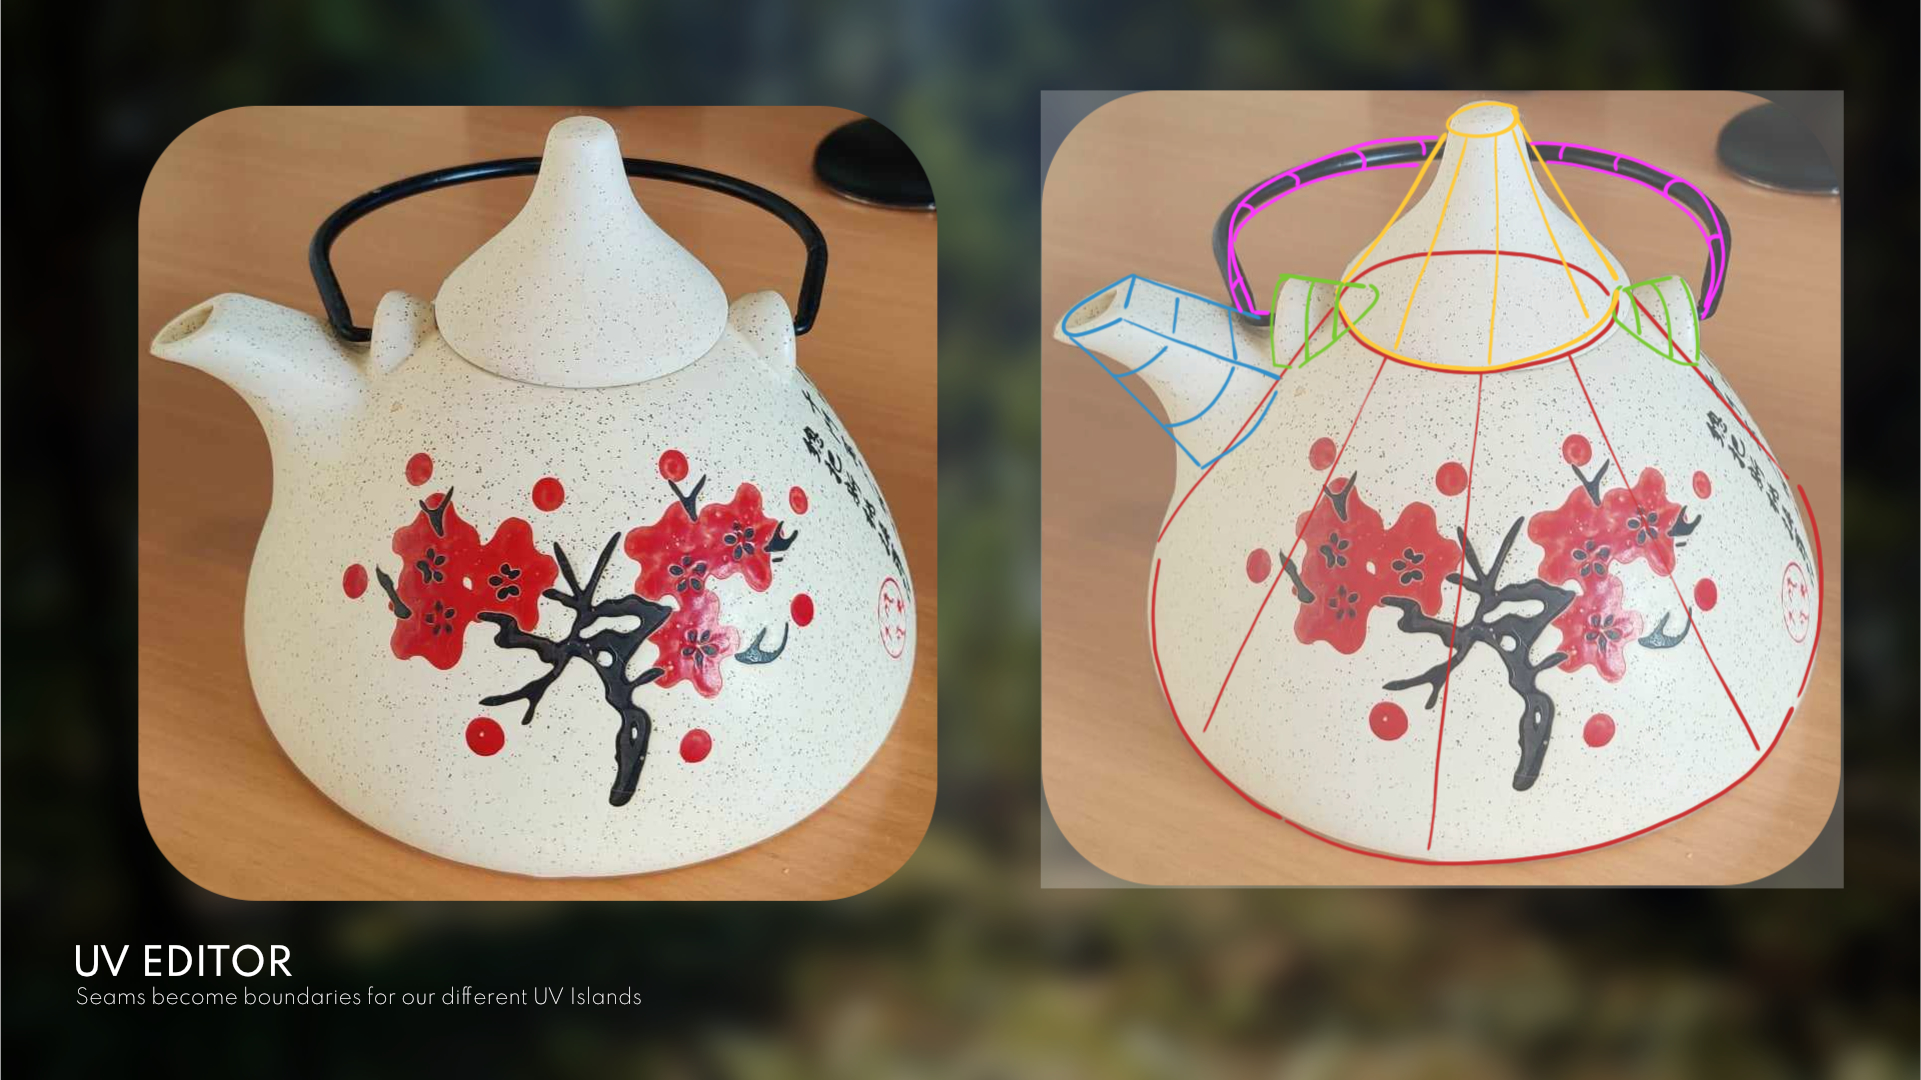
WHAT IS TOPOLOGY?
Every model we create consists of small surfaces that the computer can read. We call them Polygons, and they consist of a minimum of 3 datapoints called vertex. The line between two vertices is called an edge, and the flat area making up the polygon is called a face. When you have a row of edges or faces it is called a loop.
Pinpoint what a polygon, edge and vertex is on a model on this image
When modeling we want to work mostly in Quads (4 vertices), this is because selecting edge loops becomes a lot easier and it also works better with subdividing.But once your model is done and imported into the game engine, it will be triangulated automatically, since game engines like to work with tris (3 vertices).If a face consists of more than 4 vertices we refer to these as Ngons.
They are not necessarily bad, but you have to be careful with them, as they can cause artifacts when being triangulated. So if you have an Ngon, you should manually connect vertices with edges until it’s no longer an Ngon.
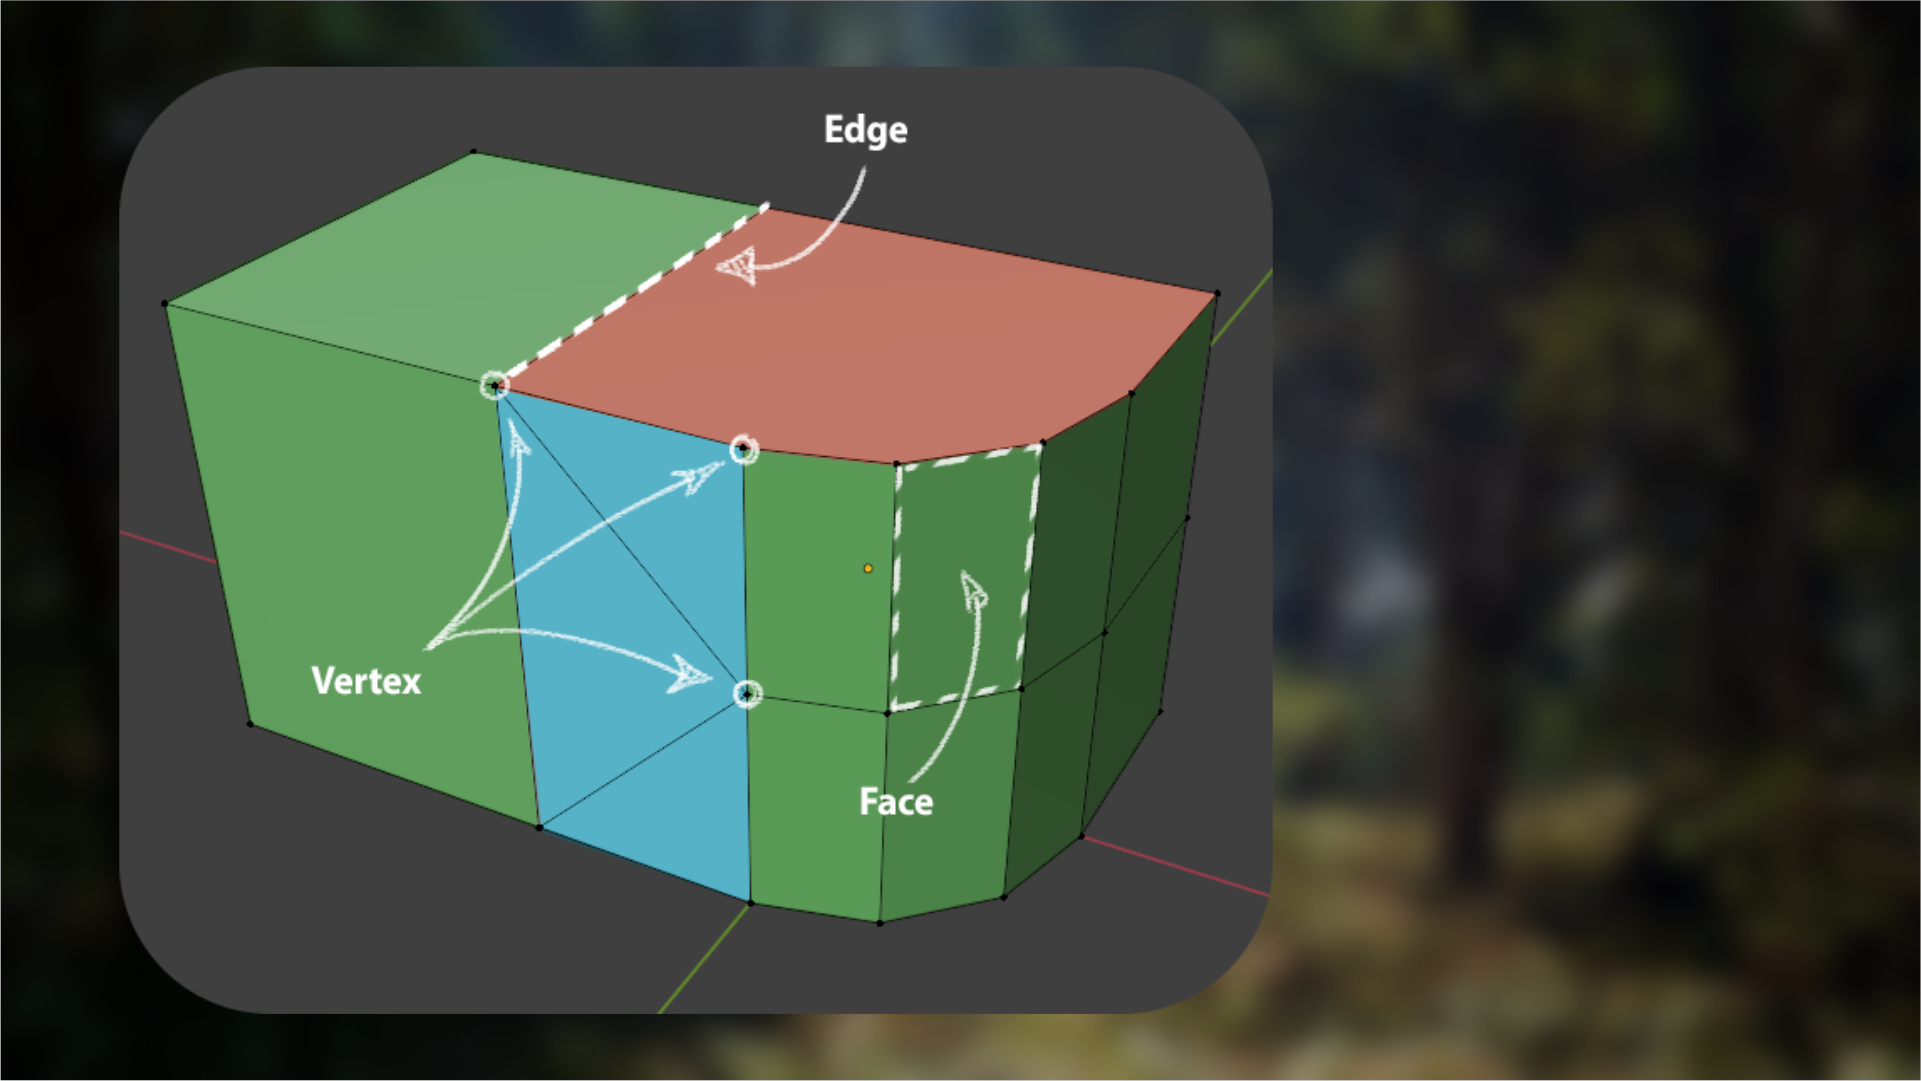
Quads (Green), Tris (Blue), Ngons (Red).
INTRODUCTION TO THE SOFTWARE
So now that we’ve got the theoretical items out of the way it’s time to open the modeling program.
When you open your modeling software for the first time, it might be overwhelming. There are a lot of buttons and stuff on the screen. But take a deep breath and let's start to slowly learn the basics of navigating around the software. Depending on the software, you usually pan, zoom and move the camera with a combination of the mouse and ctrl, alt or shift. To save, you usually use ctrl-s, but a button can often be found in the top left corner. Selecting also varies from software, but the left, and right mouse should do the trick. If you hold down your mouse button and drag, you can select multiple objects at the same time.
Take some time and play around. If you screw up, just close and open the program again. And if something is completely broken, you can always return to the factory settings at the click of a button - google “how to reset Software”. There are thousands of basic videos on YouTube that show how to navigate in less than 5 minutes. Search for something like “How to navigate in Blender” or “Maya beginner tutorial”. Once you know how to move your viewport around, save the scene and select objects you should be ready to move on.
<aside><img src="/icons/arrow-right_gray.svg" alt="/icons/arrow-right_gray.svg" width="40px" /> SECTION RESERVED FOR INTODUCTIONS TO EACH SOFTWARE
</aside>
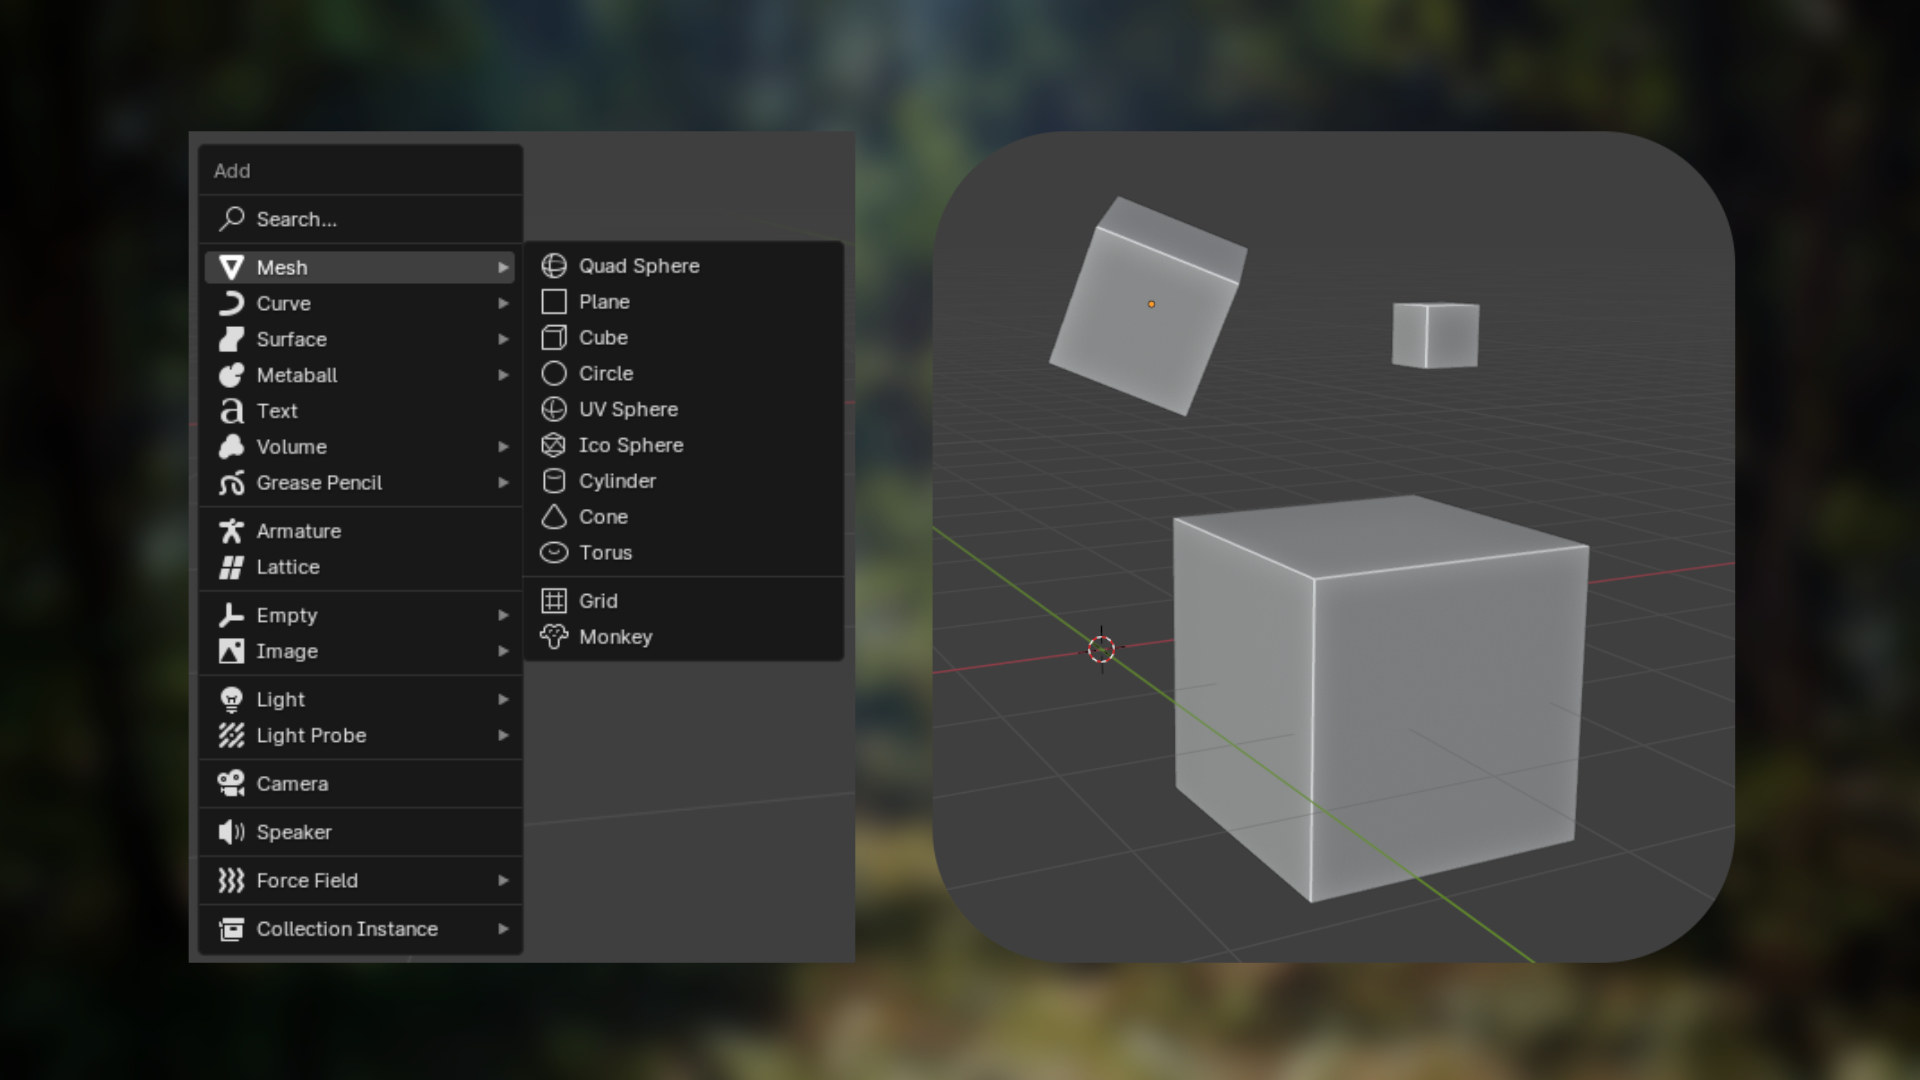
When modeling your object, you have to start from something. In most programs you can spawn primitives like spheres, cubes, cylinders, cones and torus. You can even spawn special primitives! Like the monkey Suzanne in Blender, or the Utah Teapot in Maya.
Each primitive can give a different starting point to model from, so choose the one most suited for your object.
Blender's spawn mesh tool
When you have an object to work from, you can translate(move), rotate or scale it. If you are modeling a single object I advise to keep it in the center of the scene and not rotate it. That way you can use your x-y-z axis to do accurate movements.
Cubes that has been moved, rotated and scaled.
COMMON MODELING TOOLS
Now we move on to the actual modeling. In order to manipulate the models in Blender, you have to enter a "modeling mode" - this is done by selecting "Edit mode" in the top left corner. (or pressing tab as a the default shortcut)
Some of the most common actions to do in modeling are, extrude, indent, bevel, transform, inserting loops, cutting and filling.
Extrude (”E” in Blender) - is when select a face, edge or vertex, and extend it out or in. You can extrude in any axis, but in my example I’m extruding up and down (Z-Axis).
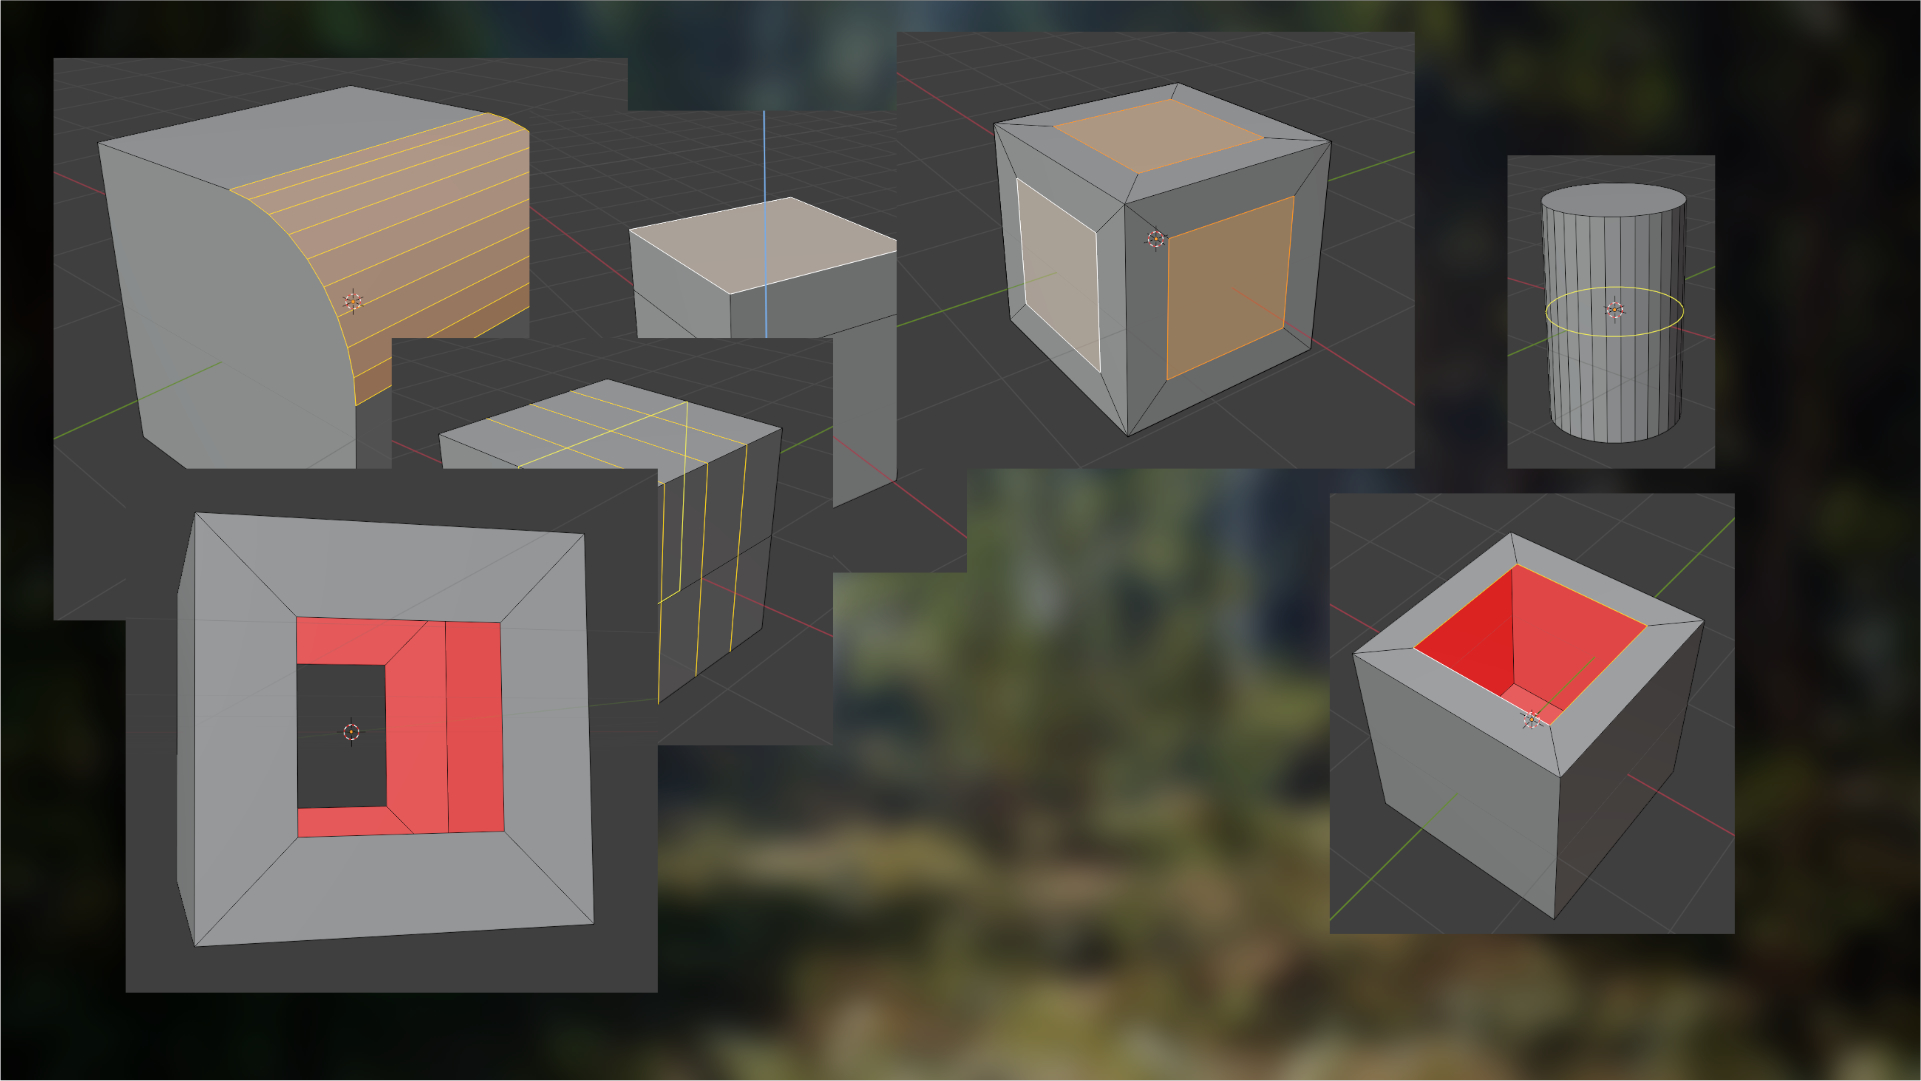
Indent (”I” in Blender) - Is when you select a face and create a section of smaller faces inside. You can switch between combined faces or individual faces by double tapping “I”.
Bevel (”Ctrl-B” in Blender) - is when you round out the corners (edges). By scrolling the middle mouse, you can increase/decrees the amount of edges. A single edge bevel is called a Chamfer. For a smooth look you can bevel your Chamfers again.
Insert loops (”Ctrl-R” in Blender) and Knife tool “K” in Blender) - Can both add more edges to your model. This might be necessary if you want to adjust parts change parts where there are no loops to work from. For instance, if I want to create an hourglass from a cylinder primitive, I will have to add a loop in the middle to scale it.You can use the middle mouse to adjust the number of loops you want to add. For the knife tool you can click youself where you want a cut to be added. But be aware of Ngons!
Fill (”F” in Blender) - is used when you want to create a face between two or more edges. This can be used to fill holes, create passages through the object, as well as many other things.
With these actions, there is almost nothing you can't model!There are workflows and tools that can speed up the process, for instance booleans and modifiers. But that will be in a future tutorial.
Examples of extruding, beveling, and indentation.
BLOCKING OUT BASIC SHAPES
To begin with I add my reference image straight into the Blender Scene. By pressing the green Y in the top right corner, you will enter the side Isometric View. Then press Shift-A to add Image. Make sure the iamge is centered on the X-Axis (Red line), and Z-Axis (Blue line).
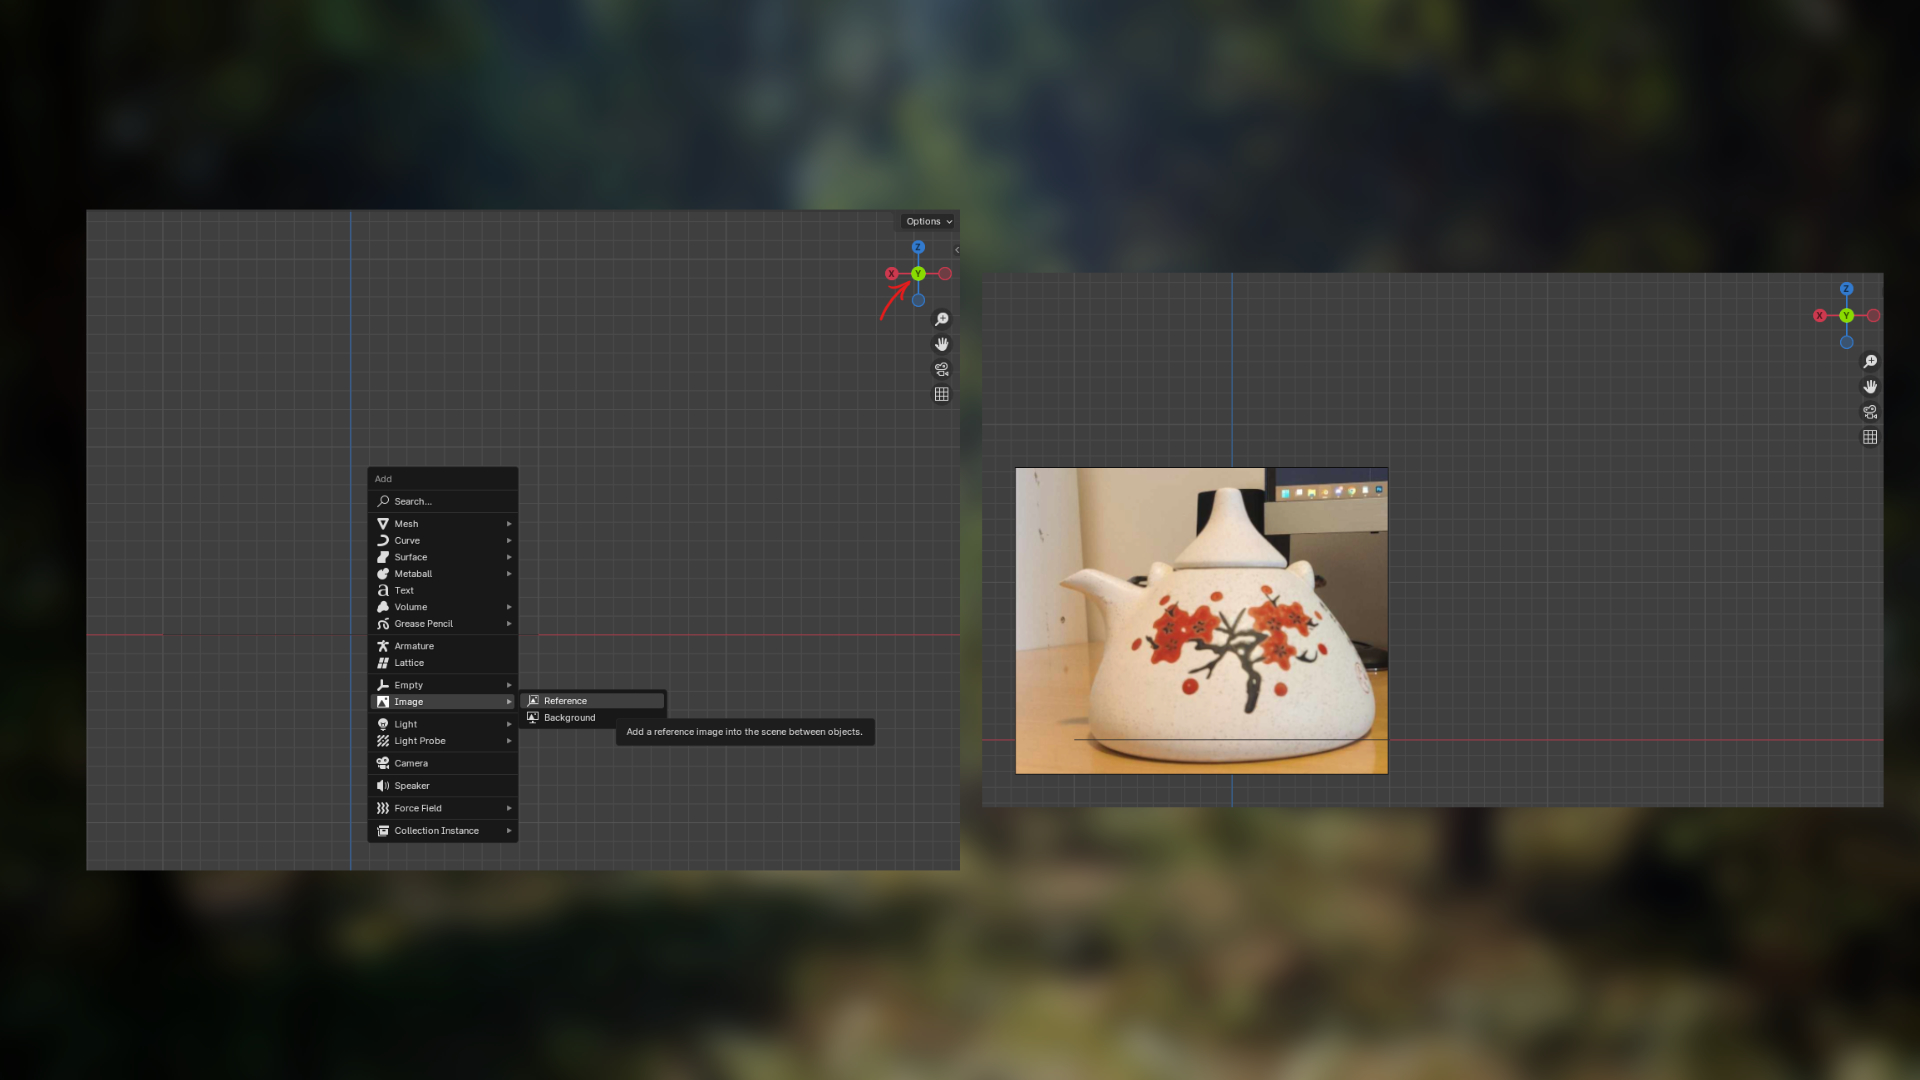
We want the nose of the teapot to face the front, hence the side view for setting up the reference.
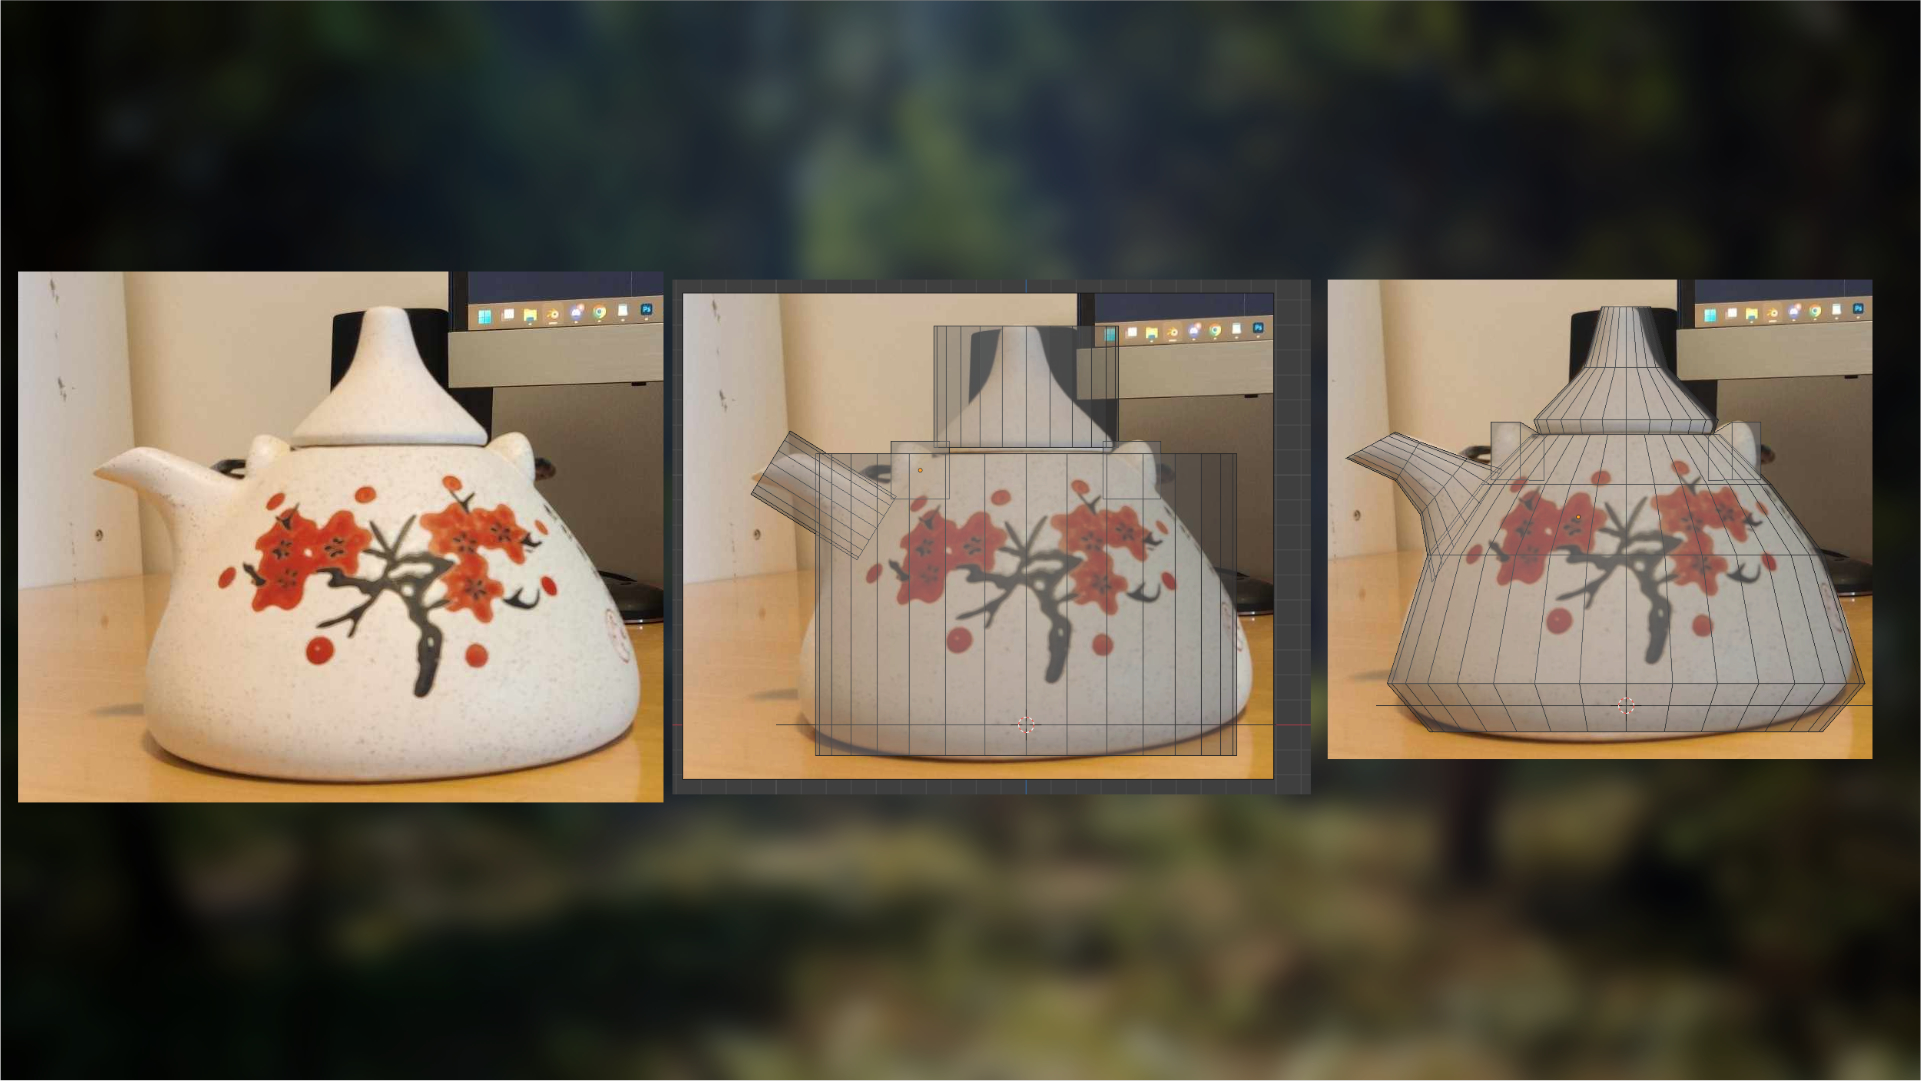
For the base of the teapot I spawned a big cylinder, two cubes to support the handle, and a cylinder for the lid as well as the nose. Make sure that your objects match your reference in size. You can enter View through mode (X-Ray) by pressing Alt-Z in Blender.
I added some edge loops to the primitives and scaled them to better match the silhouette.For the end of the nozzle I selected the face, then rotateed and scaled it to match the angle of reference.
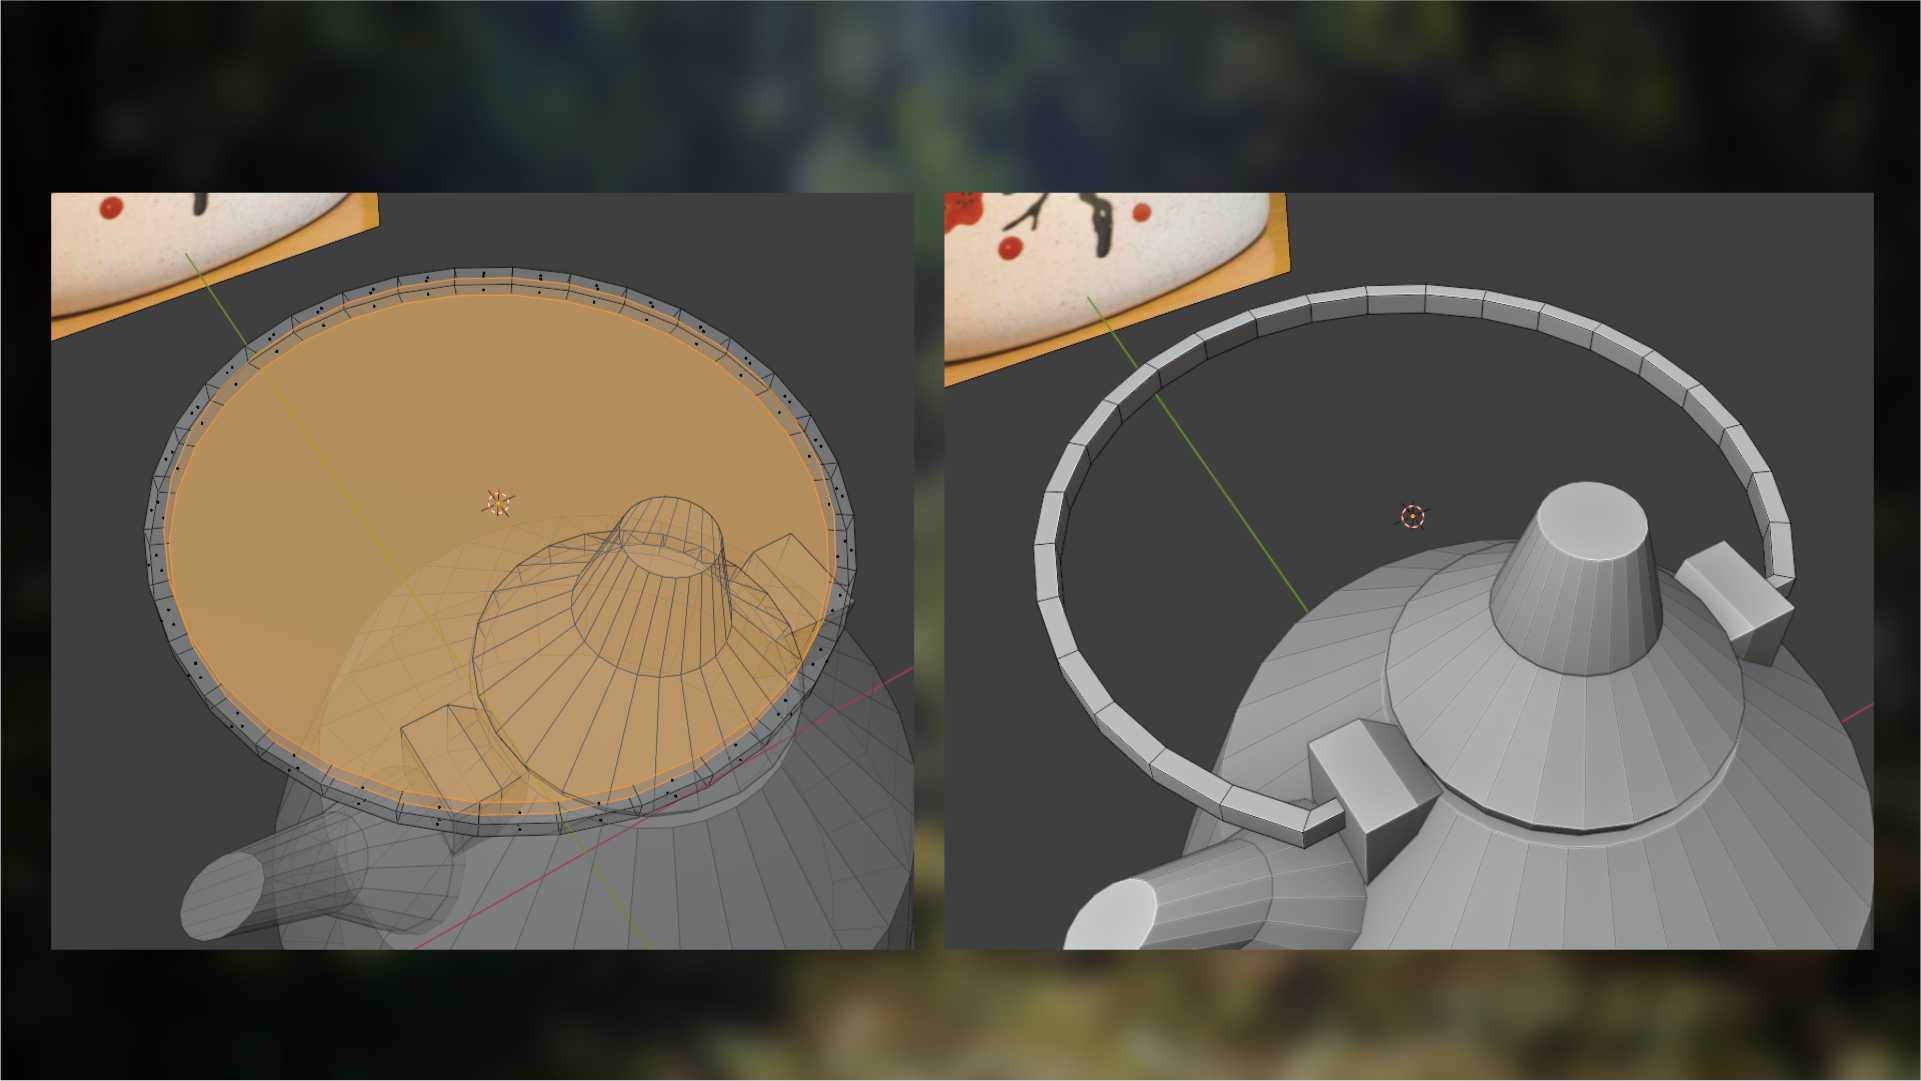
For the handle, I indented a cylinder and deleted the middle part. I selected the two edge loops and filled (using Bridge Edge Loops “Ctrl-E and select”) After removing the bottom part sticking through the kettle, extruded the end loop in towards the kettle to make it connect with the handle supports.
Stay as simple as possible until you are happy with your proportions. Only then can you start to work further on the parts.
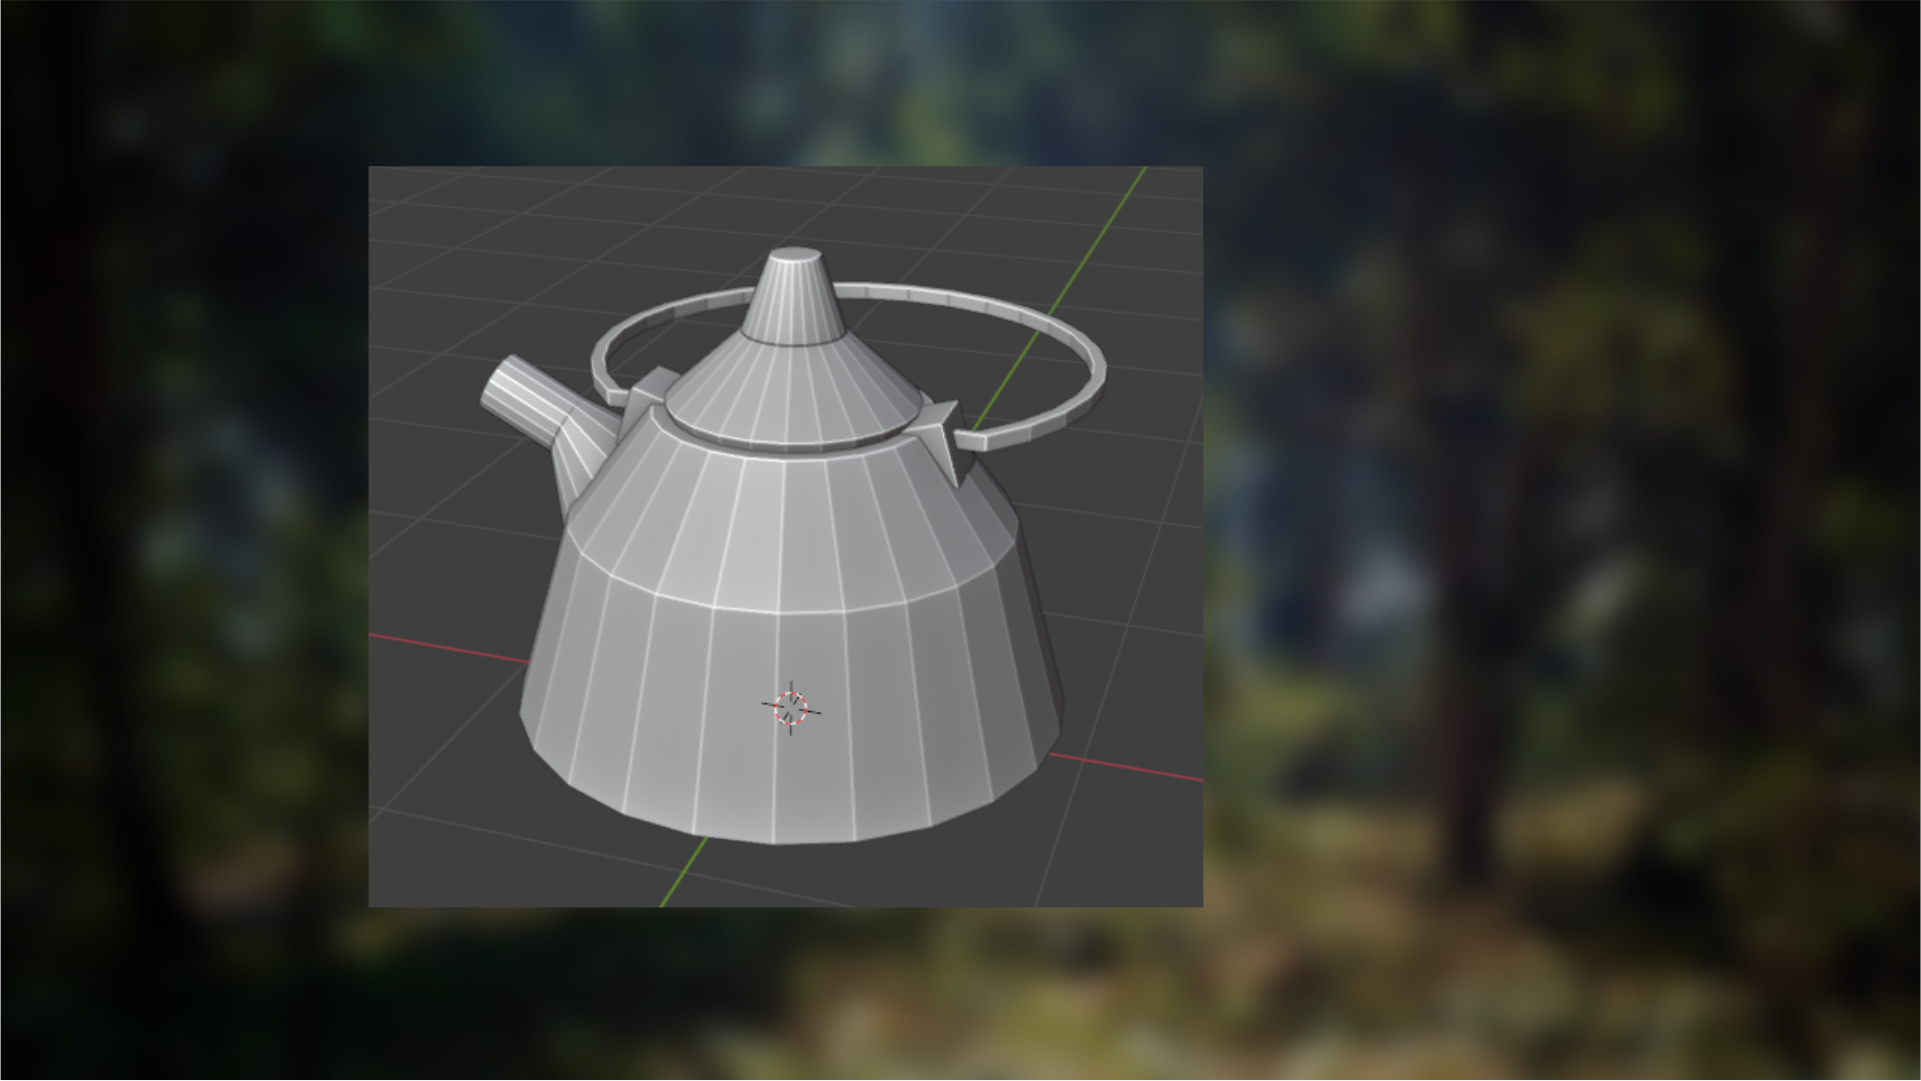
Blockout model, using cylinders and cubes.
Continue in the same way, adding loops, beveling and translating. You can even indent and extrude the end of the nozzle to create the hole that the tea can come from. Make sure you have beveled all the sharp corners for a more realistic and soft look.
At the end, you'll have something that is close to your desired object.It might, however, still look very "sharp". This is because you need to enable smooth shading on the object.
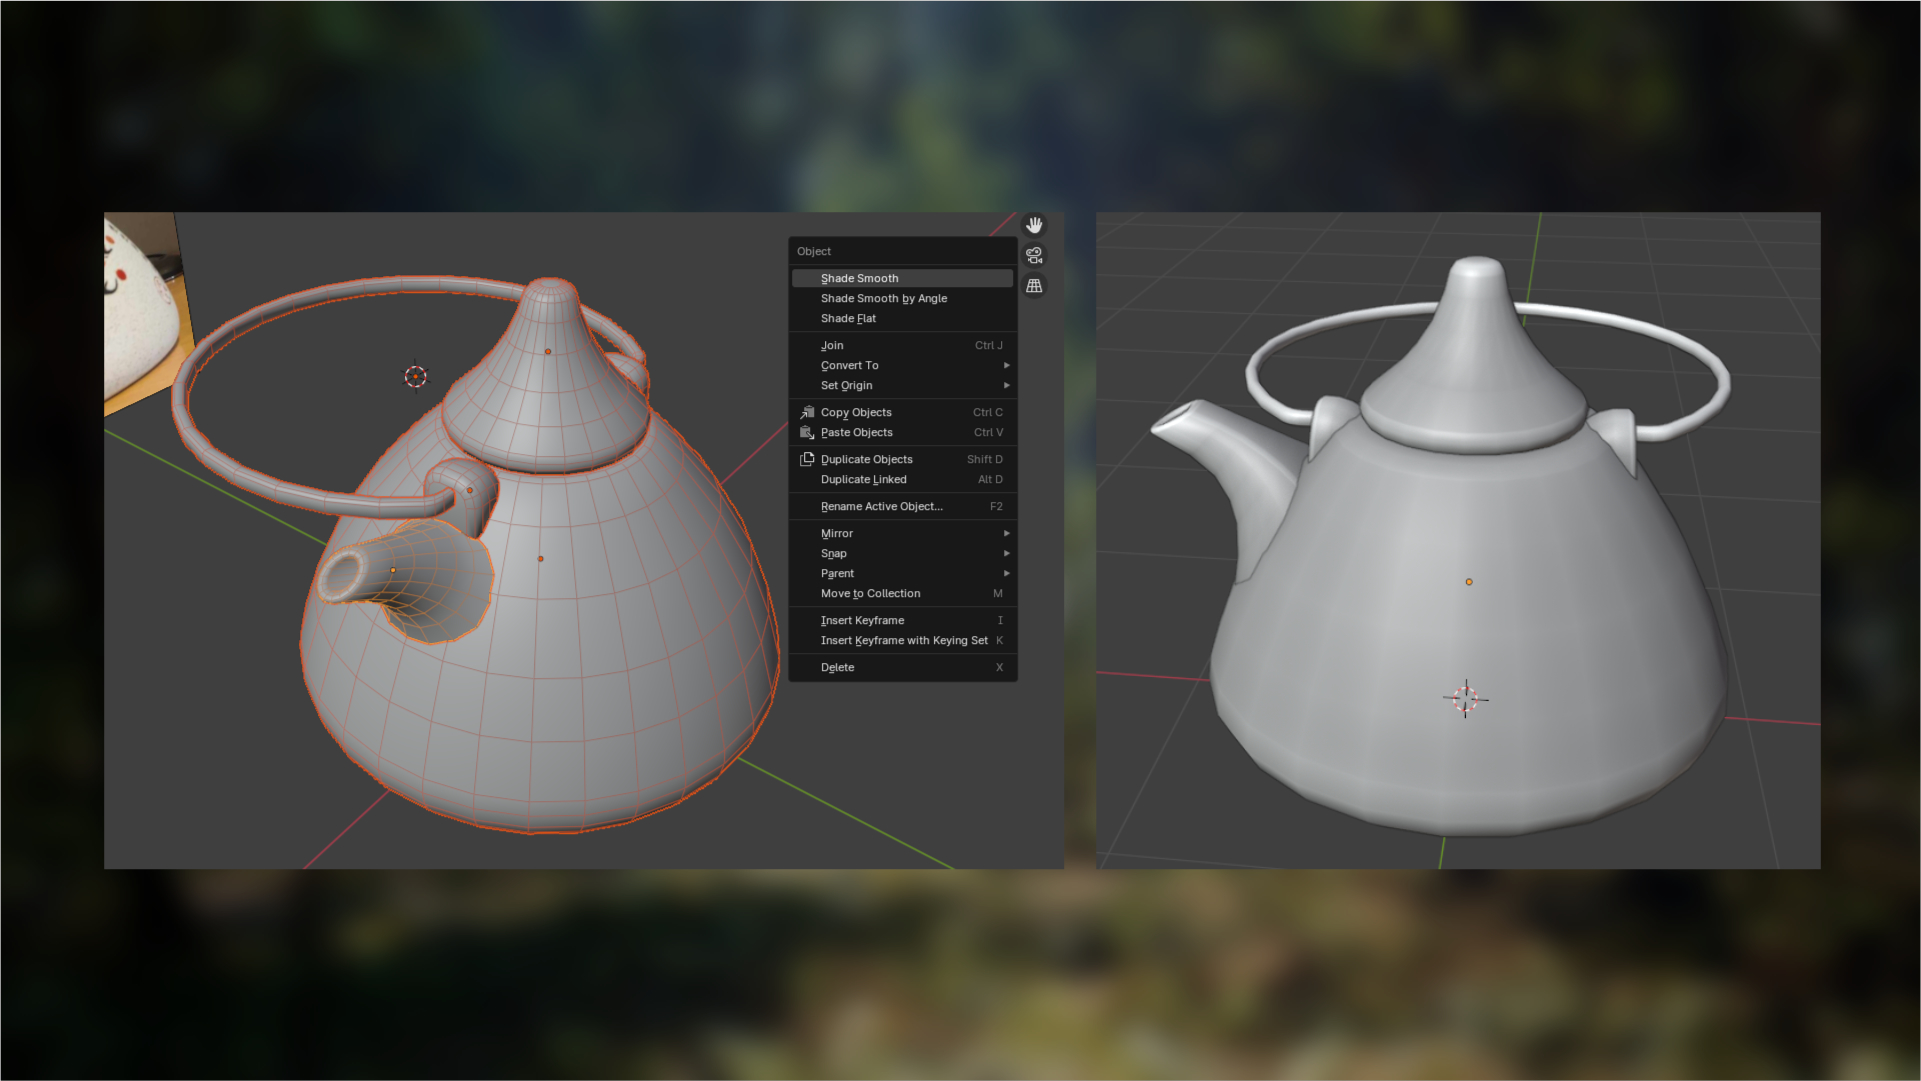
Final smooth version of the model.
MODIFIER STACK
The way we have been working so far is called “Destructive”, this is because when we do actions like Beveling the data is stored directly in the mesh, and the easiest way to change or undo that action is to Ctrl-Z backwards and do it again.However, some actions can be done in a “Non-Destructive” way. In Blender this can be done with Modifiers.
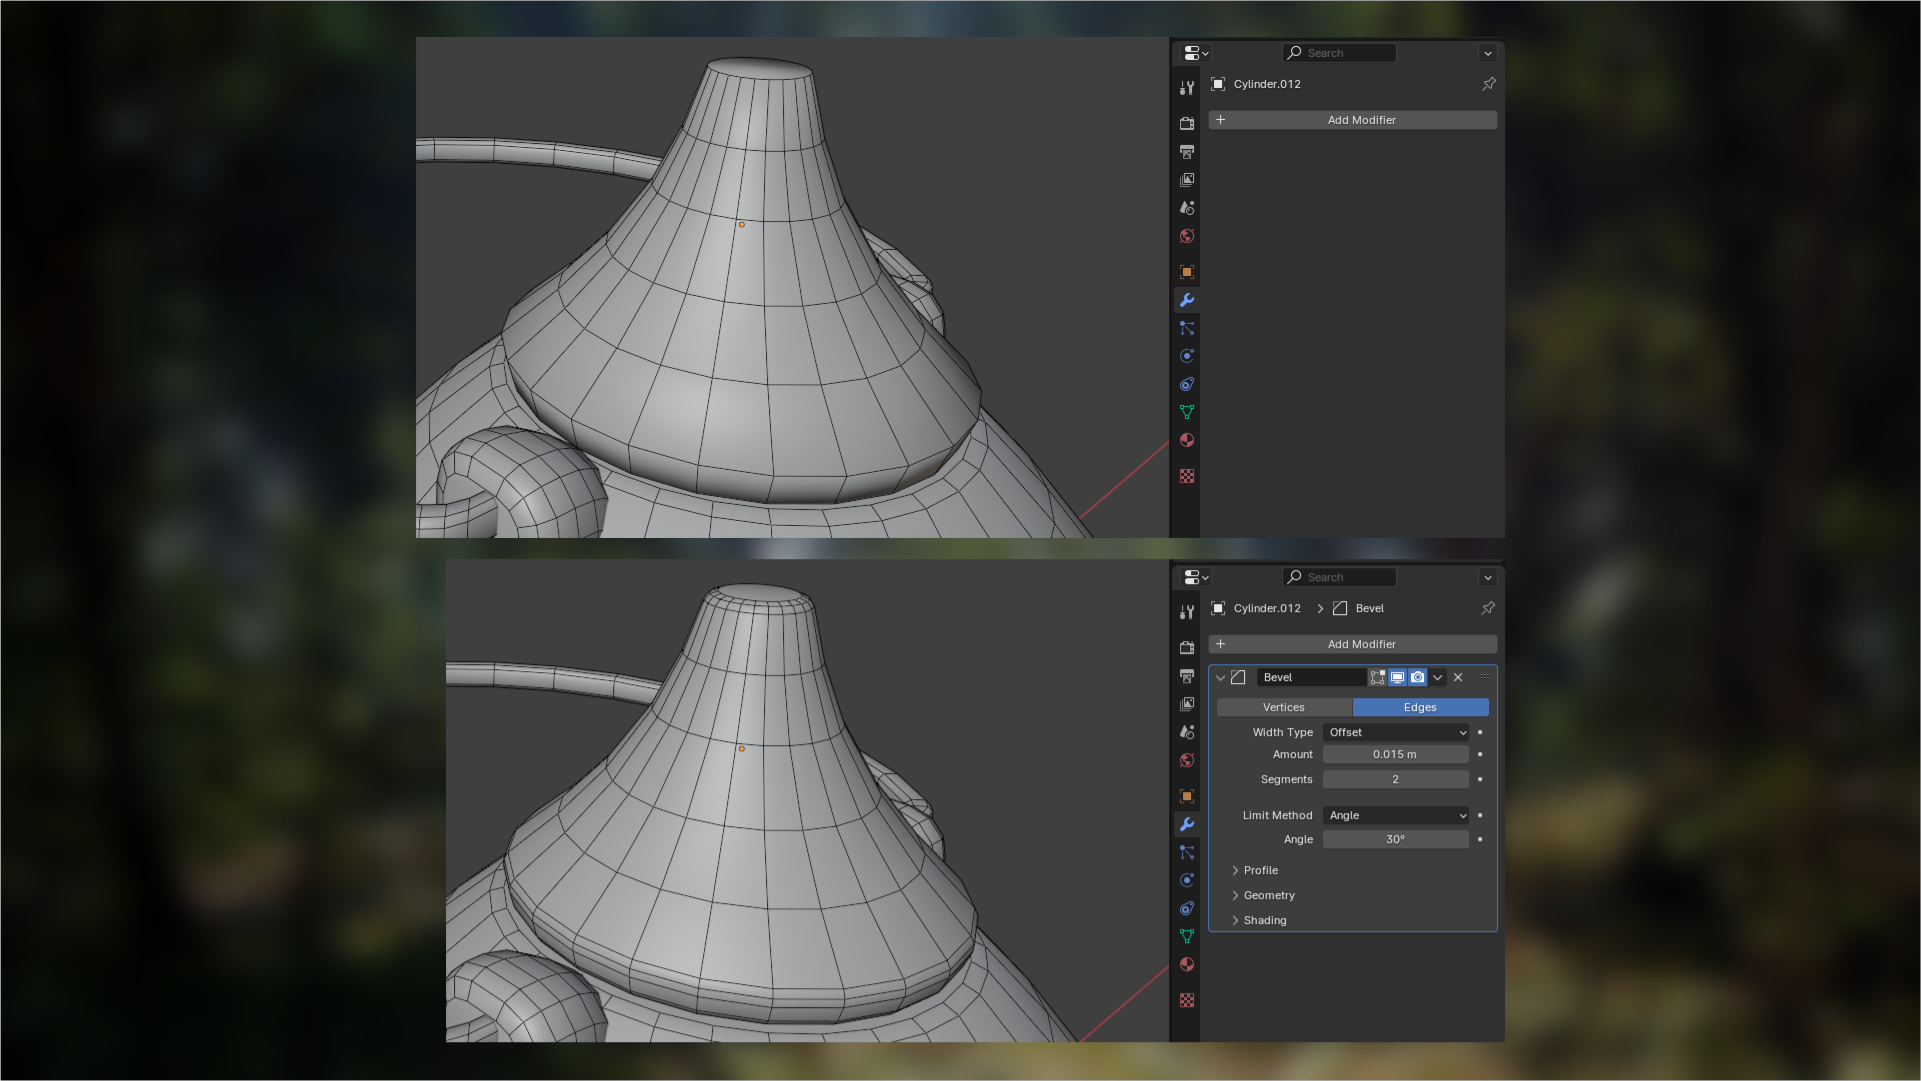
By adding a Bevel modifier to the lid, it non-destructively bevels any edge that has an angle over 30 degrees.
This is non-destructive, because we can change the way the bevel works after it is created. So if we wanted to add or remove loops, we can do that by just changing the value in “Segments”.
There are many many more modifiers in Blender, and they can do some wild stuff. But that is beyond this tutorial.However, here’s a comprehensive list in case you want some inspiration.
OPTIMISATION FOR GAMES
When we work with objects in the game engine, we want them to have as few polygons as possible without losing their shape. If we have too many polygons, the game will slow down.
However, sometimes you want a lot of detail in your meshes, more than the game engine can handle. So how do we achieve high detail but keep a low polygon count?The way to do this is to create two versions of your object, one with a few polygons (lowpoly) that goes into the game engine. And one with a lot of polygon and detail (highpoly). Then we transfer the high detail from the highpoly onto the lowpoly mesh.
This is called Baking and is very common in games. The baking usually happens in a different software than you use for modeling, and it’s up to you (and the studio you work at) to find the best program. Substance Painter, Marmoset Toolbag, and xNormal are commonly used.
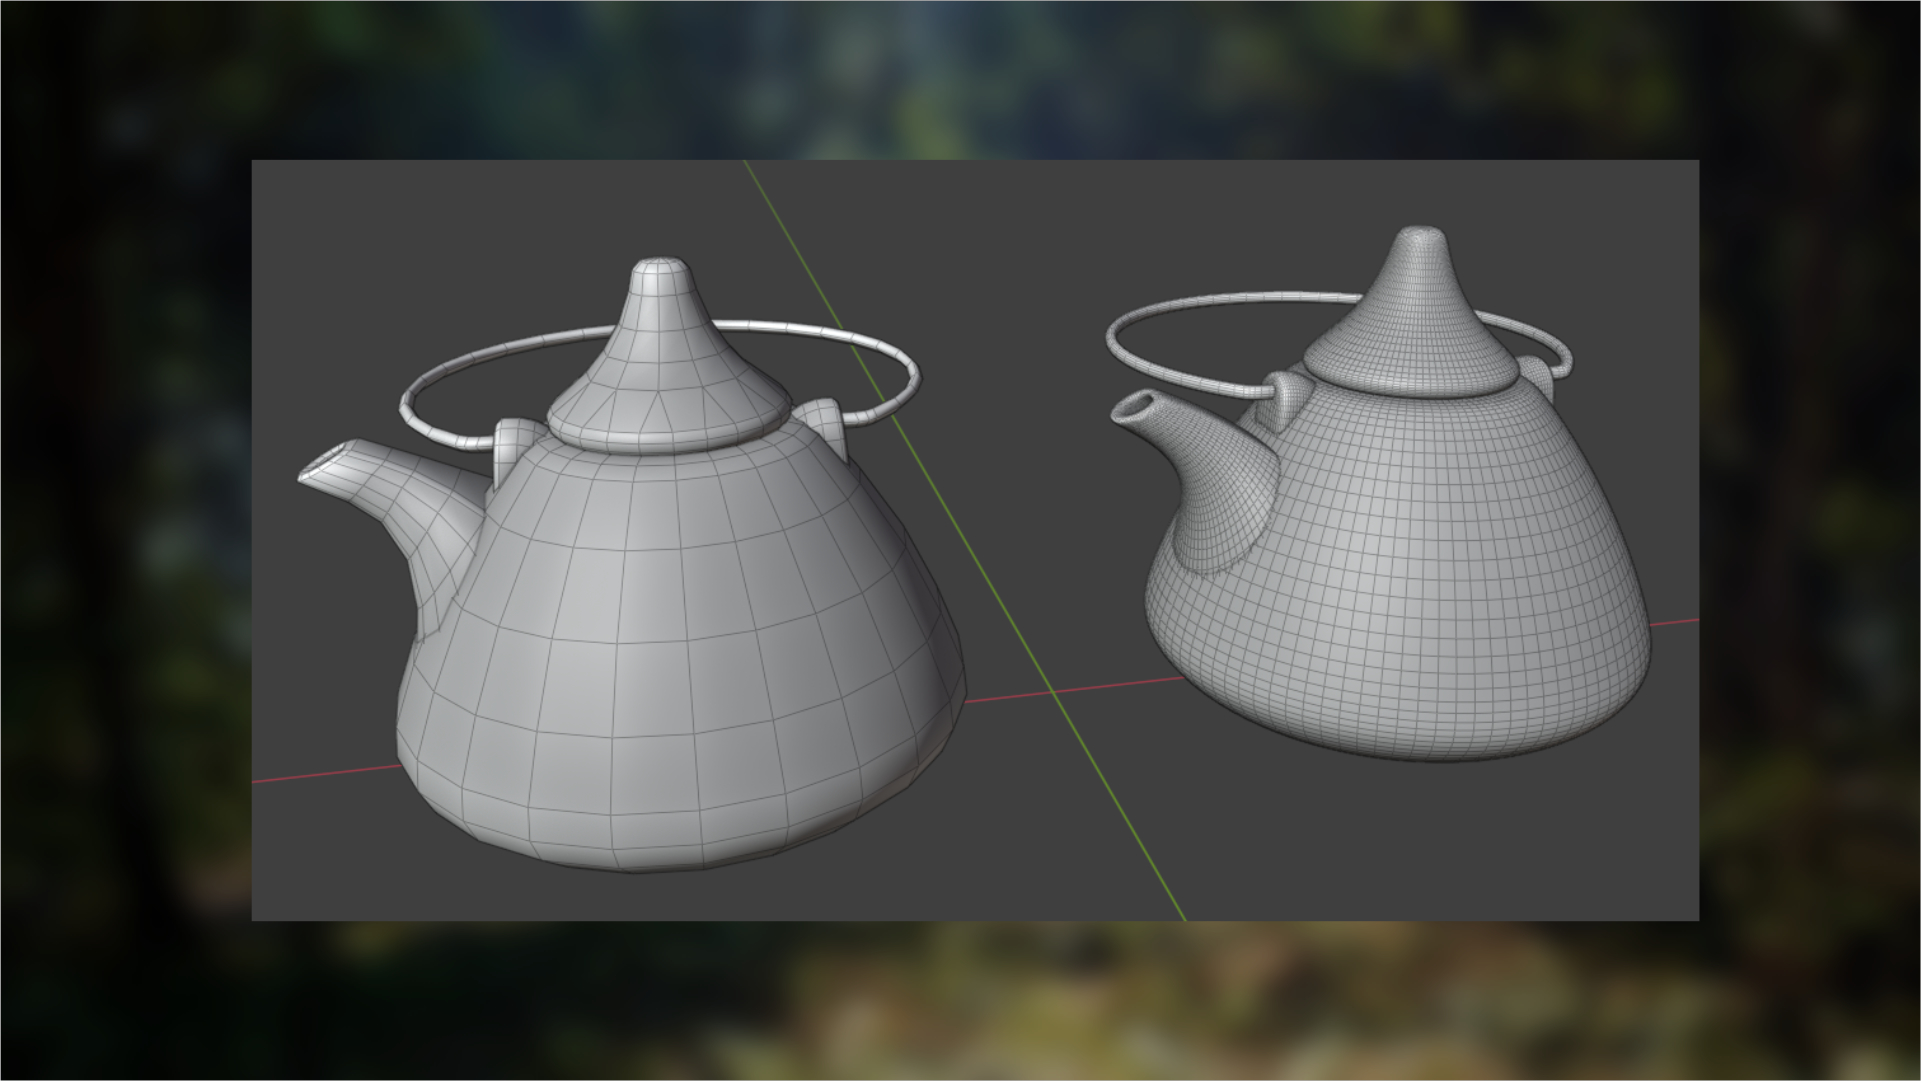
It's fair to note that a lot of artists do their high poly models inside of software like ZBrush. These programs are more capable of handling a high polycount, easily in the millions. You also have a lot more tools for sculpting detail.


