LESSON OVERVIEW
UV Unwrapping is the translation of our 3D model into the 2D space, a necessary step to be able to bake and texture our 3D models. To achieve this, we will need to add seams, unwrap our islands, and pack them according to the needs of our workflow.
The goal of this lesson is to learn how each of these steps works and how to do it in the best possible way; the differences you will have to take into account depending on how you plan to texture the asset and learn the fundamentals that will allow you to unwrap any kind of asset properly.
During this lesson, I will assume the use of Blender but will keep this lesson about the fundamentals so they translate to other modeling packages as well.
While some people find this step less exciting than others, I like to look at it as a little fun puzzle to solve that will get really easy with some practice.
Unwrapping is needed to texture our objects accurately, and while there are other projection methods that we could use to avoid the use of UVs, those methods are usually less performant and give you less control over the final result, so relying on UVs is usually the default route.
The better work we do with unwrapping our models, the easier time we’ll have while texturing them, but not only that: an efficient packing that aims to get the highest texel density possible can translate directly into allowing us to use a lower texture resolution to achieve the quality our project is aiming for, helping us reduce the memory usage of our texture maps to improve performance and save those valuable resources to spend in other more important areas that may require complex solutions. Everyone on the team will love an artist who produces beautiful, high-quality art that’s also optimized, so get ready to put the attention this topic needs!
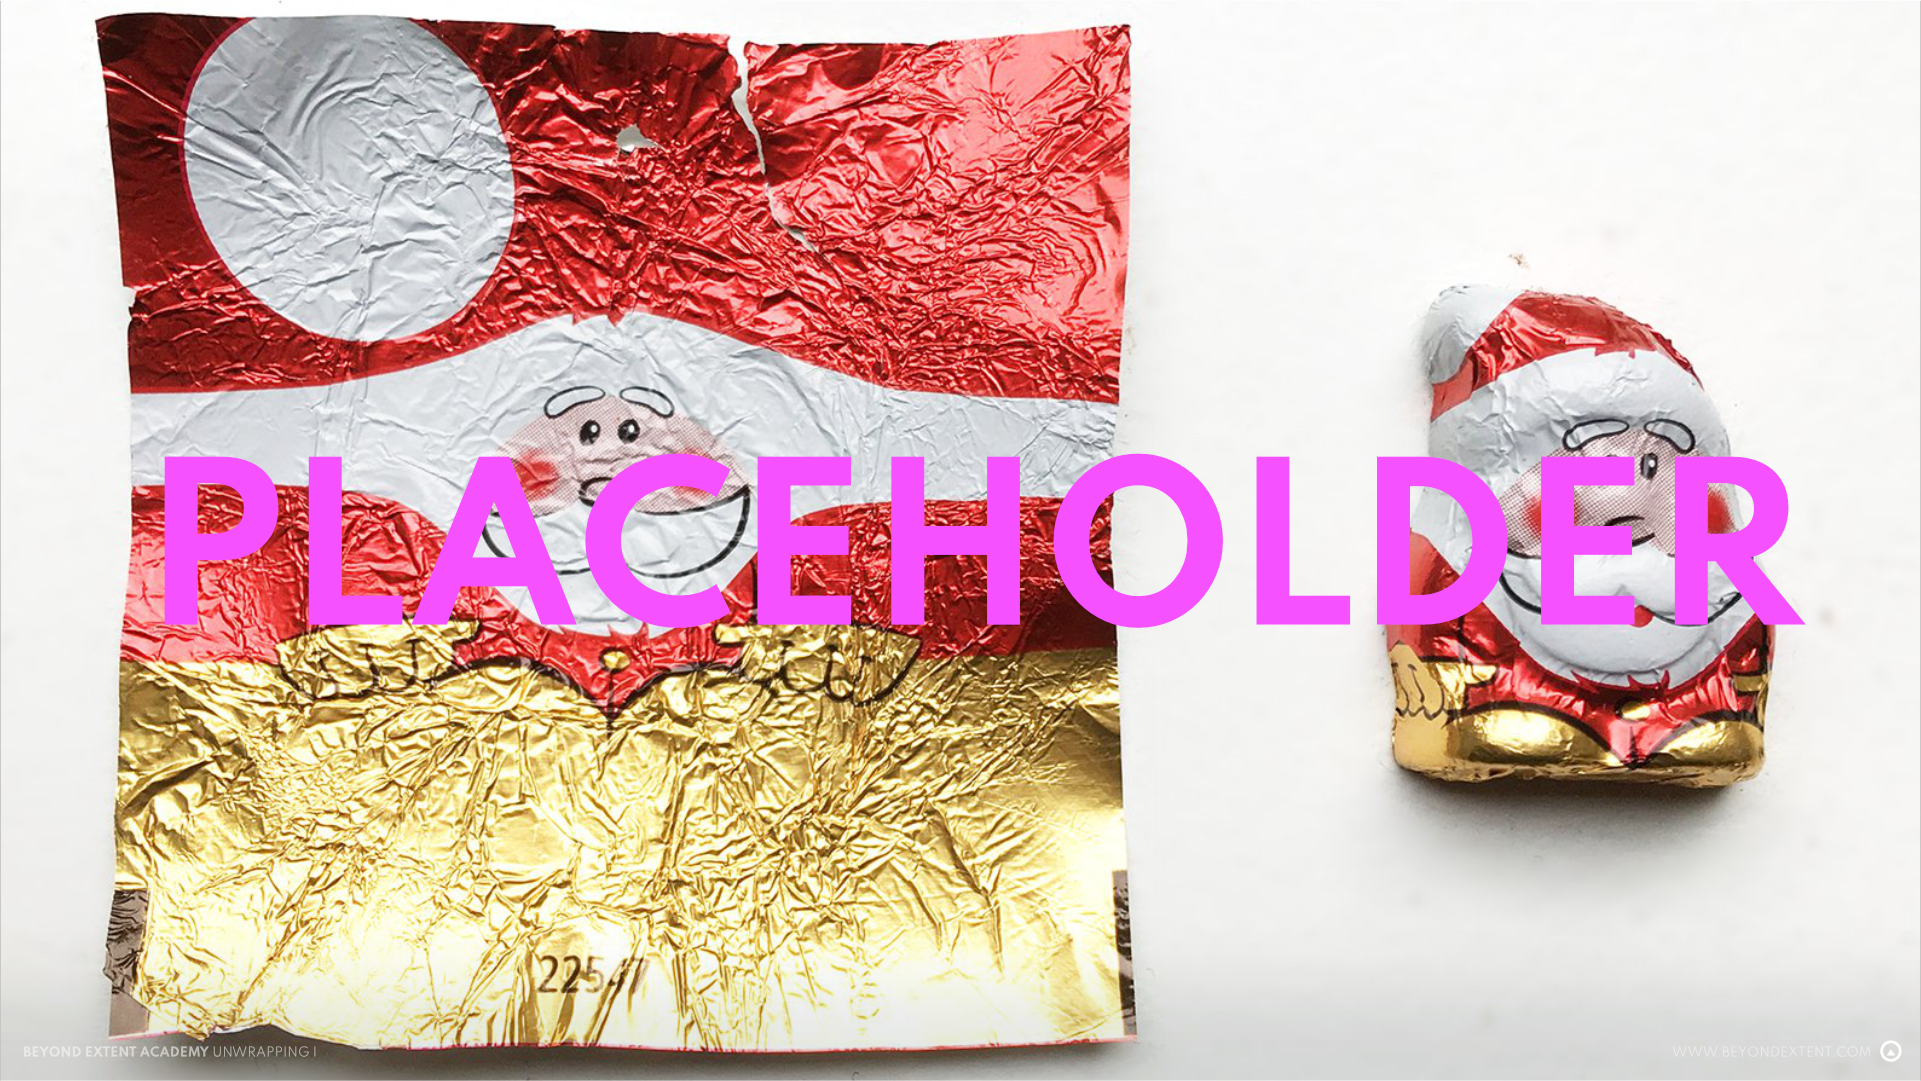
This image may look funny, but it’s a great way to understand the translation of our 3D models into 2D space and the basics of UV unwrapping.
UV SPACE
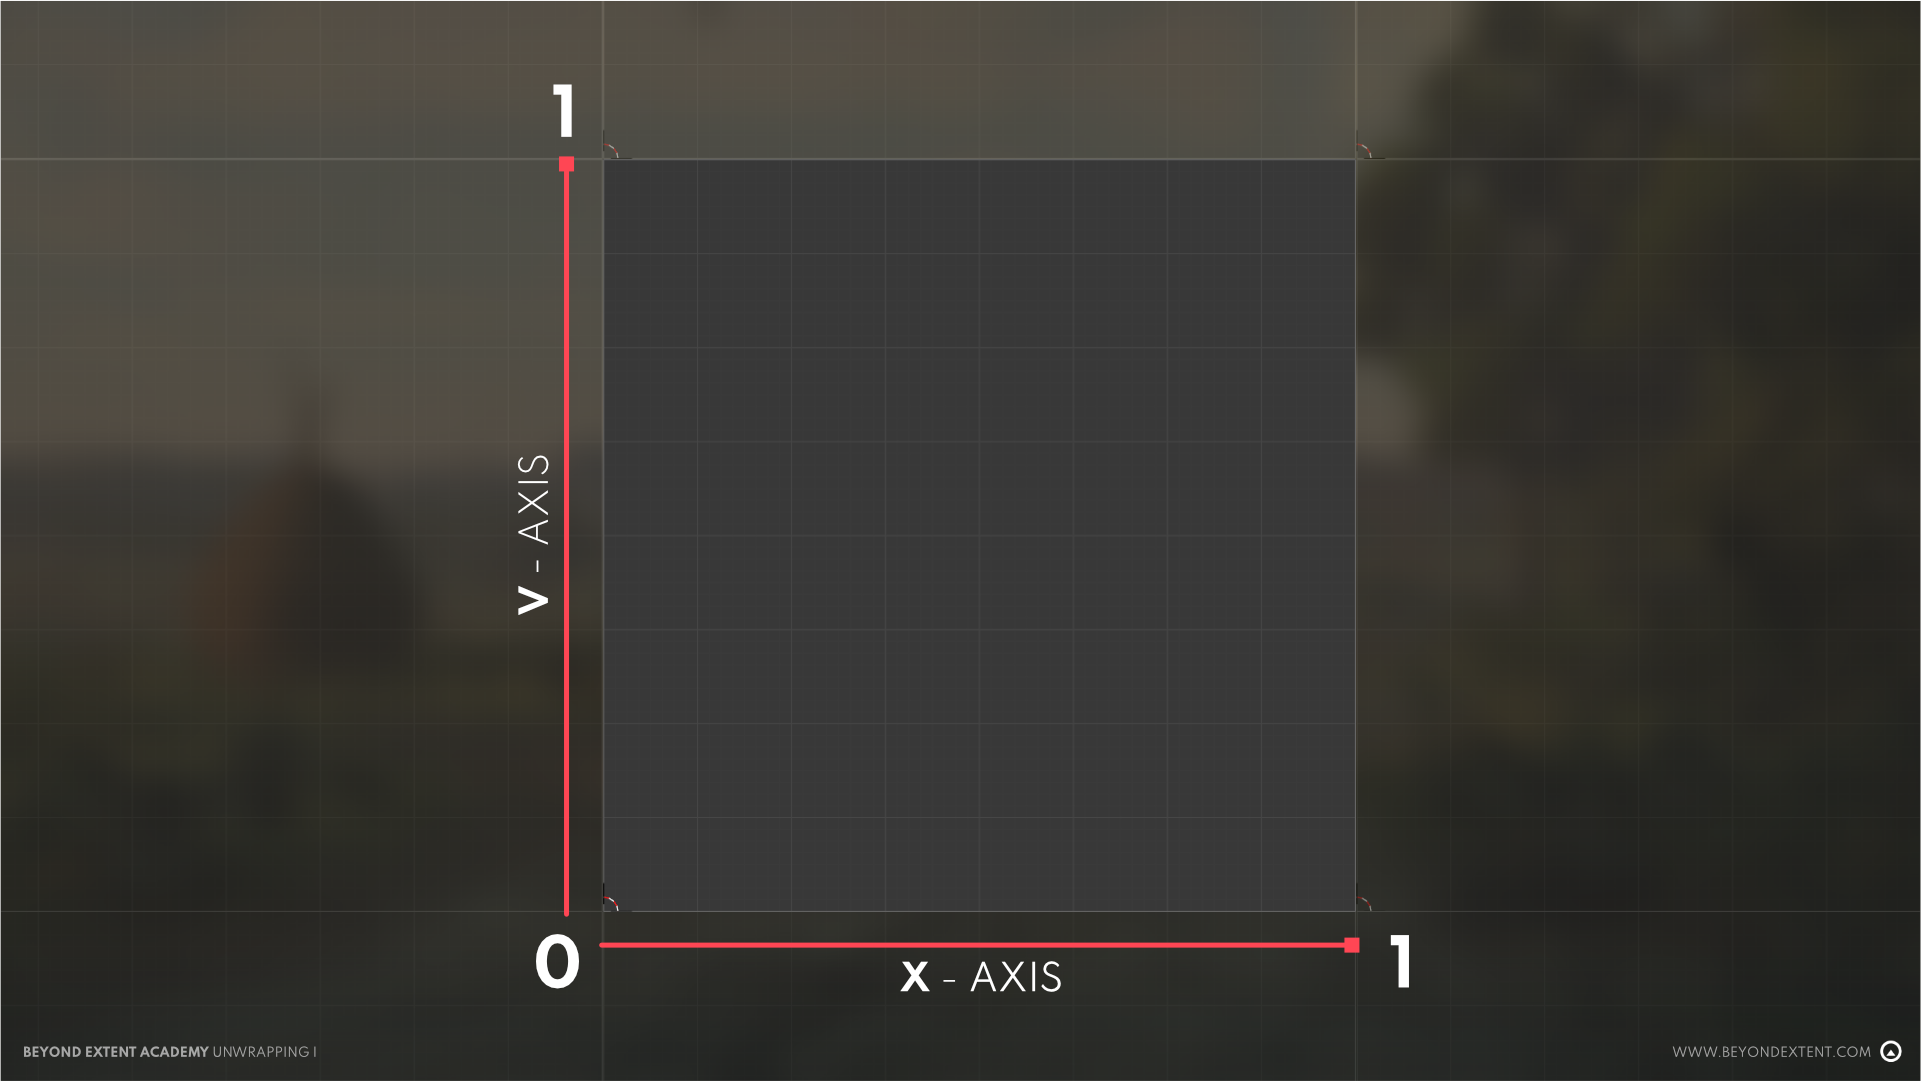
UV Space is the place where you are going to pack your UVs, also called our "packing box" or "0-1 space" (literally the square that you will see when opening the UV section in any software). This space goes from 0 (origin) to 1 in both of the bidimensional axes (U and V, and that’s where the name for UVs comes from).
The axes in the 2D space are named U and V to differentiate them from X, Y, and Z (used in the 3D space).
- When texturing props that will have a unique UV layout or ad-hoc textures, you always want to keep everything inside the packing box. You can still overlap some islands on top of each other and offset them outside the packing box temporarily for baking, but I recommend that the final mesh that you’ll import into the engine has all islands inside that packing box. I’ll expand on this topic later in its own section.
- When using tileable textures and trims (also tileable textures but just on a single axis), you can have your islands outside that packing box without any problems. This is because the 0-1 space tiles (repeats) indefinitely. You can easily understand this by putting your texture inside the packing box and knowing that once an axis has to reach 1, it will start again on 0. This allows you to texture assets with tileables and make your UVs as big as they need to be without worrying about them having to fit inside the box.
More relevant information on this topic will be discussed in later sections.
SEAMS
These represent the cuts in our model that allow us to then unfold and flatten our islands. We will create them by selecting edges/edge loops and marking them as seams.
Making the decision of which edges turn into seams will come pretty naturally, and I encourage you to take a moment to examine your model and think about where those seams would make sense.
However, there are some guidelines on where to put your seams:
- You always want to hide your seams if possible, so try to find the least visible places in your model (cavities, faces at the bottom or back that won't be seen by the player, parts of your mesh covered by other components on top…). The reason why we want to hide them is to avoid visible discontinuities in our textures.
- When creating a model with a baked normal map, if you have a hard edge in your model, you always need to have a seam. Otherwise, your baked bevels will show a visual error (also known as seams).
However, placing a seam doesn’t mean that you need to harden that edge; seams are totally fine on smooth surfaces. - Always aim to have as few seams as possible. This will help both in hiding them (less stuff to hide) and because ending up with fewer pieces to pack will help minimize the wasted space between islands due to the edge padding each island needs. It will also help improve performance because, for every UV seam we have, the vertices of that edge will be calculated twice by our engine.
- While methods like tri-planar projection will do a great job in not showing your seams, you won't always be able to use that because of their performance cost, especially on a real-time basis in our engine. Sometimes, you will need to use planar projection in Substance Painter, and sometimes, you will need to texture your mesh using tileables or trims, so in those cases, it's really important to hide the seams since they can become very obvious.
The good side about that is that with tileable textures, you (usually) won't need to bake your mesh, so you can minimize the use of seams.
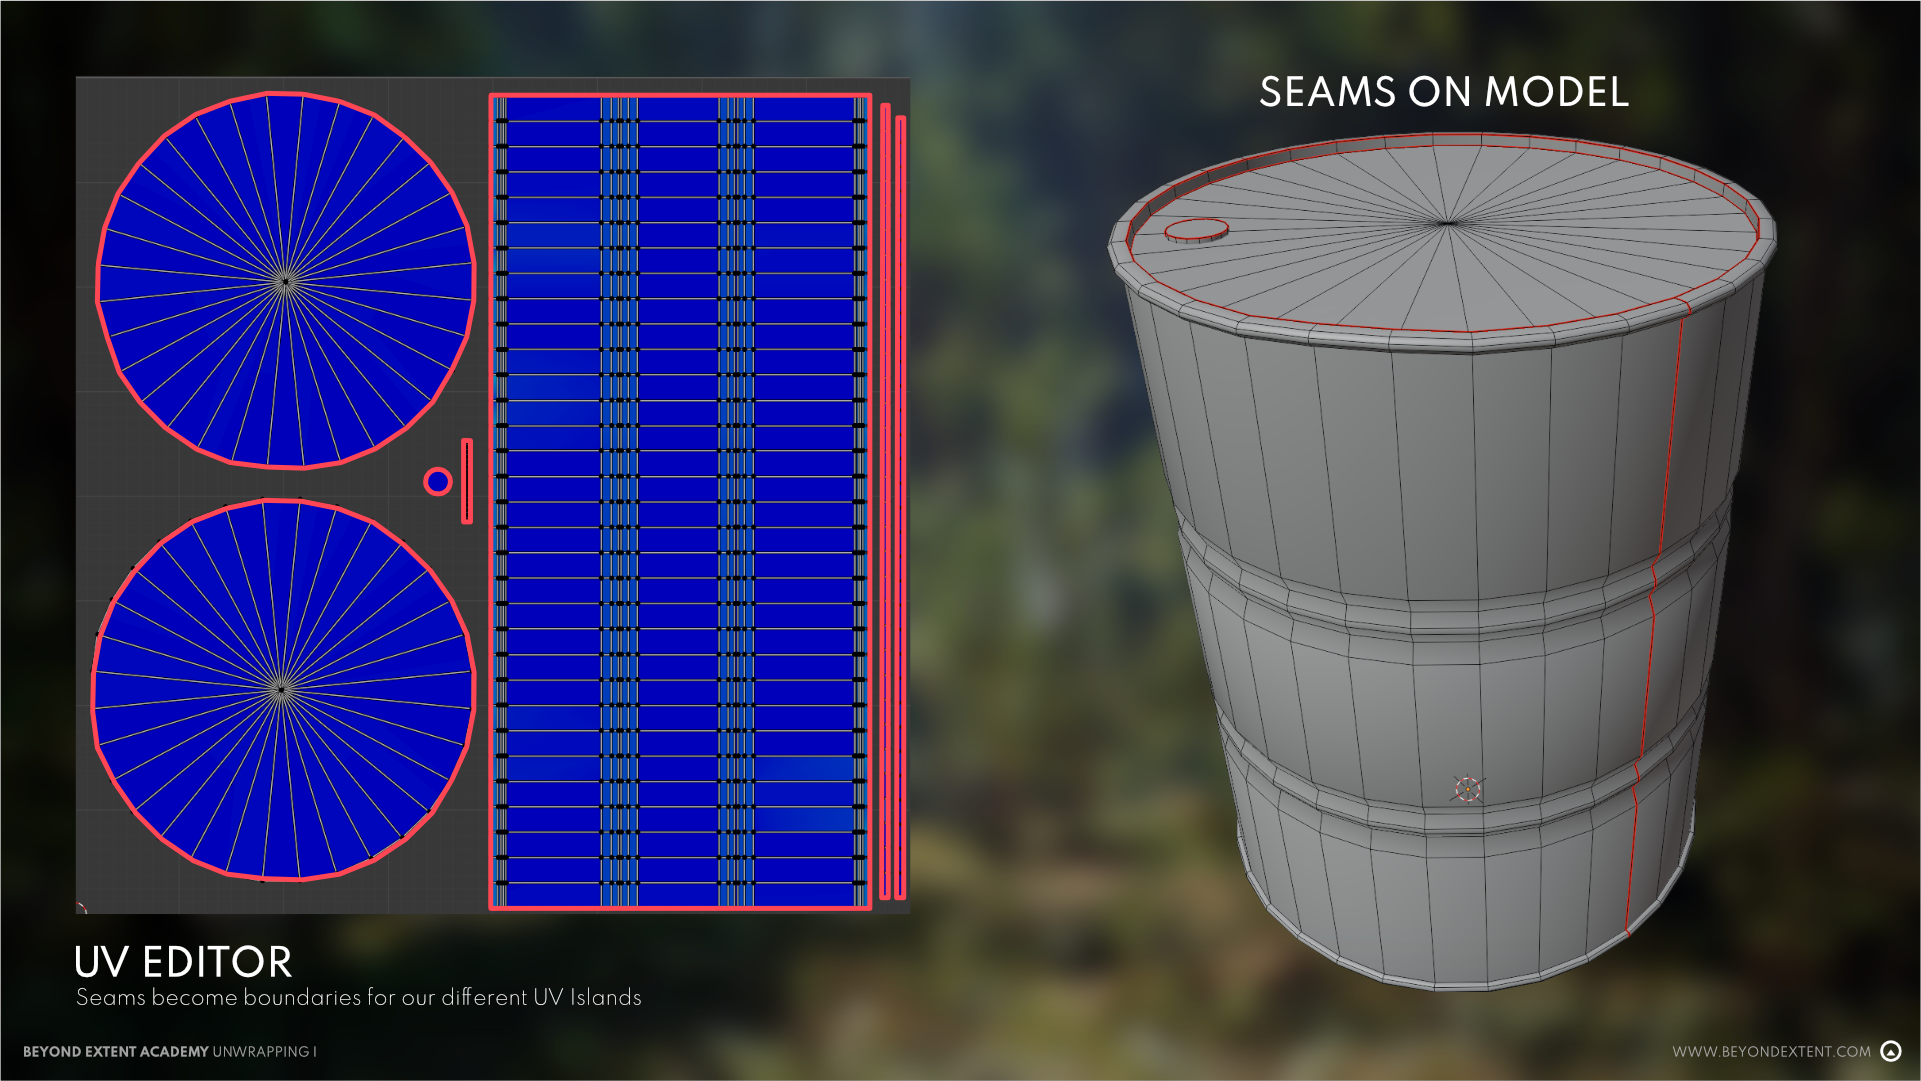
The seams on the barrel that are used for unwrapping (represented by edges marked in red for Blender), I made sure to have as few seams as possible and also made them match my hard edges to avoid baking errors.
UV ISLANDS
UV Islands are the individual pieces that we will have in the 2D representation of our 3D model. To create these islands, we will need to create cuts (seams) where our model will “open” and unfold it in order to get minimal distortion.
UNFOLDING OUR ISLANDS
With our seams in place, we can now unfold our islands, which means we are going to lay them flat in the 2D space. In this step, we will aim to have minimal distortion in our islands, selecting the projection methods that best fit each piece.
In most software, as long as our seams are good enough, just hitting unwrap will make most of the work. In Blender, I also recommend swapping between "Conformal" and "Angle Based" methods of unwrapping to see which one produces the best results.
There are also various projection methods that can alternatively help us with specific pieces and even make cuts for us. For example, cylindrical, sphere, or cube projections will help with assets with shapes similar to the names of the projections. We can also do planar projections both following an axis or the view of our camera, which can be pretty useful for continuous surfaces.
After the unwrap is done we will end up with our islands, and we should go over each one of them to ensure we make them the best they can be. Some of them will be alright straight away, but for some of them we will need to do the following:
- Relax and grab/drag the island to minimize distortion or to remove overlaps.
- Straighten our islands (especially on the outer edges/seams) as much as possible and align them completely horizontally or vertically.
This is very important because textures are made of pixels, and pixels are square, so if we make sure our islands are straight and correctly aligned the result will be much cleaner, avoiding errors like aliasing or jagged transitions.
The default tools on each modeling software will allow you to do this; however, plenty of add-ons that can help you get there more easily and get even better results. I won't overload this lesson with those, but I recommend you to check out some add-ons for UVs in Blender or even RizomUV, a super strong software made specifically for UV Unwrapping. Let's continue with the basics one step at a time.
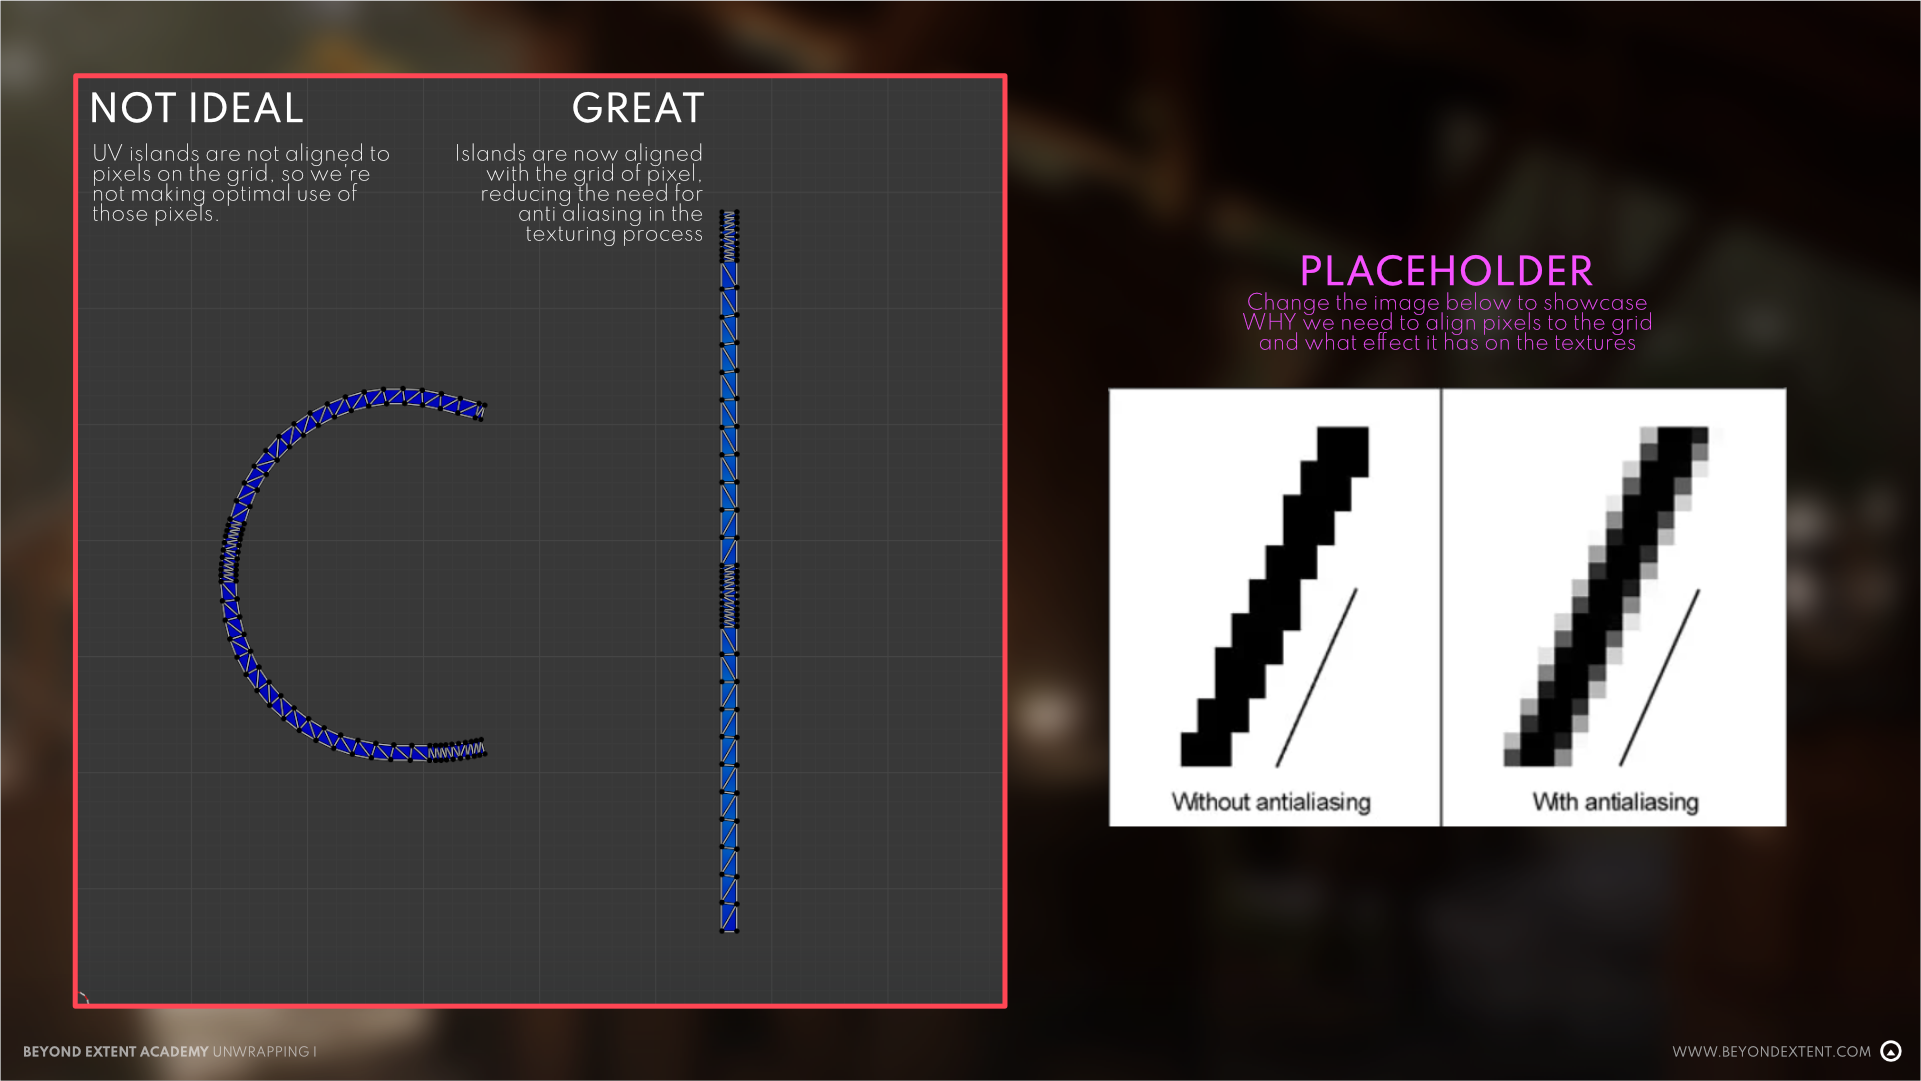
Here we can see an example of different ways of unfolding our islands. While both can be used for texturing without visible distortion, the straight one will have a much cleaner result, no artifacts on it’s edges and packing will be way easier and optimized due to it’s shape.
ISLAND ORIENTATION
It's important that our UV islands are aligned perfectly horizontal or vertical, to help minimize artifacts because of the square nature of pixels.
On top of that the orientation will also be crucial in giving you control in the texturing stage. A clear example of this is wood texturing, having all your wood pieces aligned vertical for example, will allow you to align your wood texture also vertically, making the grain follow the longest direction, crucial for realism. If you don't have them aligned you will have a hard time making separate layers with different rotations on each piece of wood, and this is both time consuming and an avoidable problem.
When using tileables or trims, orientation is also important, and some custom shaders will also need to use that, like for example if you want to add a rain effect that goes down your asset, or dirt gradients that start on the ground and go up, so for that you always need to aim to have your UVs oriented same as they would be in the world.
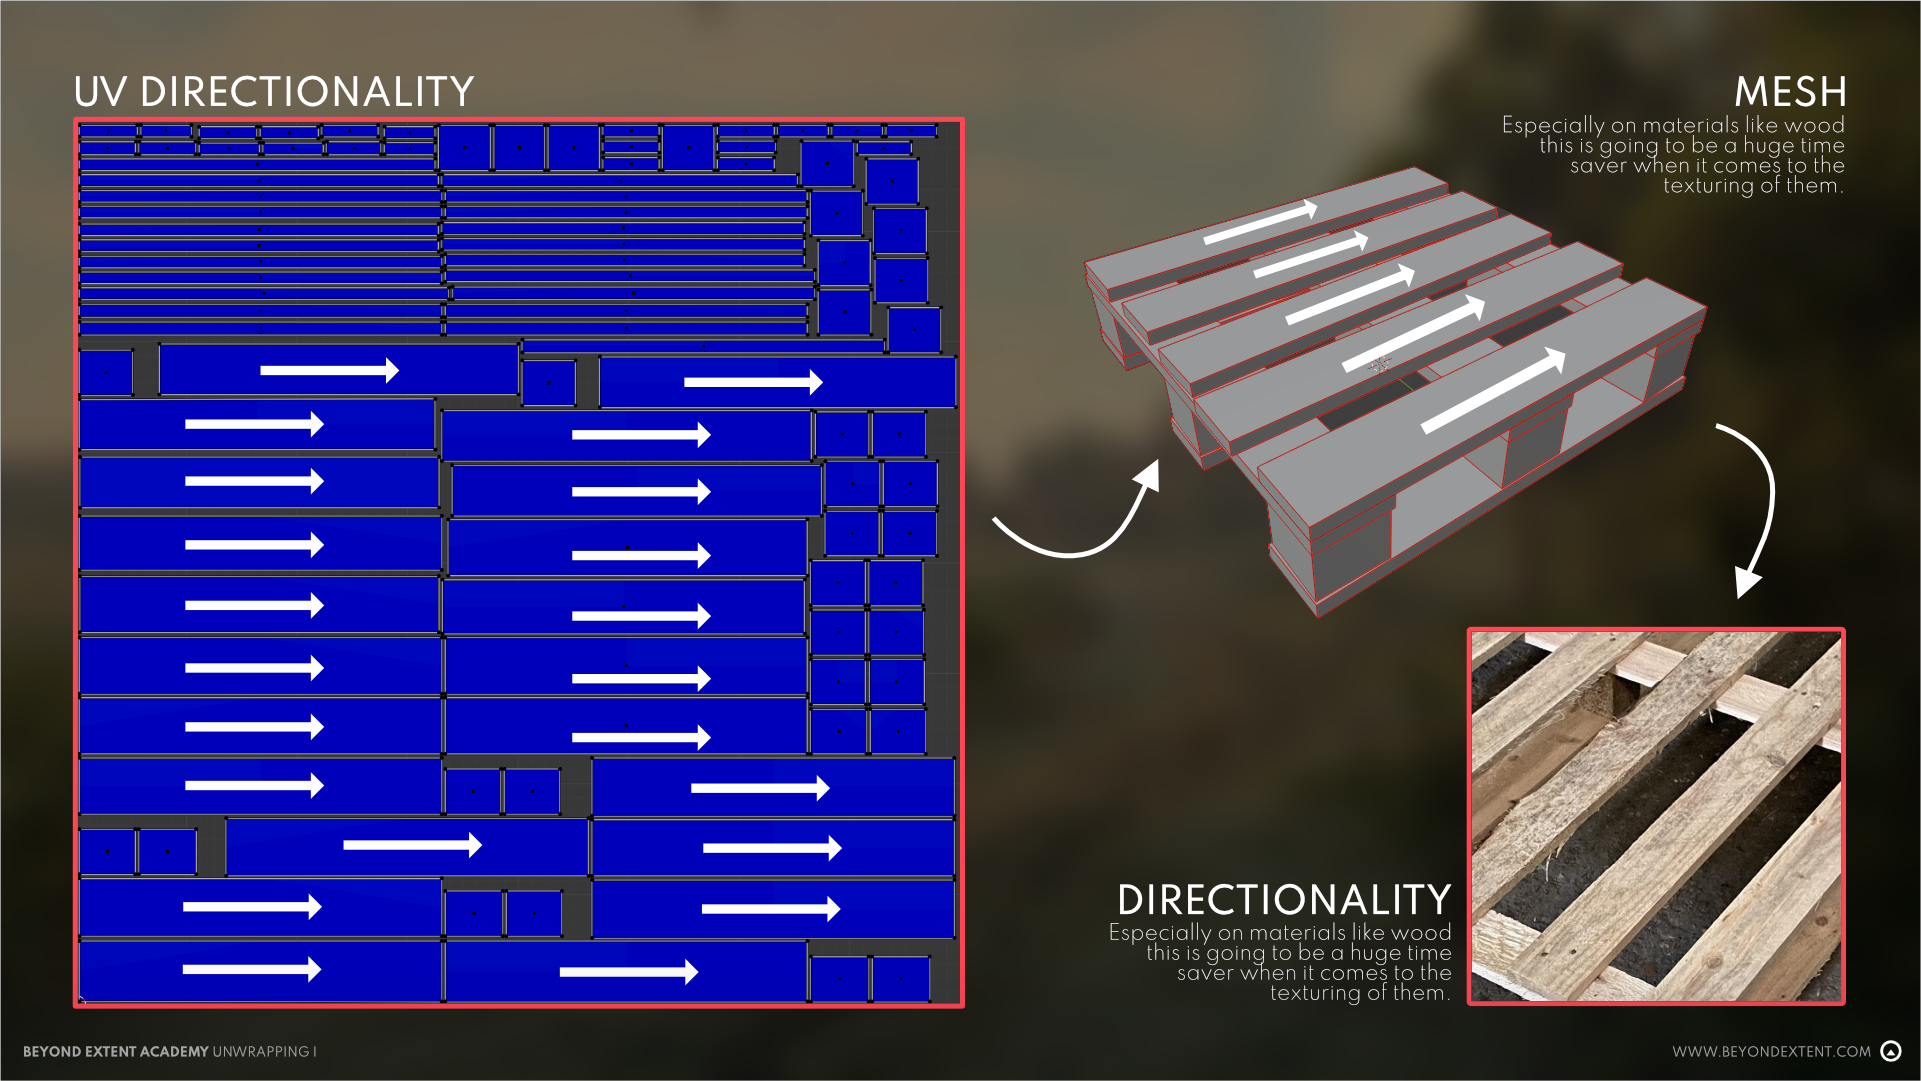
For this wooden pallet, I’m orientating all my wooden planks horizontally, making it easier to have a correct direction in my wood grain when texturing
CHECKER MAPS
Checker maps are textures that will help you double check that your asset is unwrapped correctly. The way they work is simple, just assign a checker texture to your model while you're unwrapping it and you will be able to see if there's distortion, will be able to orient them properly, check that the scale of the details is uniform and if there’s seams that are in very visible places.
Most software's come with checker maps available in their default Unwrapping toolset, but feel free to look for the one you like online. Some add-ons like TexTools also come with a good amount of them that you can easily apply with one click.
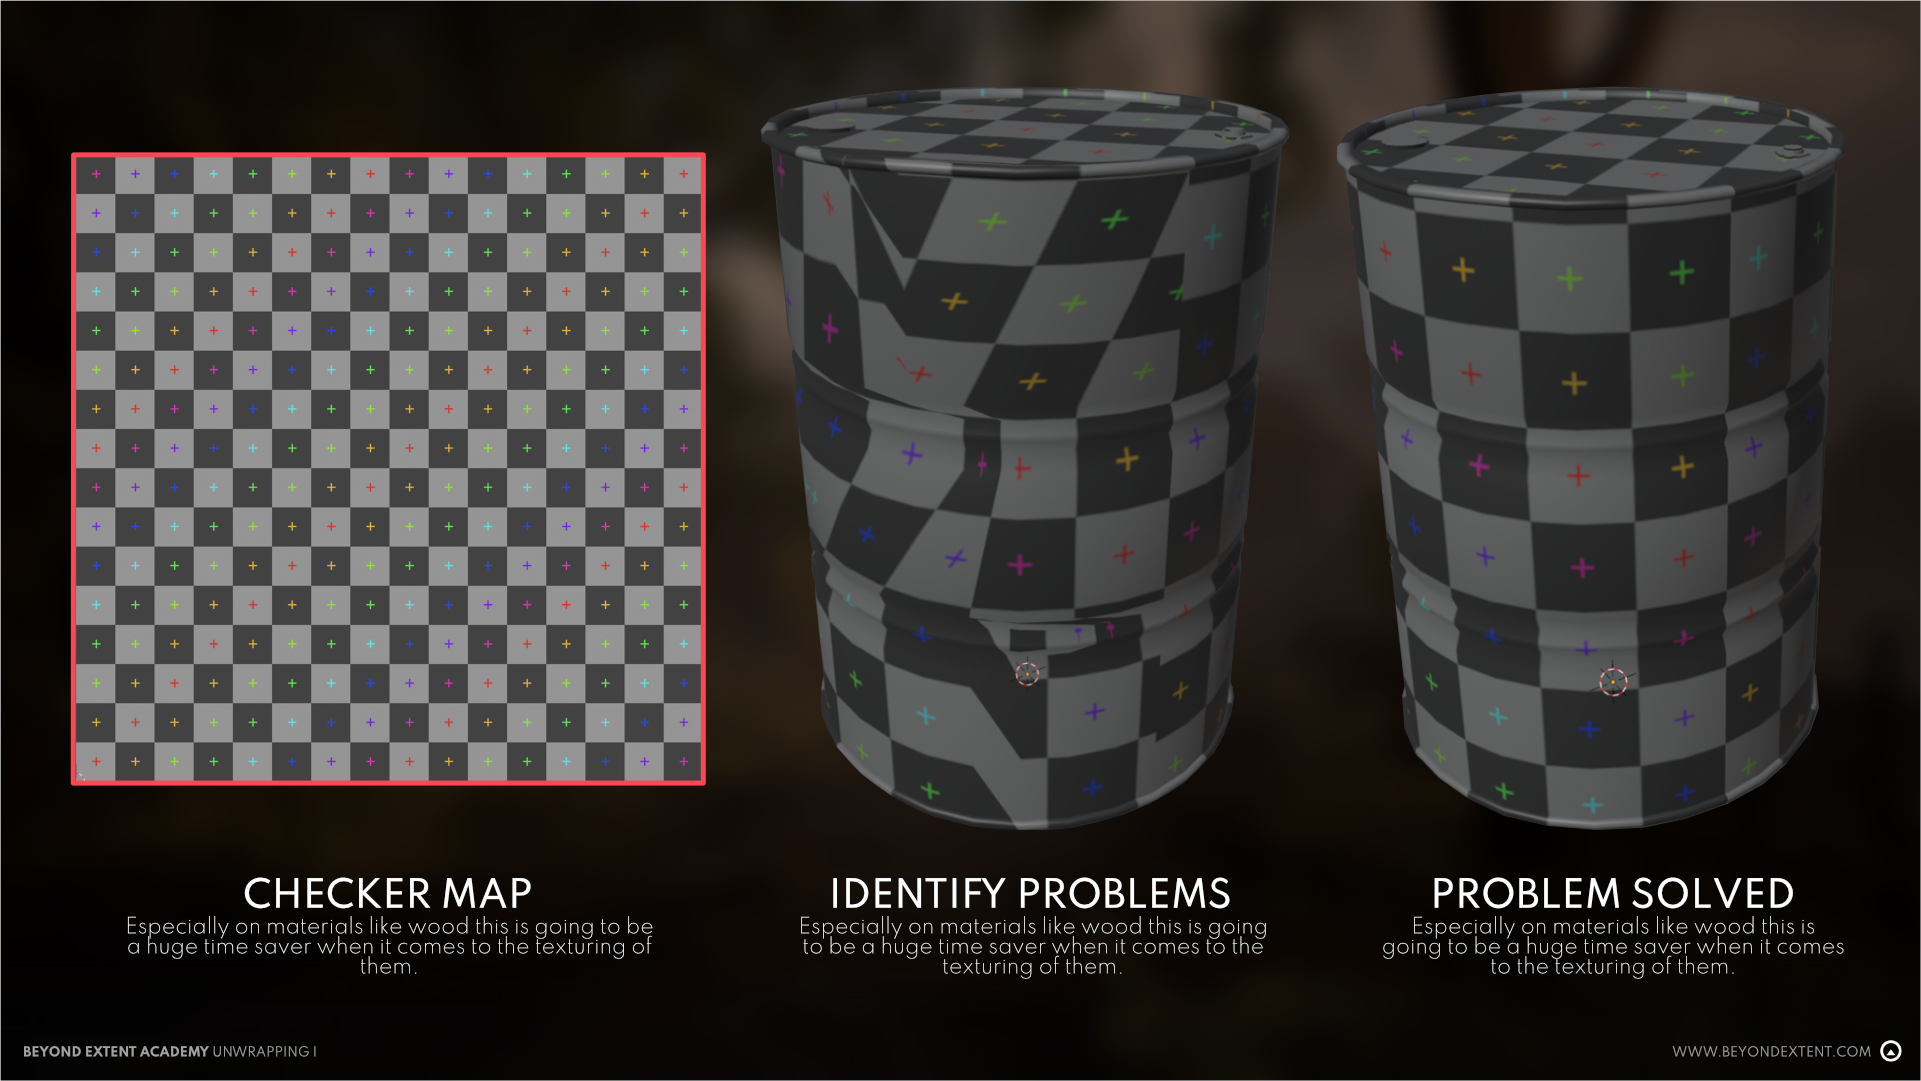
Checker maps are a great tool to identify problems in our UVs and make sure we fix them before moving on
TEXEL DENSITY
This one is a big topic on it’s own, so for this lesson I’m going to keep it simple and give a brief overview just so you have an idea of what’s about, so your next steps (packing your islands) can be done in a better way:
Texel Density (TD) is a measurement for the amount of pixels in relation to the surface area of our 3D model. It’s a useful tool that we can use to make our assets be consistent to each other in terms of quality for visual resolution (aka how high-res or low-res a texture applied to an object looks), and also help us determine the texture size we will need for each asset in order to achieve that.
It's units of measure are pixels per centimeter (px/cm) or pixels per meter (px/m). We can also see it being shortened to “ppm”.
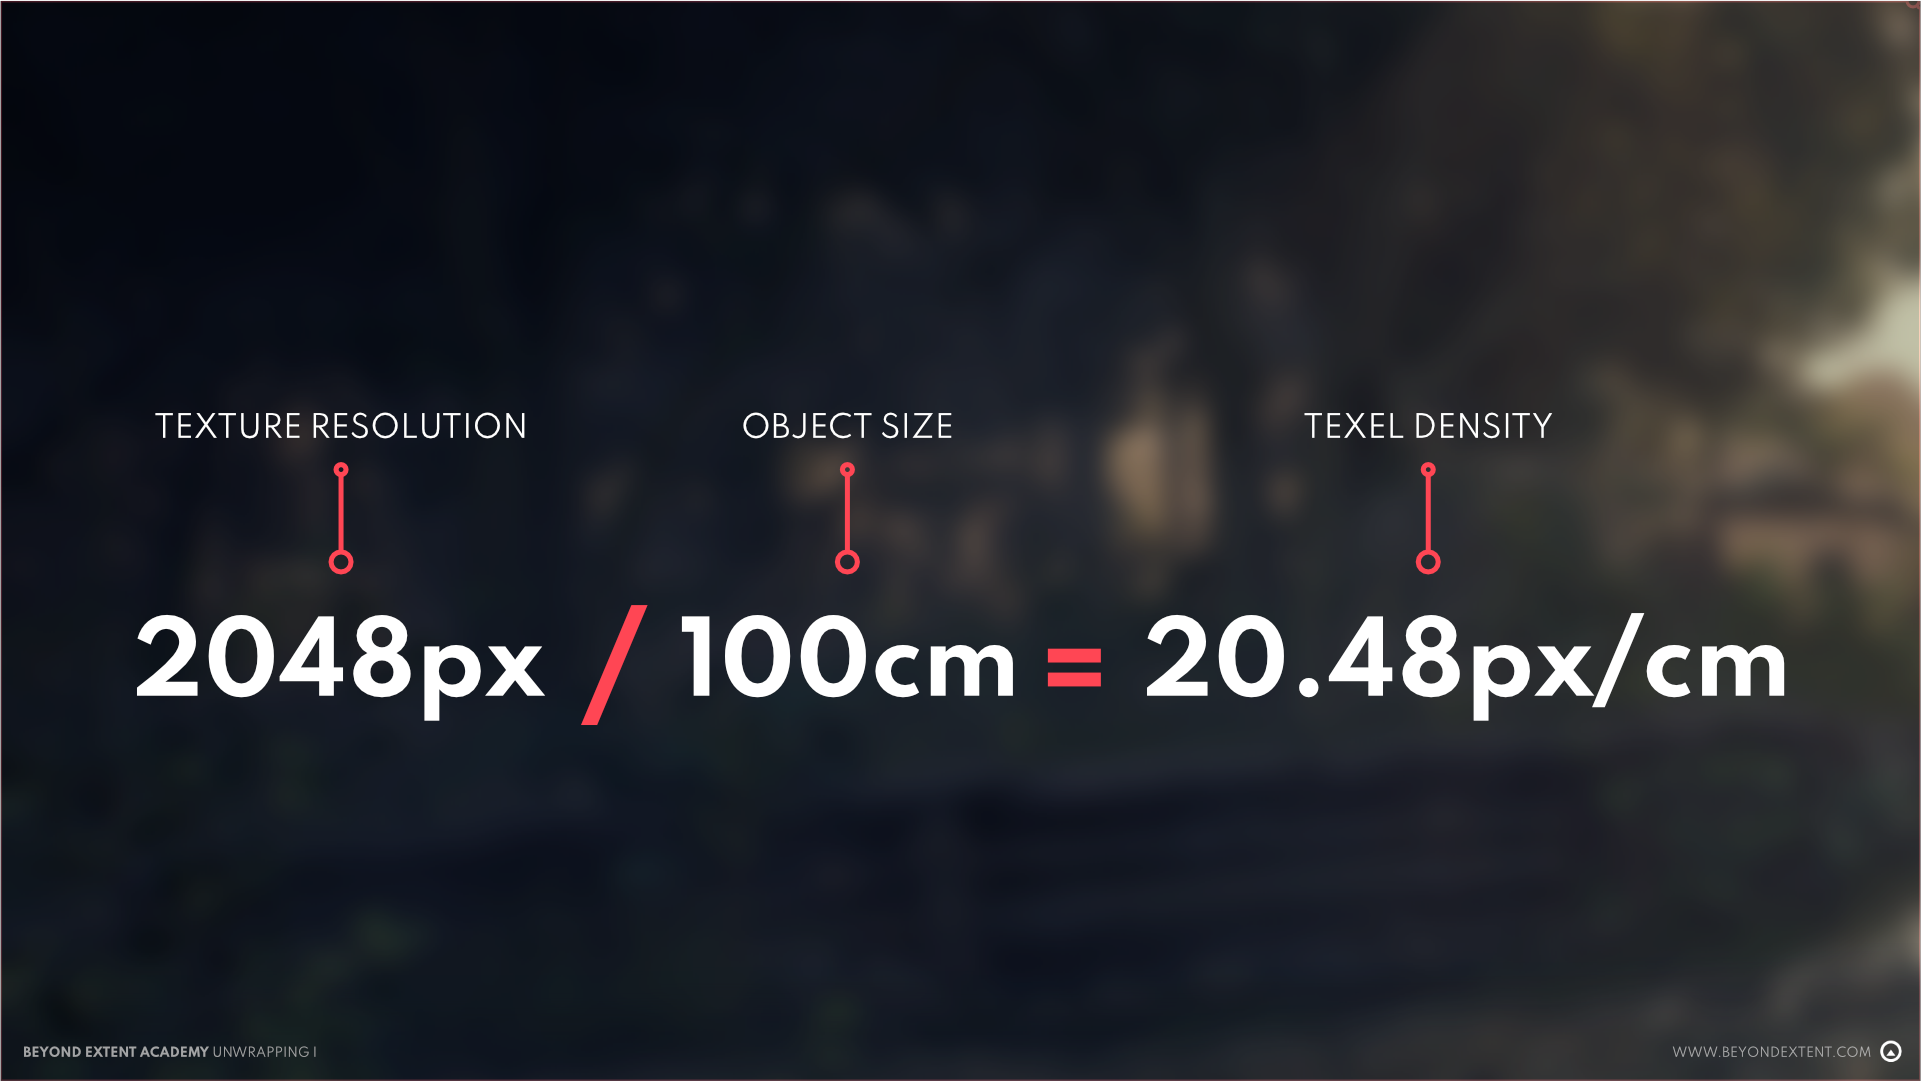
Texel Density is not the resolution or size of our textures per se, but the TD will be affected by it (the bigger the size of our texture, the more pixels it will have), together with the size of our 3D object (the bigger our object, the harder it will be to make our pixels cover the surface of it).
For example: a unique 1024x1024 texture will be enough to texture a screwdriver with good TD (small object, so less surface to cover), but trying to texture a helicopter with a single unique 1024x1024 texture will not be enough, resulting in a very blurry look for your asset.
WHY WORRY ABOUT TEXEL DENSITY?
Because obviously you want your game (or personal projects) looking awesome and with enough resolution to support all your texture details, but most important than that: you want everything in your project to look consistent, with a shared quality across all your assets and with nothing that throws off the player/viewer or breaks the immersion. You want your worlds to be believable, and consistency is key to help you with that goal.
WANT TO KNOW?
We got you covered! While the list of this topics comes down to knowing what the numbers mean and what certain tools do we also have documentation on this topic for a deeper understanding of Texel Density:
COMMON TOOLS FOR TEXEL DENSITY
The previous article explains how to calculate Texel Density and gives examples of tools to make this job easier. I’m going to also list them here so you can start using them right away and move on to the next section without the need of stopping on the topic for a lot of time. Feel free to come back to that article as many times as you need for a deeper understanding, as well as checking other useful additional resources that I’ll share at the end of this lesson:
- Manually: Texture Resolution/Surface Area = Texel Density
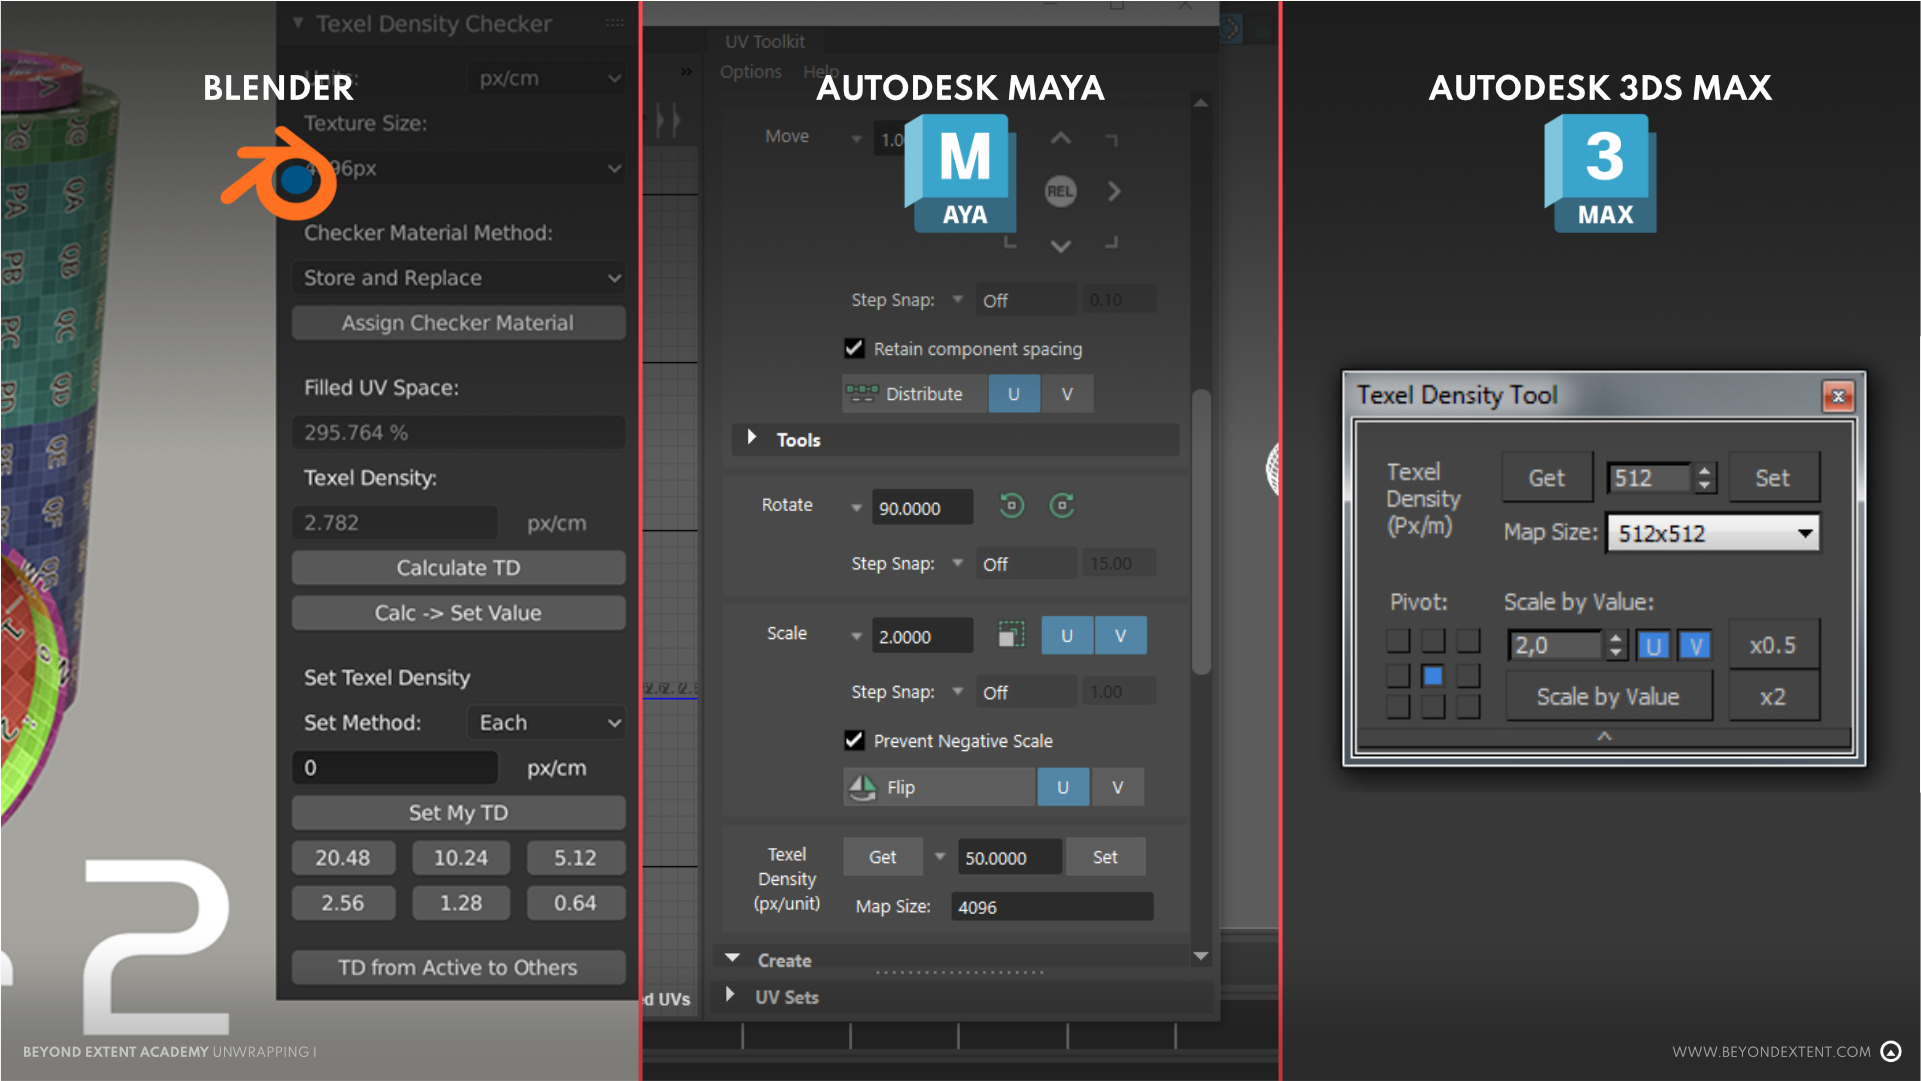
- Blender: Texel Density Checker (free): https://mrven.gumroad.com/l/CEIOR
- Maya: UV Toolkit (built-in)
- 3DSMax: Texel Density Tool in the UV Editor (built-in)
- RizomUV: Built-in (paid software, but very interesting to look at since it’s a powerhouse for all things UV)
PACKING OUR ISLANDS
This is pretty straightforward, however the way you pack your islands can change a bit depending your texturing methods:
For assets with unique texturing and baking, you always need to have your UVs inside the 0-1 UV space (inside the square that appears when opening the menu for UV editing). There can be overlapping and mirrored islands (more on this topic later on in this lesson) that you will usually move outside the space when baking, but you will need to put them back inside the box for final export/import in engine.
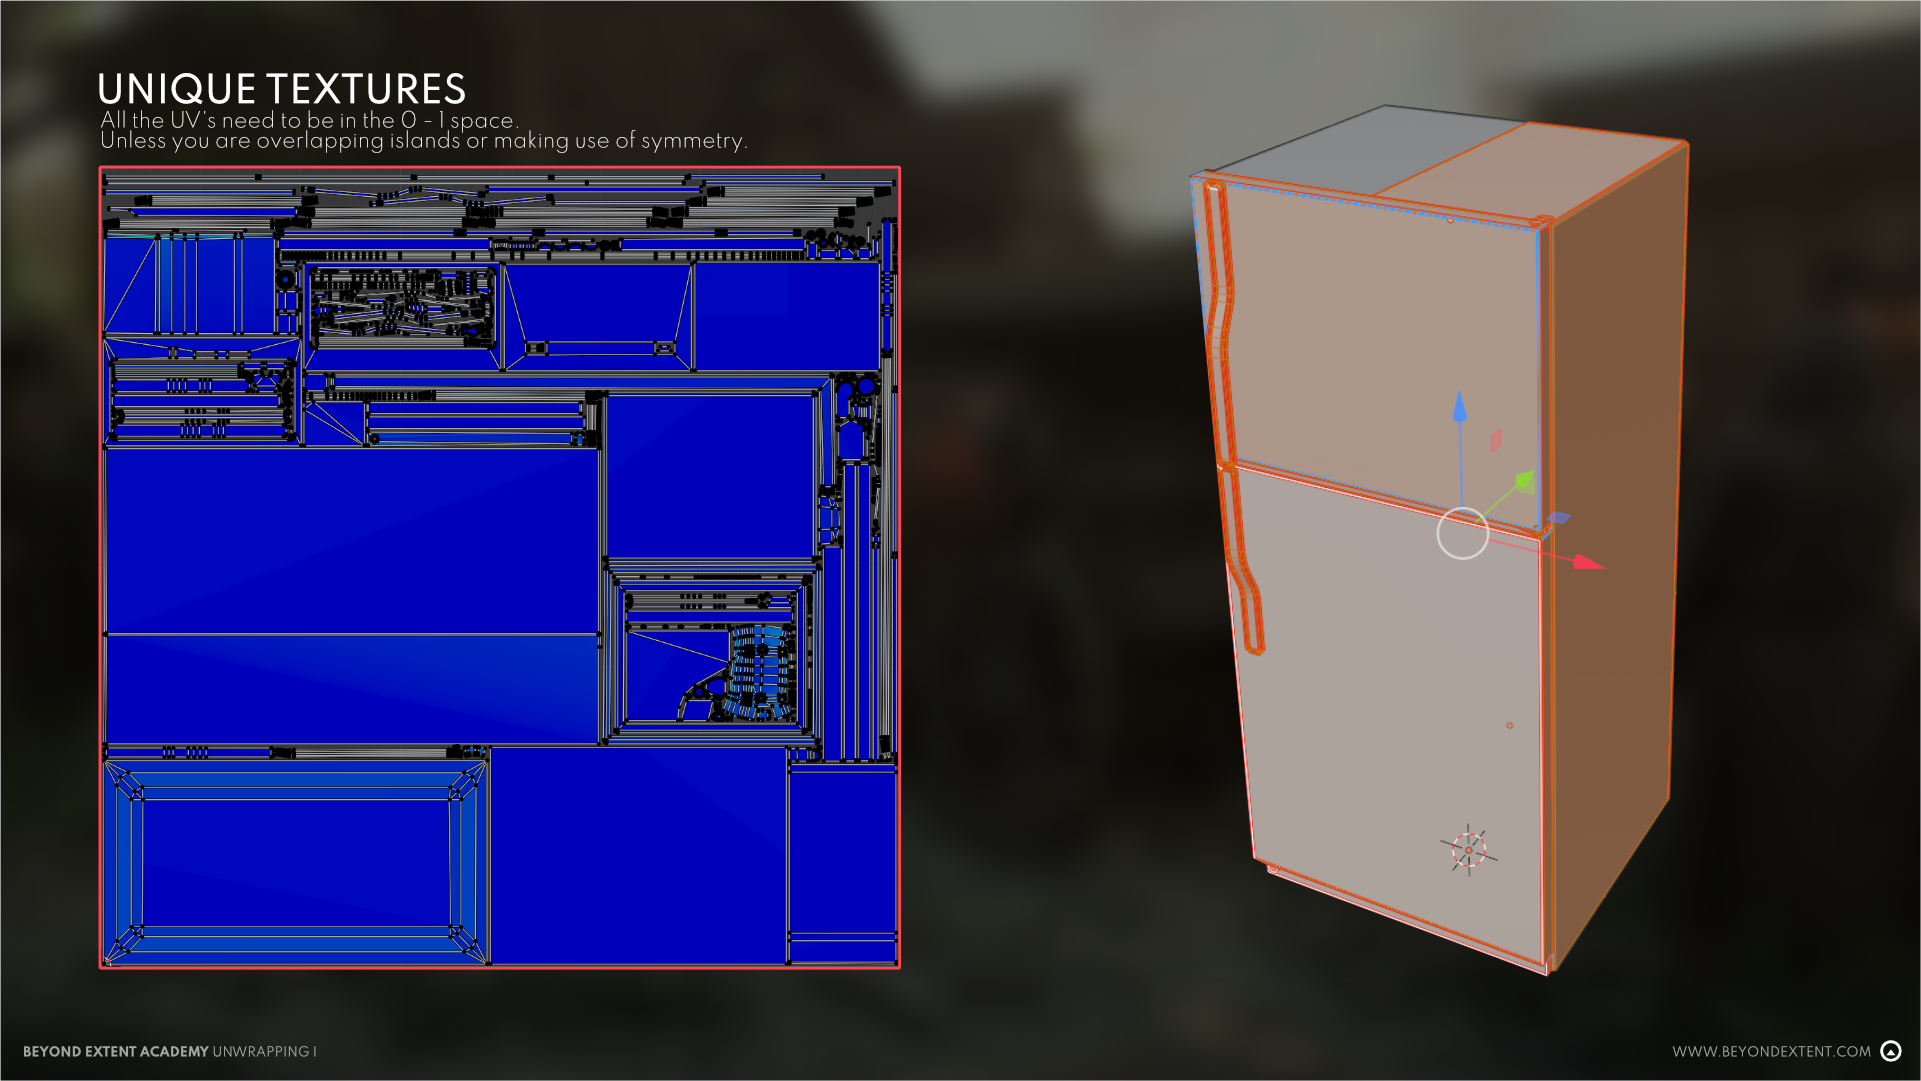
Everything is inside the packing box here, example of an asset with unique texturing
Assets using tileable textures can be outside that box, since the important part is that their Texel Density is exactly at your target. If you want a specific detail on a part of your asset you can move your islands to match that detail too.
For trim sheets you will need to place them matching the intended section of the trim but can be outside of the box too in their tiling direction. If you need to make various modules that tile seamlessly you will need to perfectly match the end of an island with the beginning of the Next one, usually snapping them in the grid or boundaries of your 0-1 space, depending on target TD and metrics.
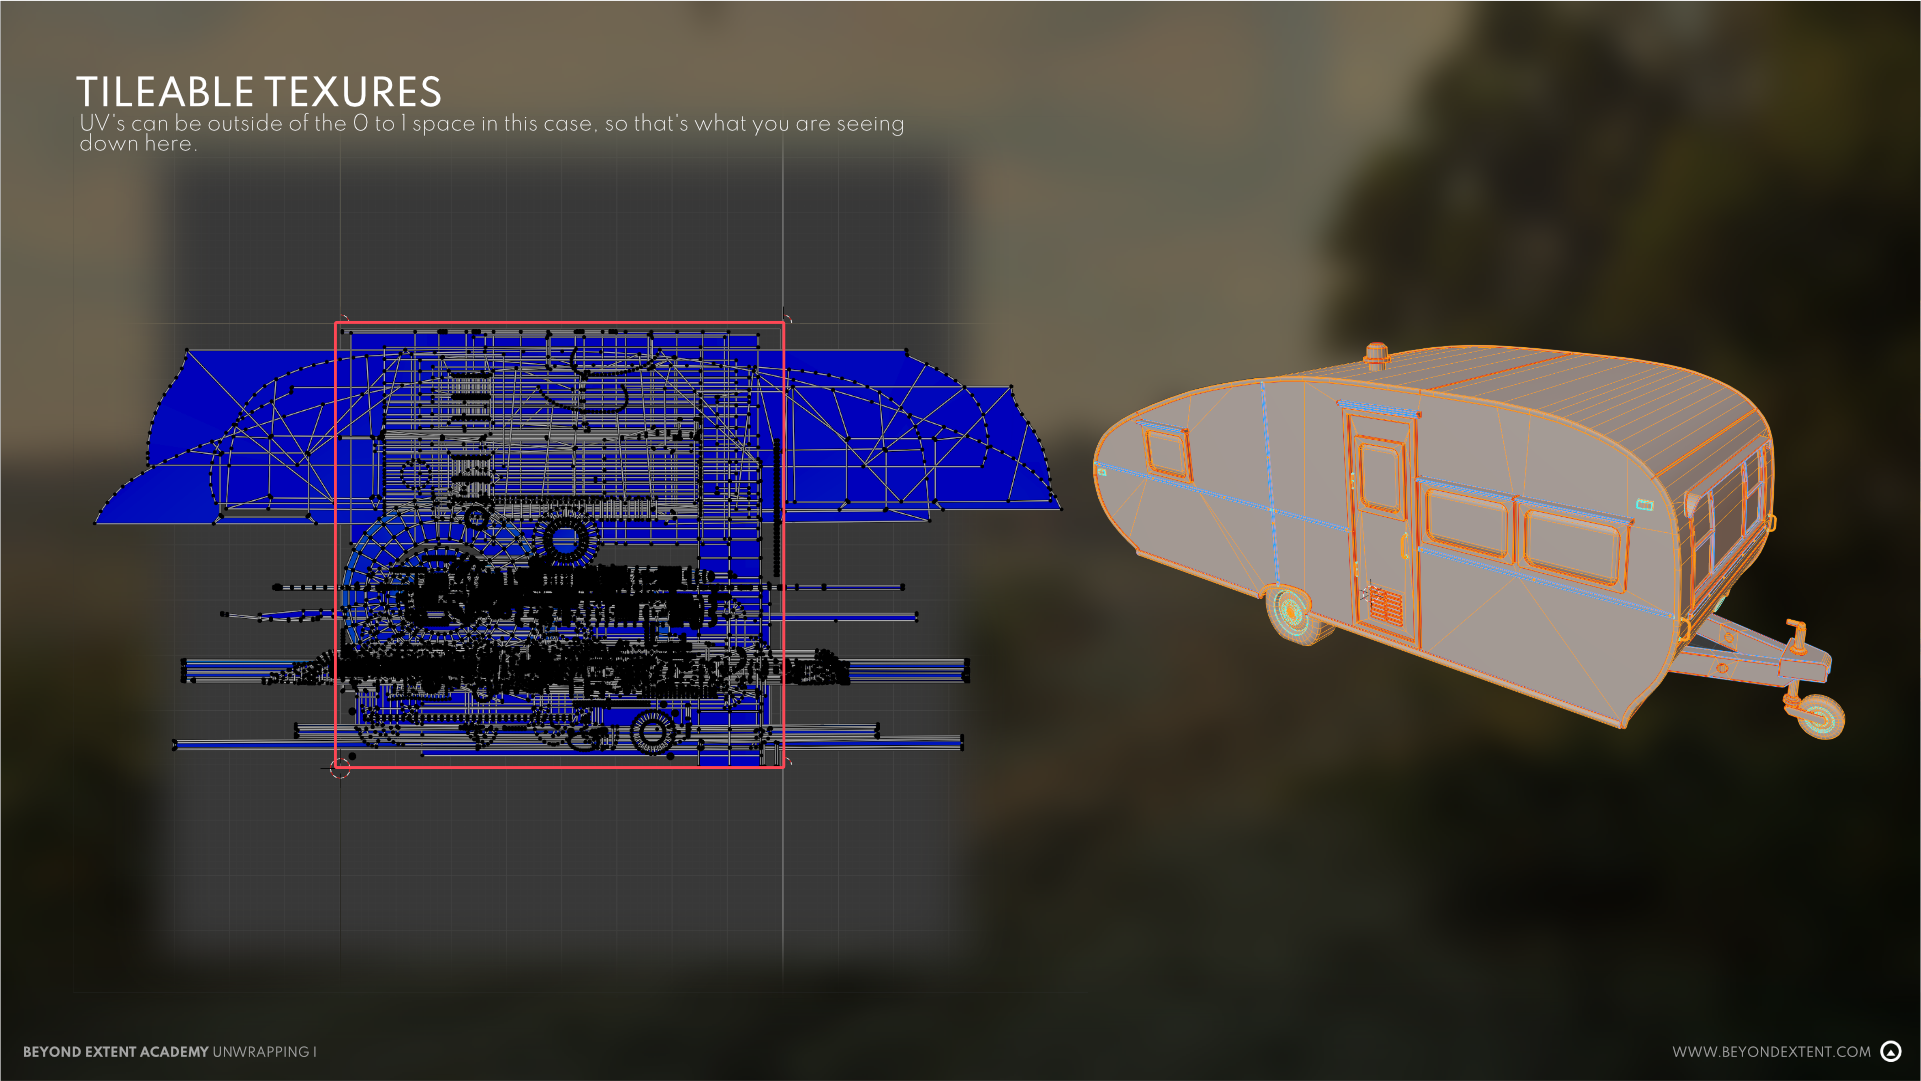
This camper van is a big asset so I decided to use a trim sheet (horizontal tiling) for texturing. In this case our UV islands can go outside the packing box without a problem, allowing us to reach our target Texel Density .
For lightmaps all your islands need to be inside the 0-1 UV space and you can’t have any overlapping islands, everything must be uniquely laid out. You also want to give a bit extra padding due to lightmaps having a lower resolution than regular textures, and maybe do your cuts a bit different, where each face with a change in light direction would be separated by a seam. However, nowadays we have pretty good automated solutions for lightmaps and using Unreal you can create your lightmaps automatically at import by ticking the “Generate Lightmap UVs” box. This will require you to have a first UV map (you will already have it for most assets since you will need it for textures) and Unreal will repack those UVs in an additional channels following the rules mentioned previously. That automatic solution will work right 99% of the times as long as your first UV channel is correct, saving you quite a bit of time!
PADDING AND DILATION
When we pack our UVs, our 0-1 space will be essentially divided in two: used space (our UV islands) and blank areas (basically, the space in between each island, also called gutters or “unused” UV space ).
It’s essential to take these blank areas into account, because that space will make sure that the texture information inside our islands don’t “bleed” into the other islands around it. That bleeding will happen as our engine downsamples or create mips our textures to smoothly render our textures and further optimize them.
It sounds a bit complex, but essentially what you need to know here is that you need to give enough space between UV islands and also the margins of your 0-1 space to avoid rendering problems.
PADDING
Padding is the distance in pixels that there will be between the limits of each of your islands, and also between your islands and the packing box or 0-1 UV space. This additional space may seem wasted but it’s not, since it’s crucial to avoid problems in rendering. Here you’re aiming to avoid islands getting too close to each other or the margins of your box. You can do this manually and just try to give enough space, but if you want to be more precise and maximize the used space (I recommend this), you want to look into some tools or addons for packing. For Blender I recommend UV PackMaster, which lets you select the amount of pixels you want to use both between islands and the packing box when you’re about to pack your UVs. The addon is paid but worth every cent, although I’m sure there are some free options out there, so I recommend to do a bit of research to find what best suits your needs.
How many pixels should my padding be? It will depend on your engine and your pipelines, but a good guide to start depending on your texture sizes will be:
- 2048x2048: 16px
- 512x512: 4px
- 1024x1024: 8px
- 256x256: 2px
And so on, you see the higher our textures, the more space we will need to give, and this is a good practice because the higher the resolution, the more downsampling our engine will do and the bigger the dilation of our islands will be.
For the margin between your islands and packing box, you can either keep the same distance, or if you want to optimize as much as you can you can give half of the space that you have between islands (if you have 16px space between islands, give 8px between islands and the margin of your packing box). This is because the 0-1 space tiles indefinitely, so you will have the space in pixels from both sides of your margins combined.
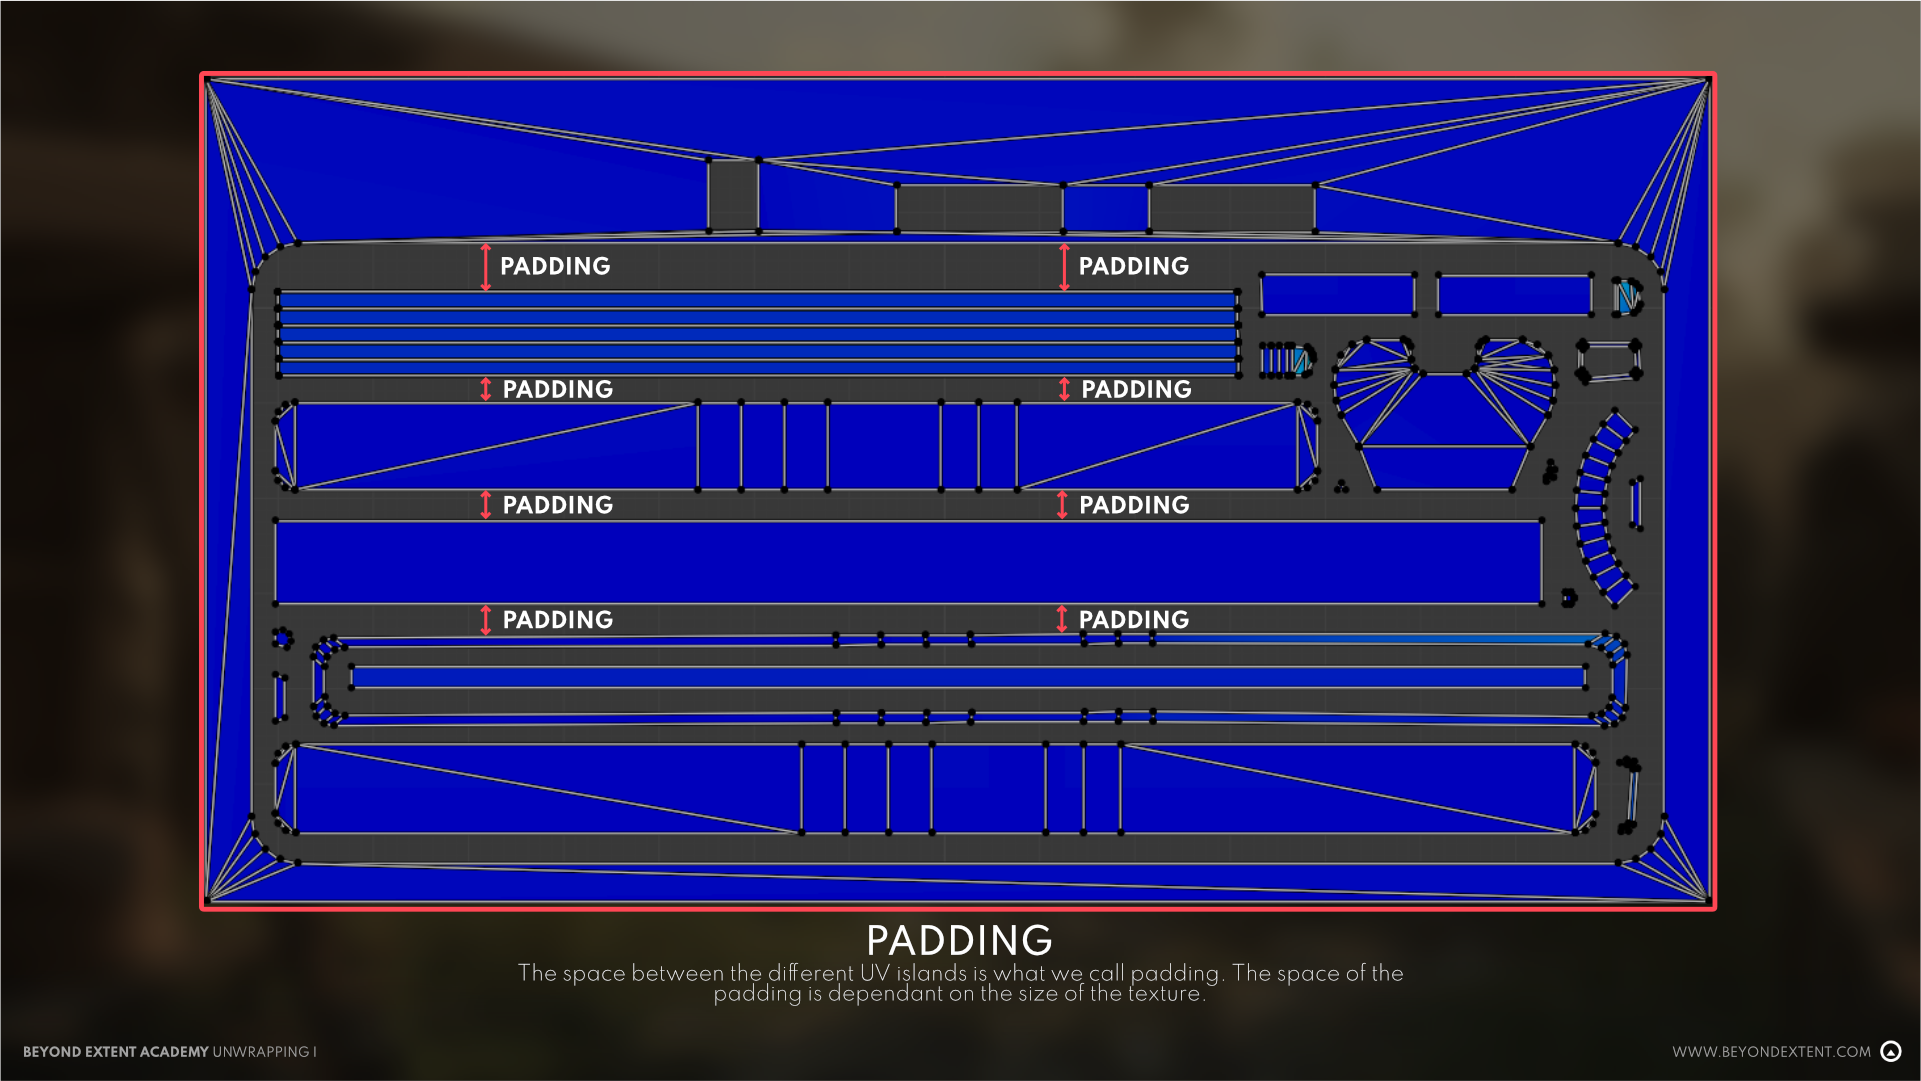
In this image you can see how there is enough pixel space (padding) between islands. If they were closer together we would probably run into issues. You need to find the balance between maximizing the used space for a higher TD, and having enough space between islands.
DILATION
Dilation is an extension of the texture outside of the boundaries of your UV islands to the gutter or blank space between your islands, that makes sure that there is some info to allow for smooth rendering when downsampling/mip mapping the textures, instead of leaving the blank space empty.
You can choose how much dilation (in pixels) you want to apply to your textures when exporting them with Substance Painter/Designer, and other similar softwares will also allow for this. If you made sure to have enough padding space between your islands dilation won't cause any issues, so you can even apply infinite dilation, which will extend from each island filling all blank spaces.
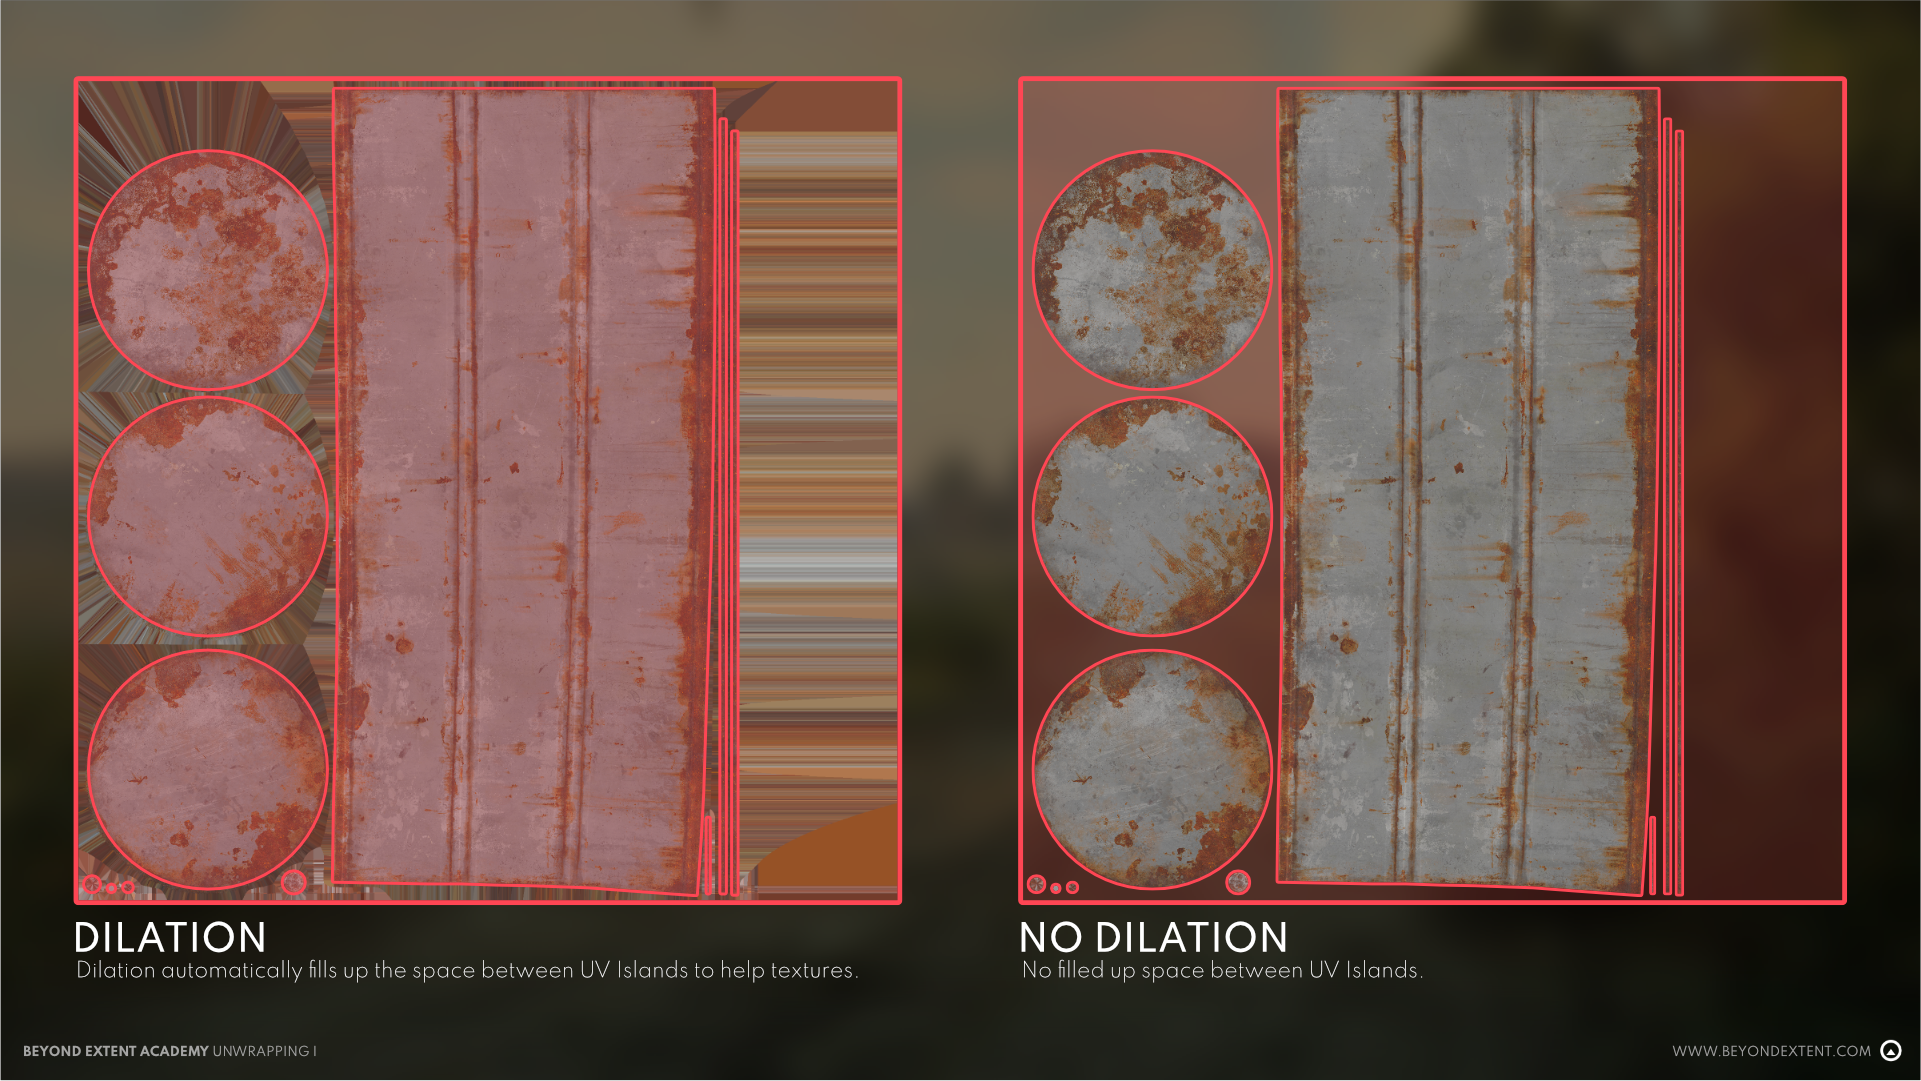
In this albedo you can clearly see the dilation working. See how the texture extends indefinitely from each UV island filling the blank space (the distorted parts). This will help with smooth rendering on downsampling/mip mapping processes.
OVERLAPPING UVs
When you want to get the most optimized UV pack you can, it’s always a great idea to inspect your model to see which UV islands you can overlap. This essentially means to stack UV islands on top of each other, sharing the exact same spot and therefore maximizing your used space. It’s a common practice and you will find a candidate for overlapping UVs in almost every model you work on. The texture info of overlapping UVs will be the same, so you will have to balance your overlaps to avoid noticeable repetitions in your texturing that can make the asset less believable.
HOW TO OVERLAP UV'S?
There’s a lot of possibilities when it comes to which UV islands to overlap.
Most common are:
- Repeating/reused parts:
If you’re building a model that has 10 identical screws for example, you’ll want to model and UV the first one, and reuse the screws with overlapping UVs, so you’re texturing all of them just wasting the space of 1, leaving more space for the rest of your islands. The smaller the element, the more sense it makes to overlap it’s UVs because it won’t be as important and you won’t notice the repetition of it that much, as opposed to what happens bigger and less generic parts of your model.
- Symmetrical/mirrored elements:
They’re perfect candidates for this, it’s easy to do (in Blender, a mirror modifier will already make a copy/overlap of the UVs of the original mesh or section of the mesh) and in a lot of cases the mirrored elements will be on opposing sides of your object, so it’s not likely that there will be a noticeable repetition, since you won’t be seeing both sides at the same time. Let’s say you’re modelling a fridge, you can easily do UVs on your left side and mirror the right side with overlapping UVs to save space while keeping the front and back faces uniquely unwrapped to avoid visible mirrored texture info, this way you’re saving you a lot of UV space (big UV island on a big asset) while keeping the repeating info on opposite sides of your mesh that won’t be visible at the same time, and concentrating your efforts in the areas that matter.
- Non-visible faces:
This makes a lot of sense when you have some sides of your model that is not likely to be seen but you may not want to delete the geometry, to have a cleaner model and avoid potential errors. You don’t even need the geometry of the mesh to match perfectly to overlap their UVs, you can overlap any UVs you like but have in mind that it will be easier if their shapes are similar somehow. Let’s go back to the fridge example: you know for a fact that the bottom face will never be seen in your game, then grabbing the UV island of that bottom face and overlapping it on top of the island representing one of the sides will make a lot of sense, since you will be able to have some texture information for free, without wasting any space.
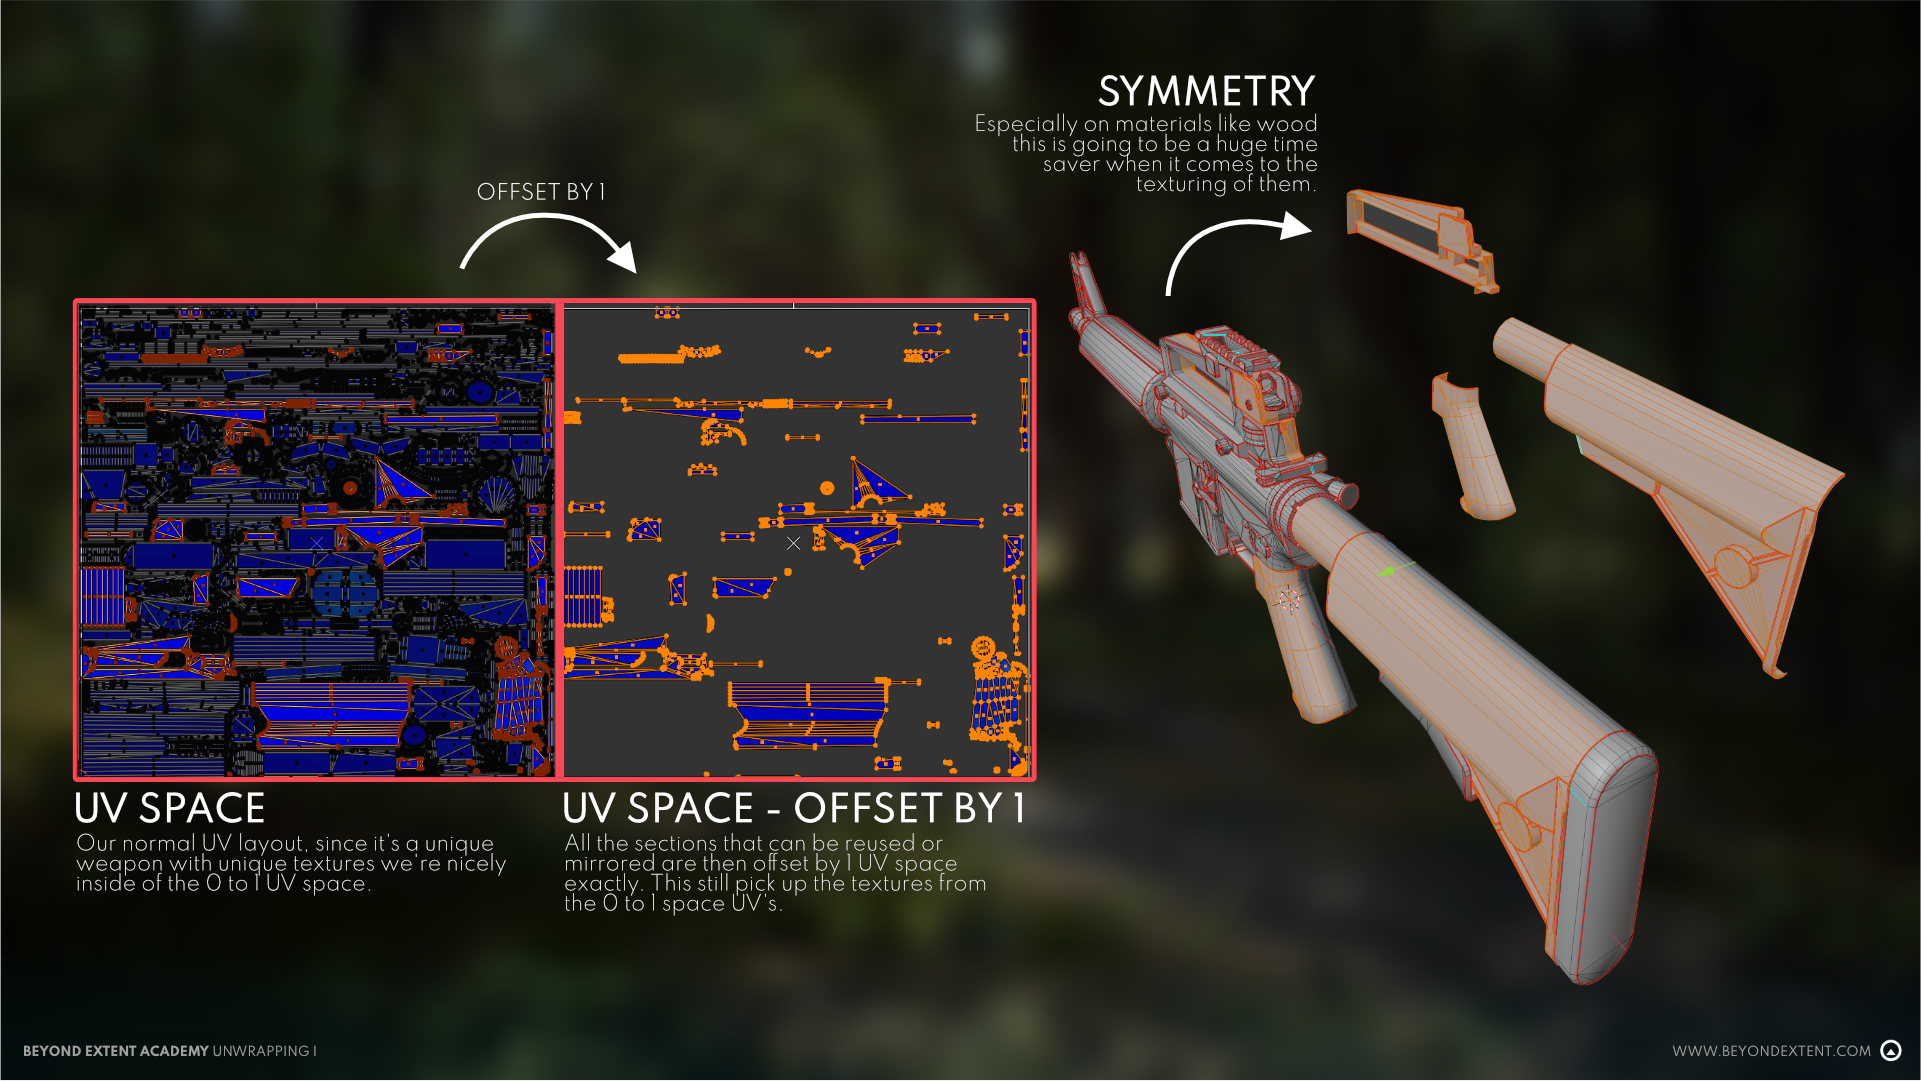
This is an example of an asset with mirrored/overlapping UVs. This M16 has a lot of symmetrical parts and my texturing didn’t include a lot of unique wear & tear, so it was a really easy decision to overlap it’s UVs to save space. Everything that’s offset by 1 outside of the packing box are mirrored UVs, allowing me to achieve a higher TD to optimize my textures.
SOLVING COMMON PROBLEMS
Overlapping your can cause a couple issues, but they’re quite easy to spot and solve.
You need to check for:
- Noticeable repetition: You don’t want to have objects with overlapping UVs that are too big/important, easy to identify or very close to each other. You need to be smart about what you choose to overlap, and also try to do as much as you can to hide that repetition. Applying different transforms to your objects with overlapping UVs can solve this problem too, a different rotation or a small size variation can go a long way in breaking that perfect repetition.
- Butterfly effect: This is common when mirroring a face using a symmetry modifier right in the middle of it. While great for saving modelling time, if you choose to do use this for your UVs you will need to be very careful about the info you put next to that mirroring point, because every detail you place will be repeated and mirrored, creating an effect similar to the wings of a butterfly.
- Baking errors: This will be covered in the Baking lessons, but since UVs and baking go hand in hand, you need to know that having overlapping islands inside of your 0-1 space will cause baking errors. Solving this is really easy, you just need to move your overlapped islands outside of your packing box (I recommend to offset them by 1 in any direction), do your bakes with no overlaps, and after all your bakes are done, you can grab all those islands and put them back inside your packing box again (offset by -1, making sure they will land in the perfect spot that you made for them).

