


LESSON OVERVIEW
Have you ever stopped mid-game to admire the scenery? Perhaps it was a magnificent mountain or a picturesque valley. It begs the question, what’s the key to crafting these landscapes? In this lesson, we'll be introducing you to Gaea II, the game and film industry's top tool for creating appealing terrain with realistic geological features.
By the end, you'll know the ins and outs of the basics of Gaea, and will be able to answer the following questions!
- What even is terrain?
- What are heightmaps and heightfields?
- What are the technical and artistic limitations?
- How can we use erosion, weathering, and geology to shape our terrains?
- What tools are used for heightfield manipulation within Gaea, and how can they be applied?
WHAT IS TERRAIN?
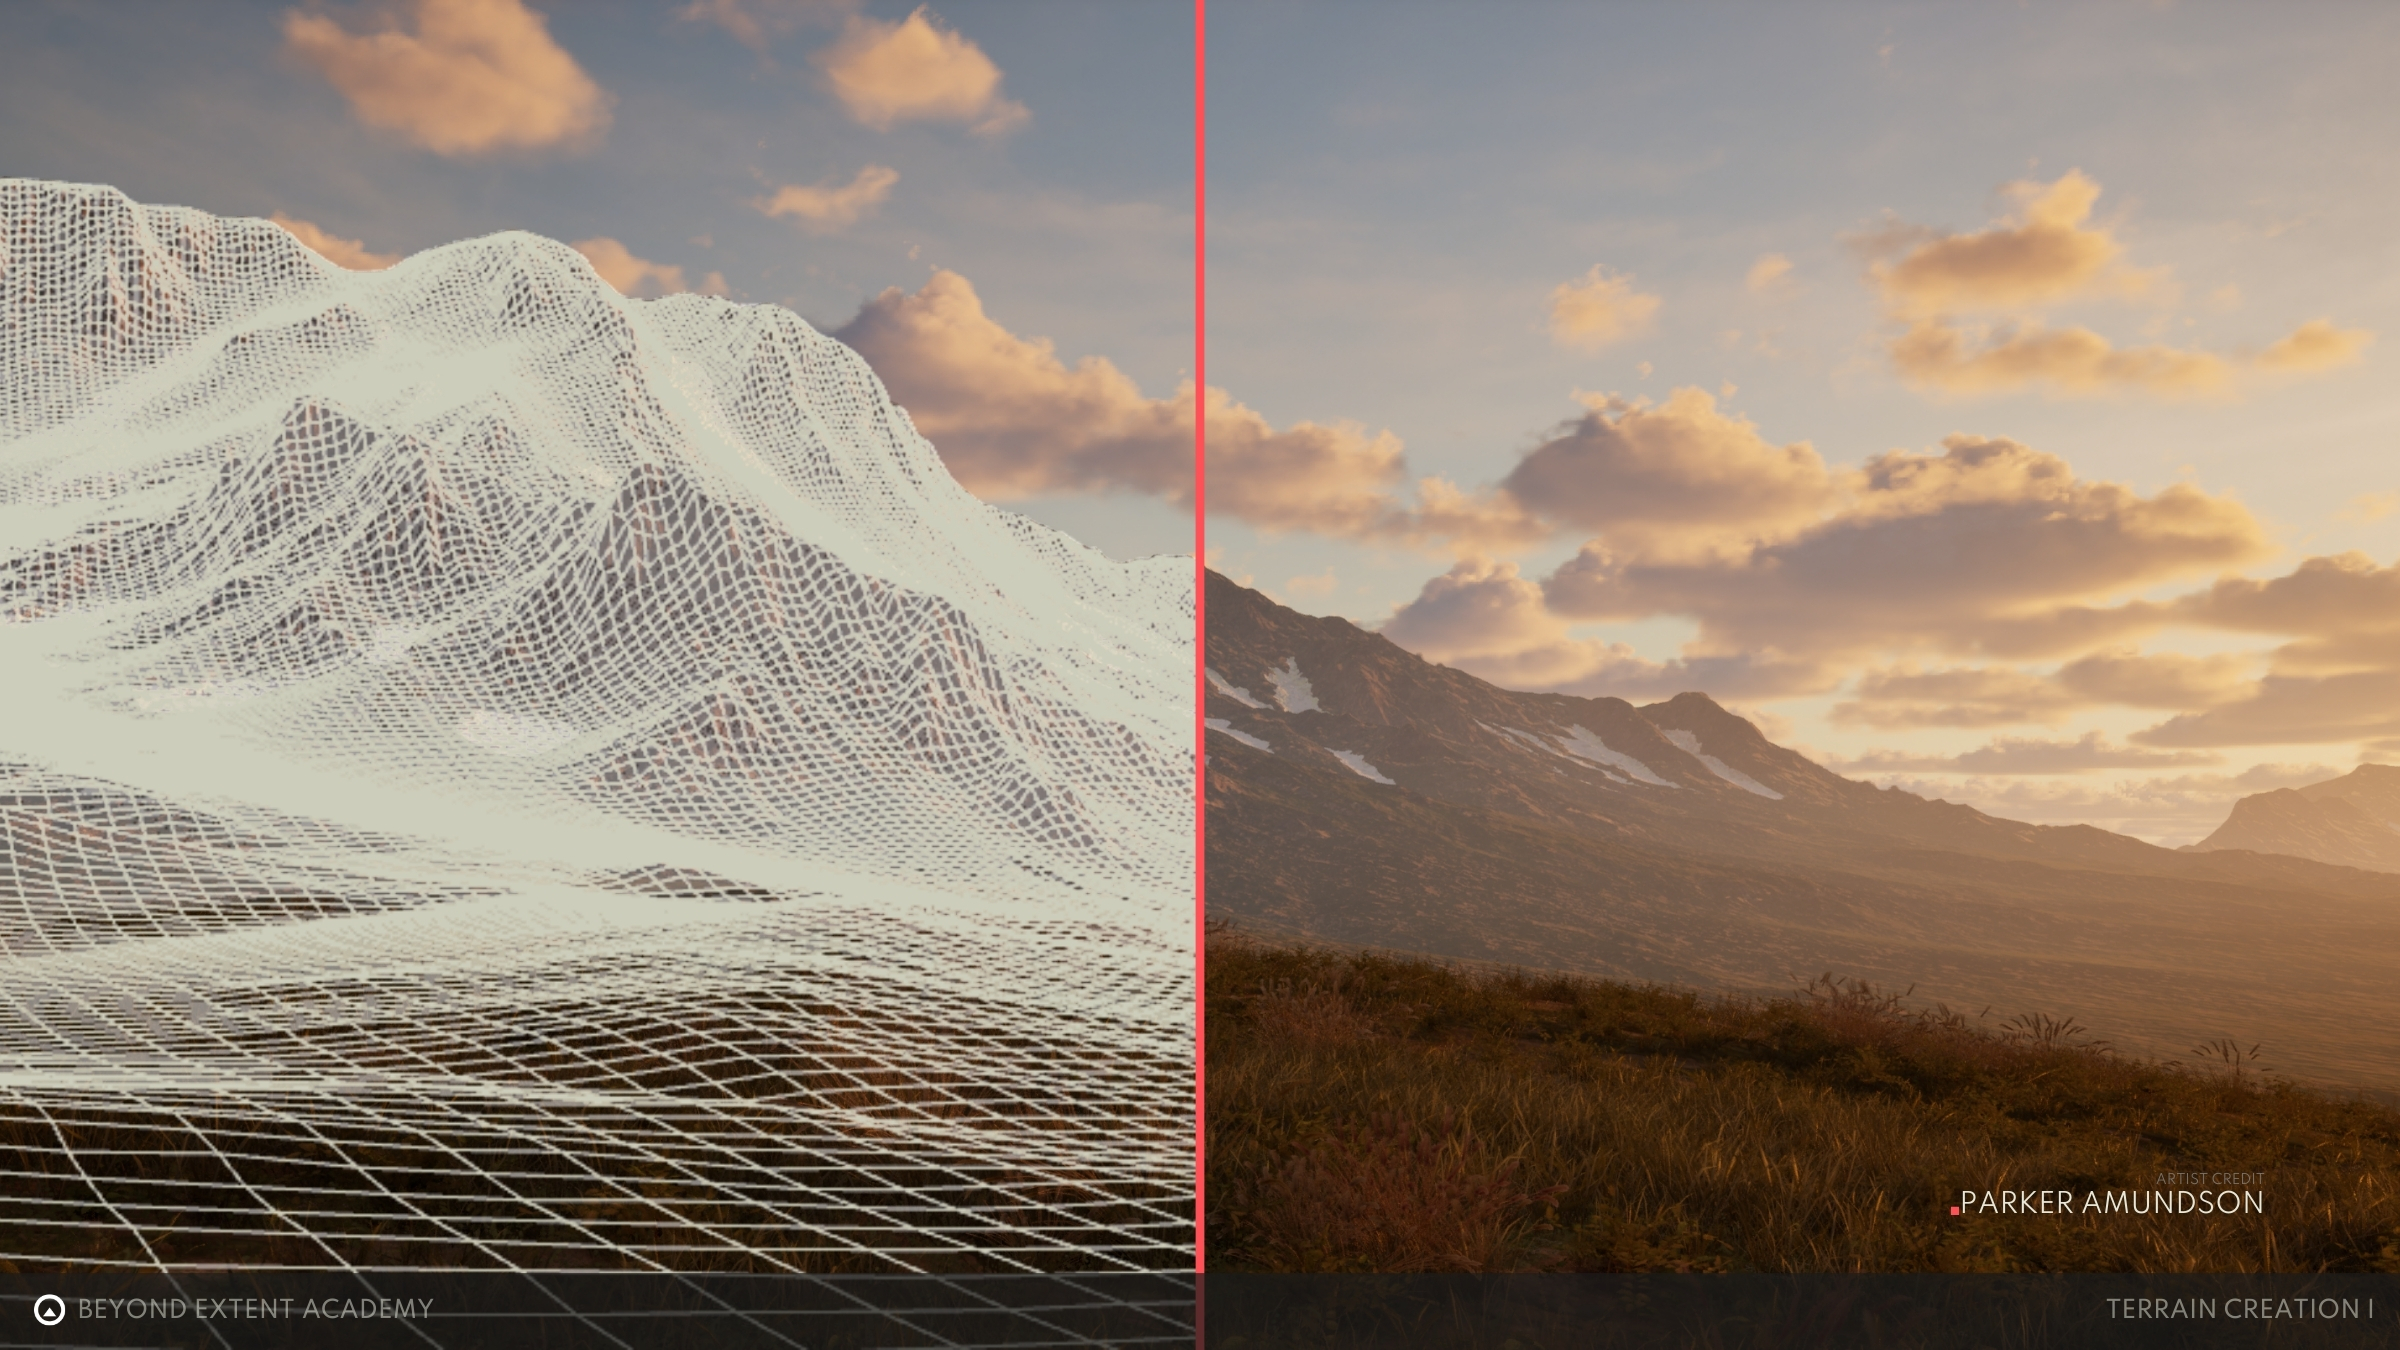
Terrain is the starting point for many exterior virtual environments, in a video game setting it is used to provide a landscape mesh on which to assemble the rest of your environment. Think of terrain as the base layer or backbone to an environment!
WHAT ARE HEIGHTMAPS AND HEIGHTFIELDS?
A heightmap is the black-and-white 2D image that Gaea uses to create a 3D visualization called a heightfield, aka the terrain! The brightest regions in a heightmap image represent the highest parts of our terrain such as mountains, and the darkest regions represent low-lying areas, such as valleys.
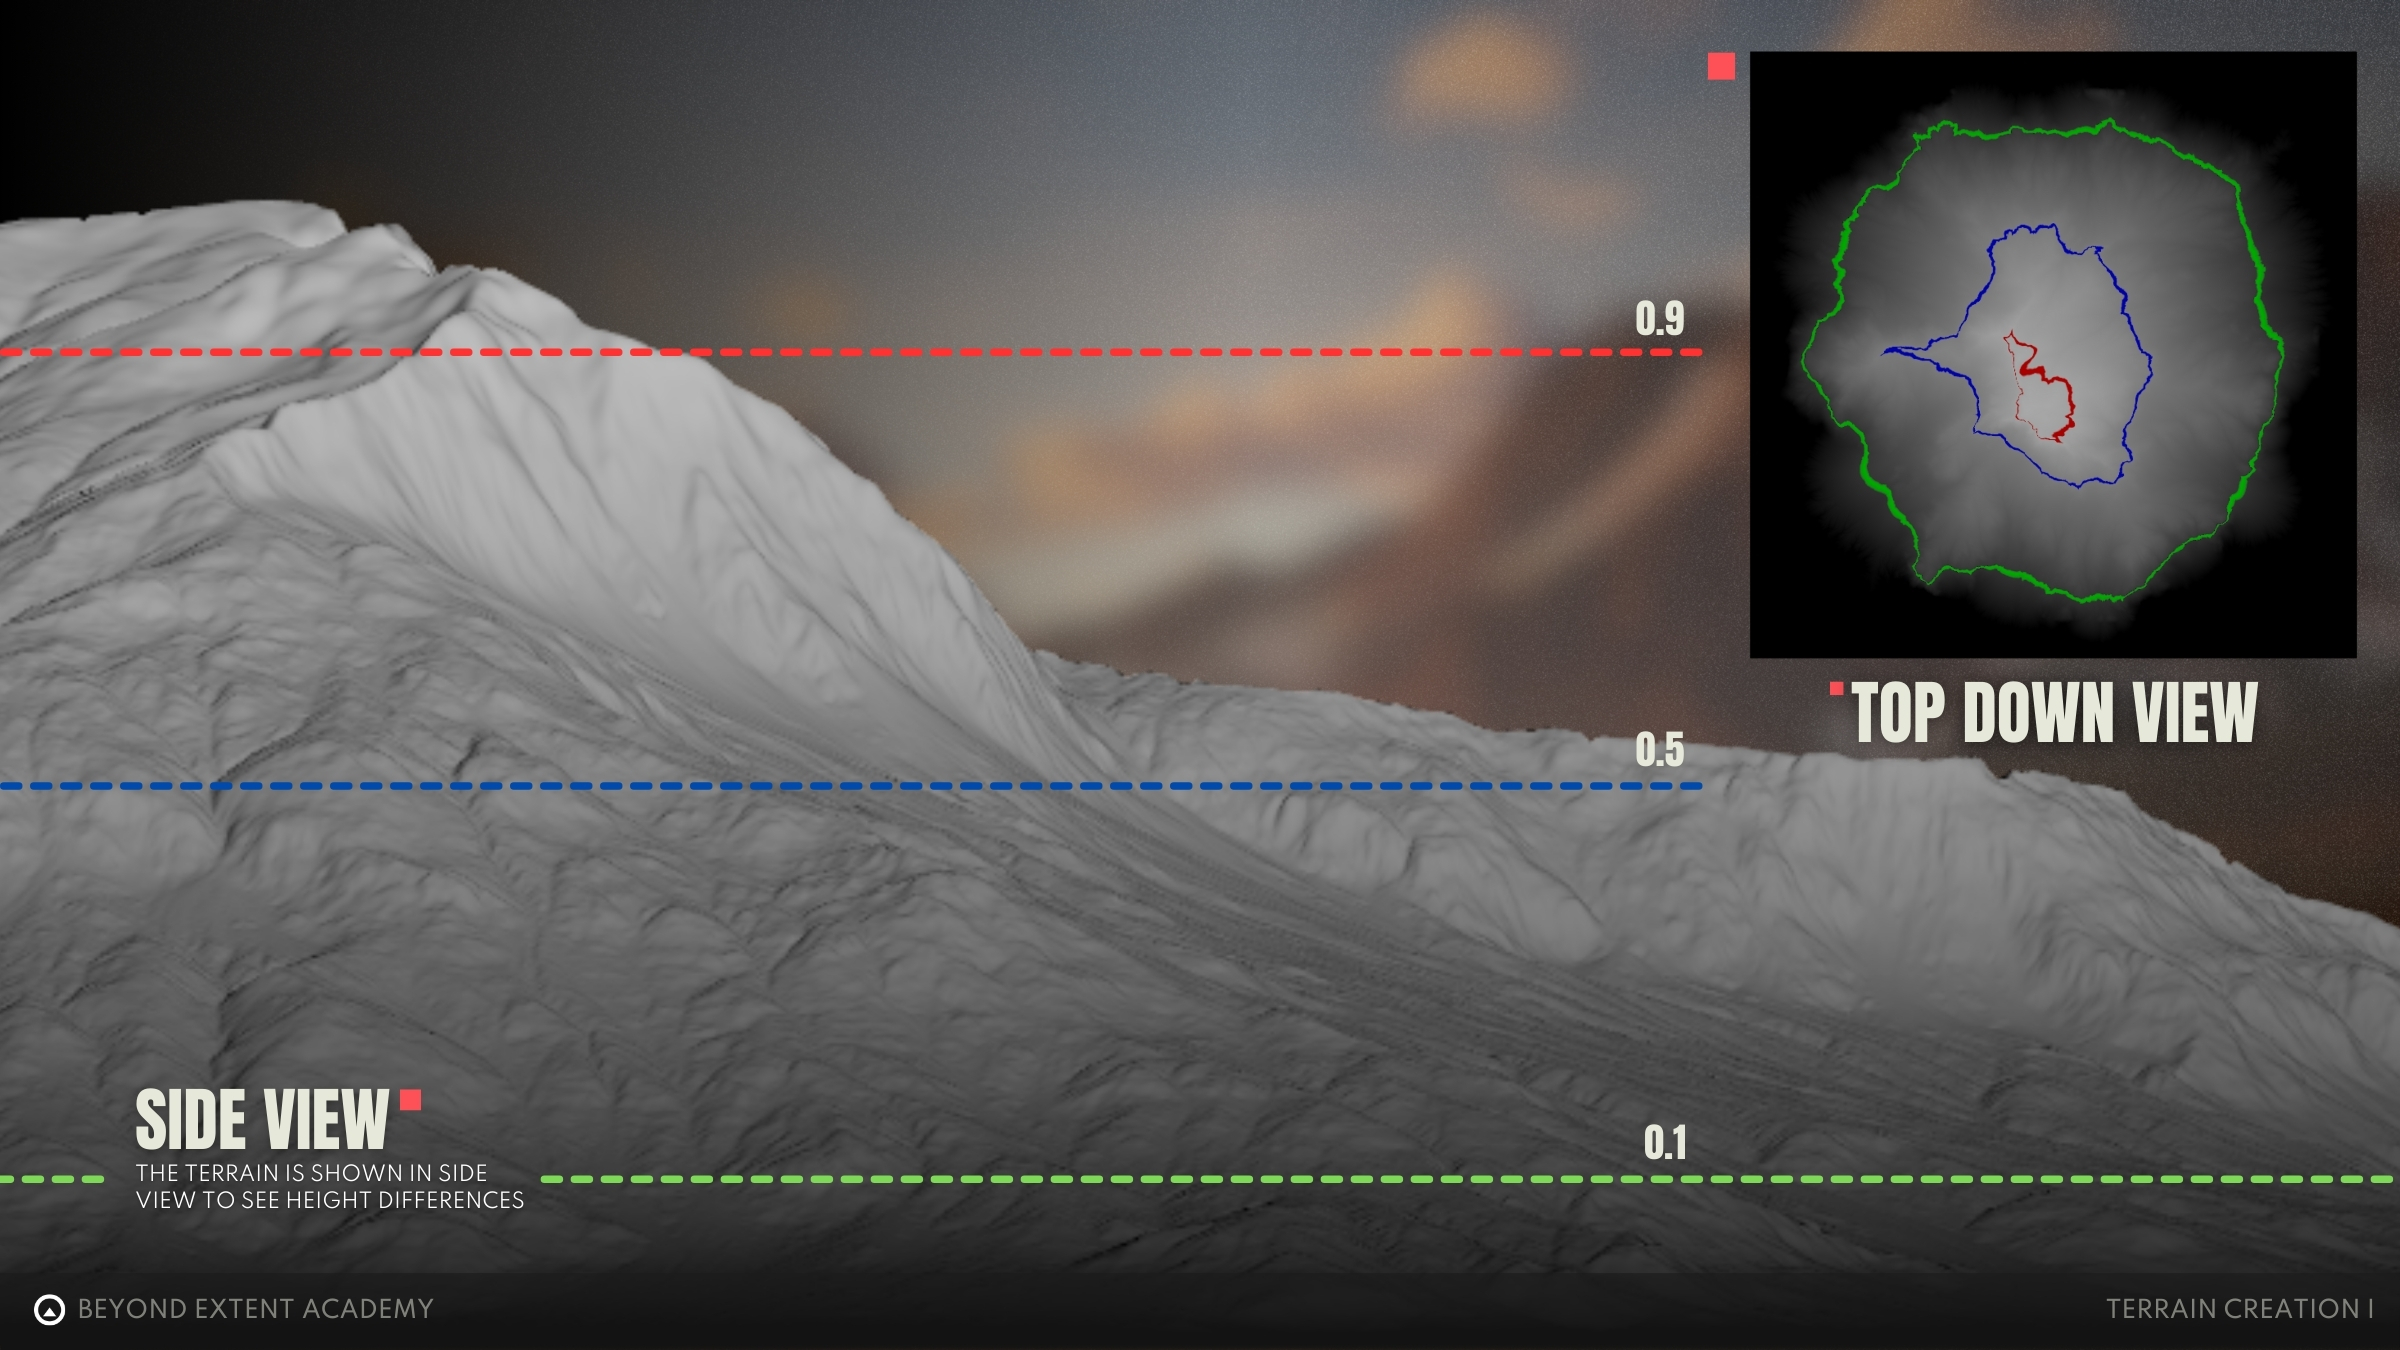
- Multiplying the black-and-white values by a maximum height gives us a 3D heightfield.
Certain black-and-white values have been colorized for visualization;
Green represents 0.1
Blue represents 0.5
Red represents 0.9
WHAT IS THE LIMIT?
Terrain has some limitations. Before diving in, it's important to know what heightfields can and can't do!
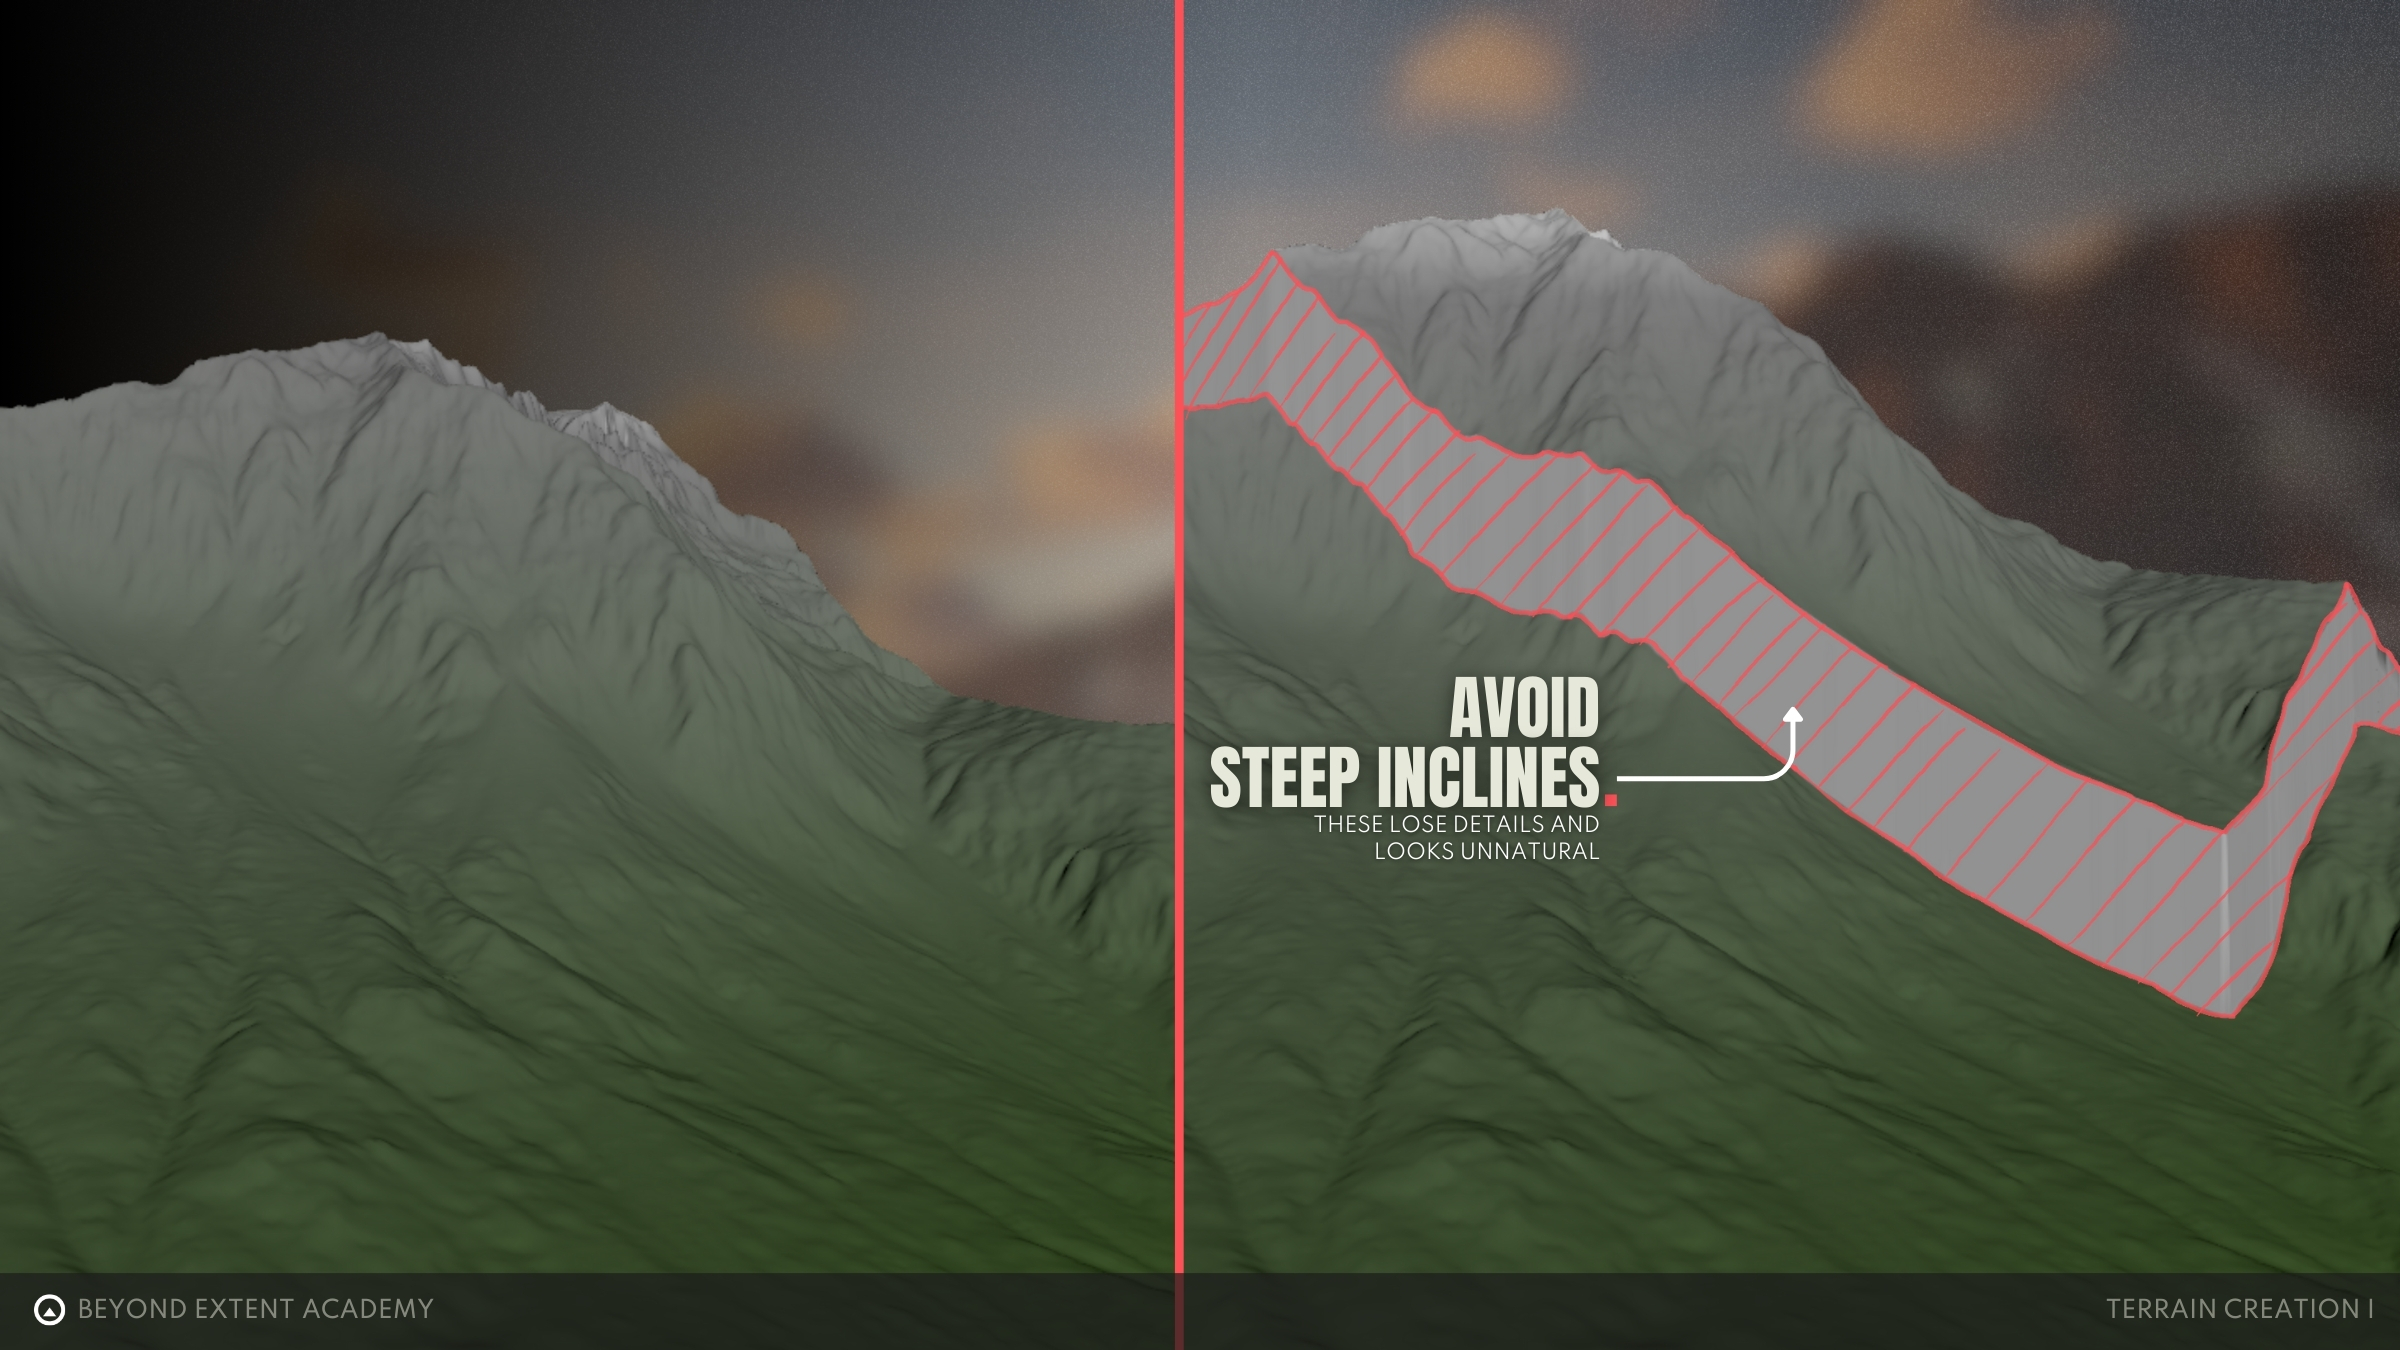
Detail vs. Vertical Displacement
Steep inclines can be tricky—they tend to lose a lot of detail, which can make your terrain look unnatural or low-res. While you can cover steep inclines up with extra geometry and by using methods such as applying cliff meshes, it takes a lot of additional effort. As we're sticking to the basics, we'll be avoiding steep inclines!
Negative Spaces
Overhanging cliffs and other complex geological formations don’t play nice with traditional heightfields. Since heightfields rely on a top-down structure, they can’t naturally support negative spaces like arches or overhangs. Trying to force them in will lead to messy topology and potential issues down the line.

Playable Space
When designing terrain, it’s best to avoid surface features that block player movement or interfere with key environment assets. Instead, the layout should support gameplay goals and objectives. Some game engines even come with built-in tools to help refine playable spaces and keep things running smoothly.
Product of Squares
Standard textures follow the "power of two" resolution scale, like 1024x1024 or 2048x2048. However, some programs — like Unreal Engine — require specific unique formats for heightmaps, such as 2017x2017, 4033x4033, and 8129x8129. Super important to remember this!
UI OVERVIEW
Gaea has a surprisingly small yet powerful toolset, making it easy to dive into. The nodes themselves are pretty straightforward, and each tool has a clear purpose. Knowing when and how to use them is key. However, the properties can get a bit overwhelming at times! Let's get into it.
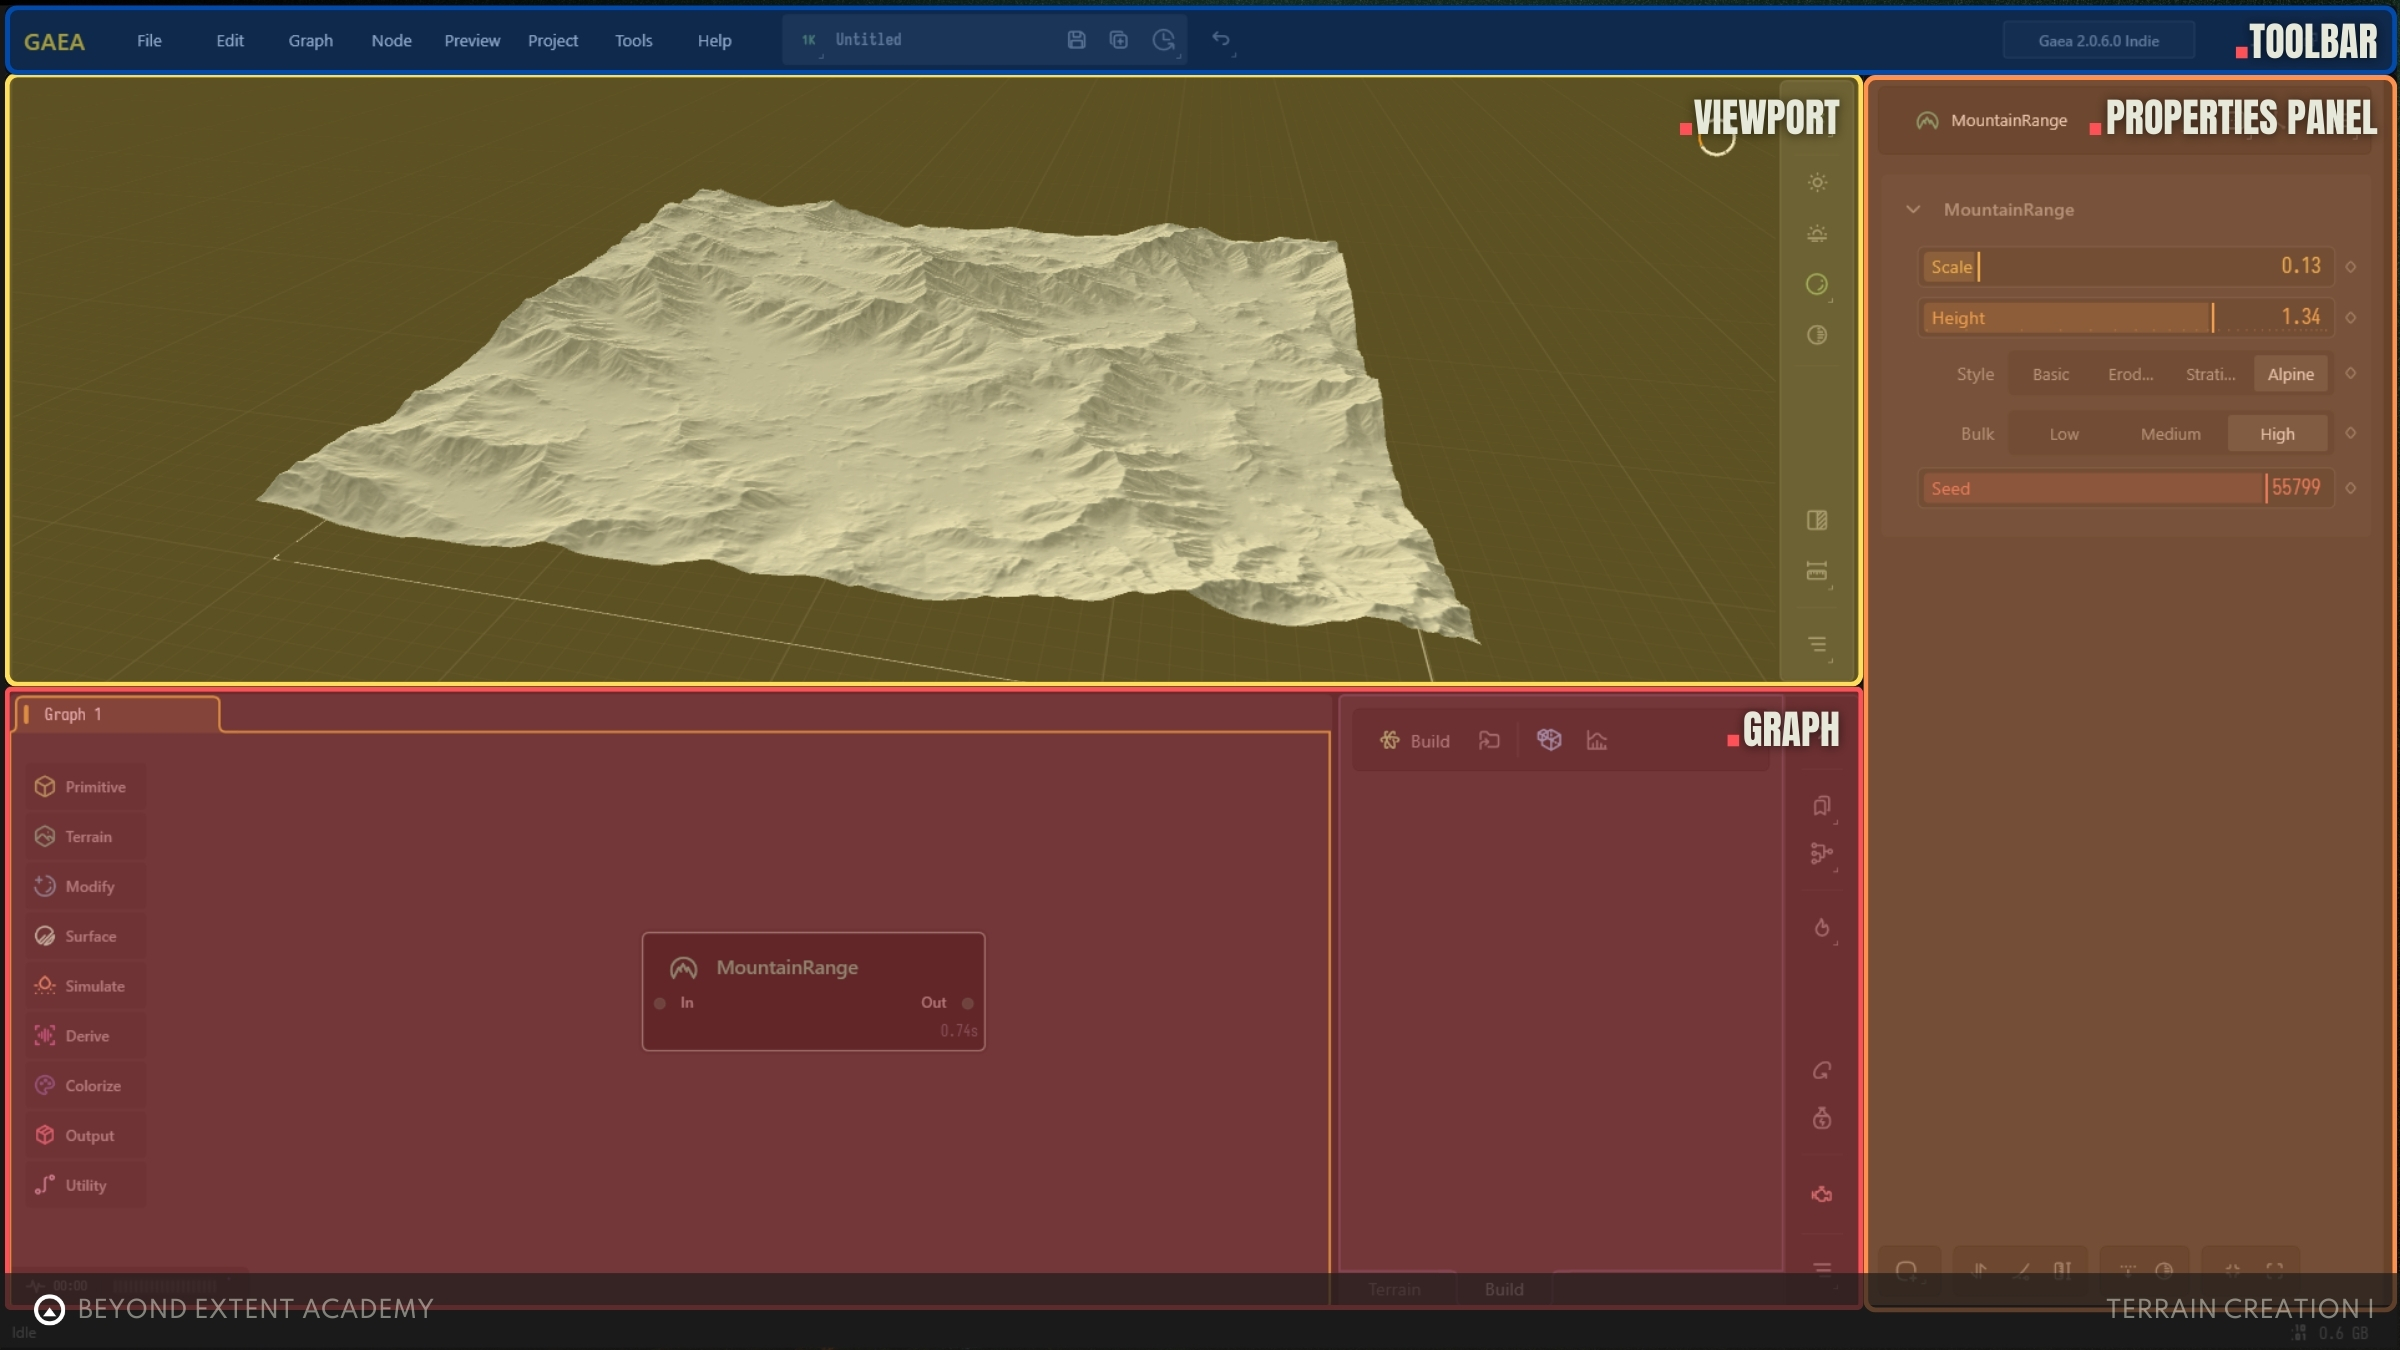
- TOOLBAR
At the top of Gaea’s UI is the toolbar which primarily grants access to file functions and Gaea settings. - VIEWPORT
The viewport helps you visualize your terrain components as you build the graph. - GRAPH
The graph is the core of Gaea where you will be linking various nodes together to assemble your terrain. - PROPERTIES PANEL
The properties panel allows you to edit the parameters on each node in your graph. When you select a node, its properties will be visible here.
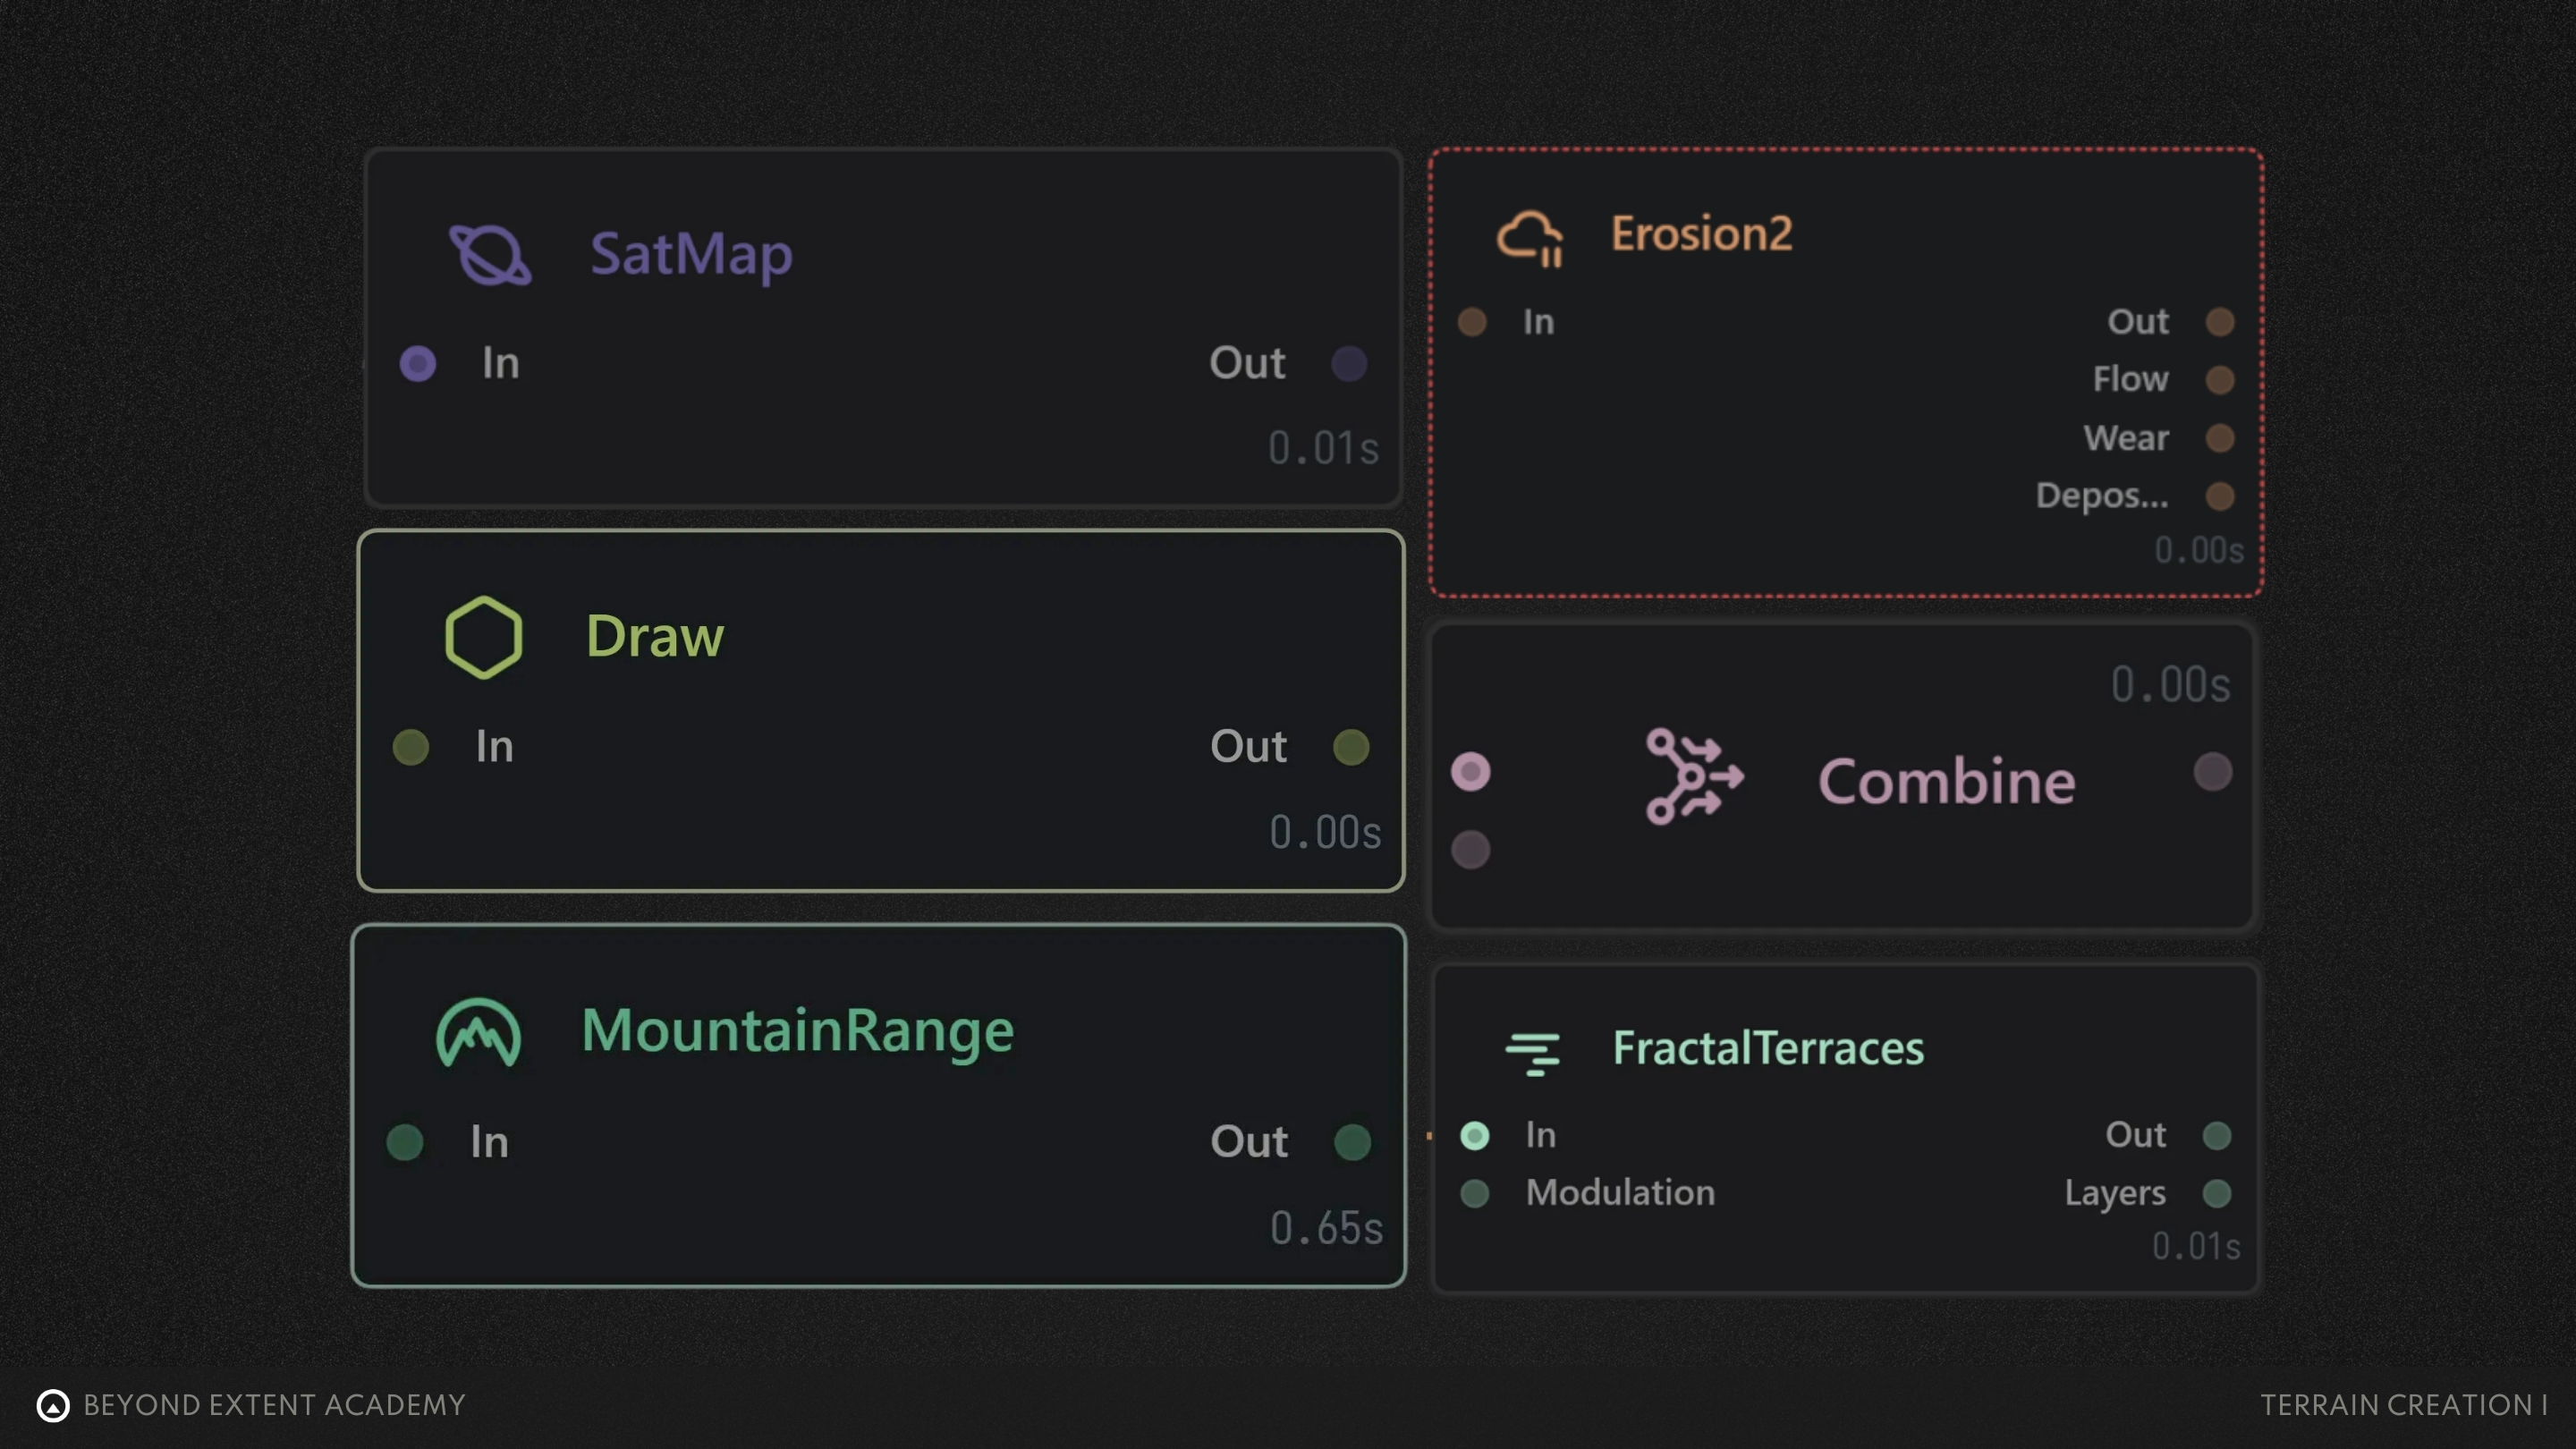
DESCRIBING NODES AND TOOLS
Node Categories
There are plenty of different types of nodes to work with! The ones that we will be working with in this lesson are the following:
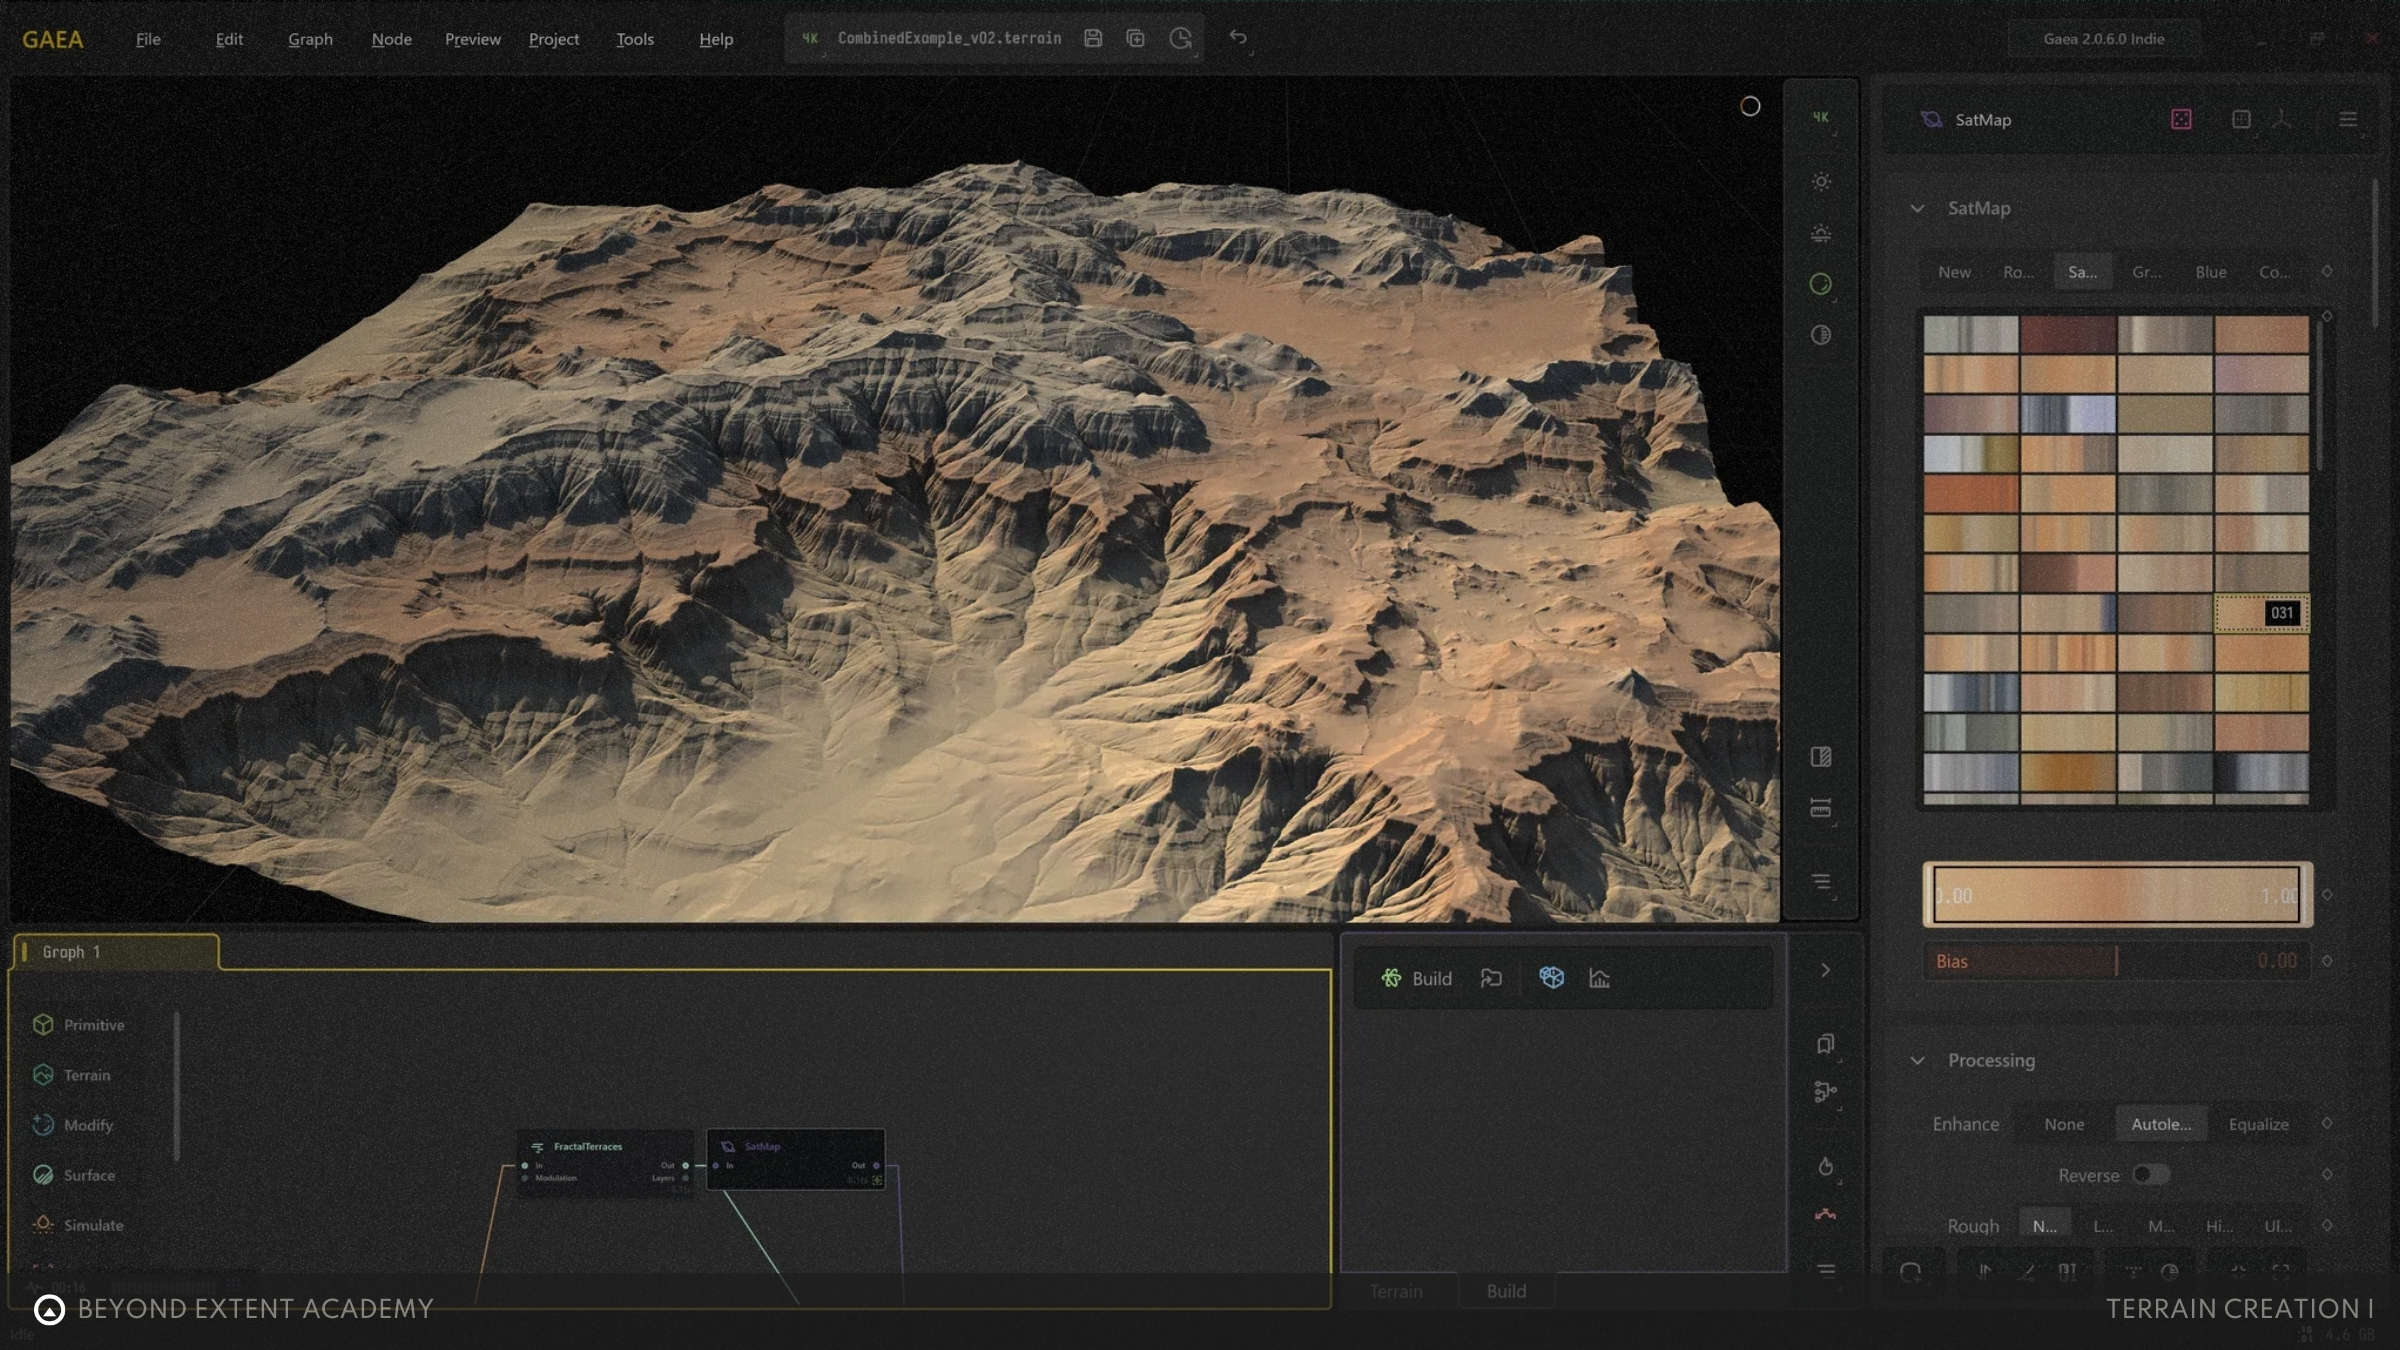
VISUALIZING TEXTURES IN GAEA
Textures bring a terrain to life, highlighting depth, detail, and realism in a way that isn't as prominent in a greyscale scene. For this reason, it can be useful to visualize textures within Gaea! While some people may skip this altogether, it’s nifty to know the methods Gaea provides when it comes to visualizing your terrain textures.
If you’re interested in learning how to use SAT maps to visualize textures in Gaia, be sure to follow along Exercise 3, in the exercise portion of the lesson!
Now that we’ve got down some theory, let’s get some hands on experience! Follow along with these exercises to learn how to apply what we’ve learned and familiarize yourself with Gaea!
exercise

Creating an Alpine Range

overview
Let’s take a guided look into Gaea 2.0 and create our first heightfield! Using Gaea’s nodes and tools, we’ll make an alpine mountain range!
lesson example content
Get into it instantly by downloading the starter content for this lesson
download lesson contentexercise
Creating a Desert Canyon
overview
lesson example content
Get into it instantly by downloading the starter content for this lesson
download lesson contentexercise
Combining biomes into one Heightfield
overview
lesson example content
Get into it instantly by downloading the starter content for this lesson
download lesson contentEXPORTING AND IMPORTING INTO UNREAL ENGINE
It’s the grand finale! Now you’ve made your heightfield and you’re ready to take it from Gaea into your game engine — let’s get into it, step by step.
There are two methods for exporting:
- Method 1 is the traditional method that will work with most software and tools, applicable to Gaea versions earlier than 2.0.
- Method 2 will utilize the ‘Gaea 2 Unreal’ plugin for Gaea 2.0
💡As mentioned in the video, Unreal Engine’s landscape technical guide might come in handy!
Unreal Engine's Landscape Technical Guide
EXPORTING WITHOUT PLUGIN
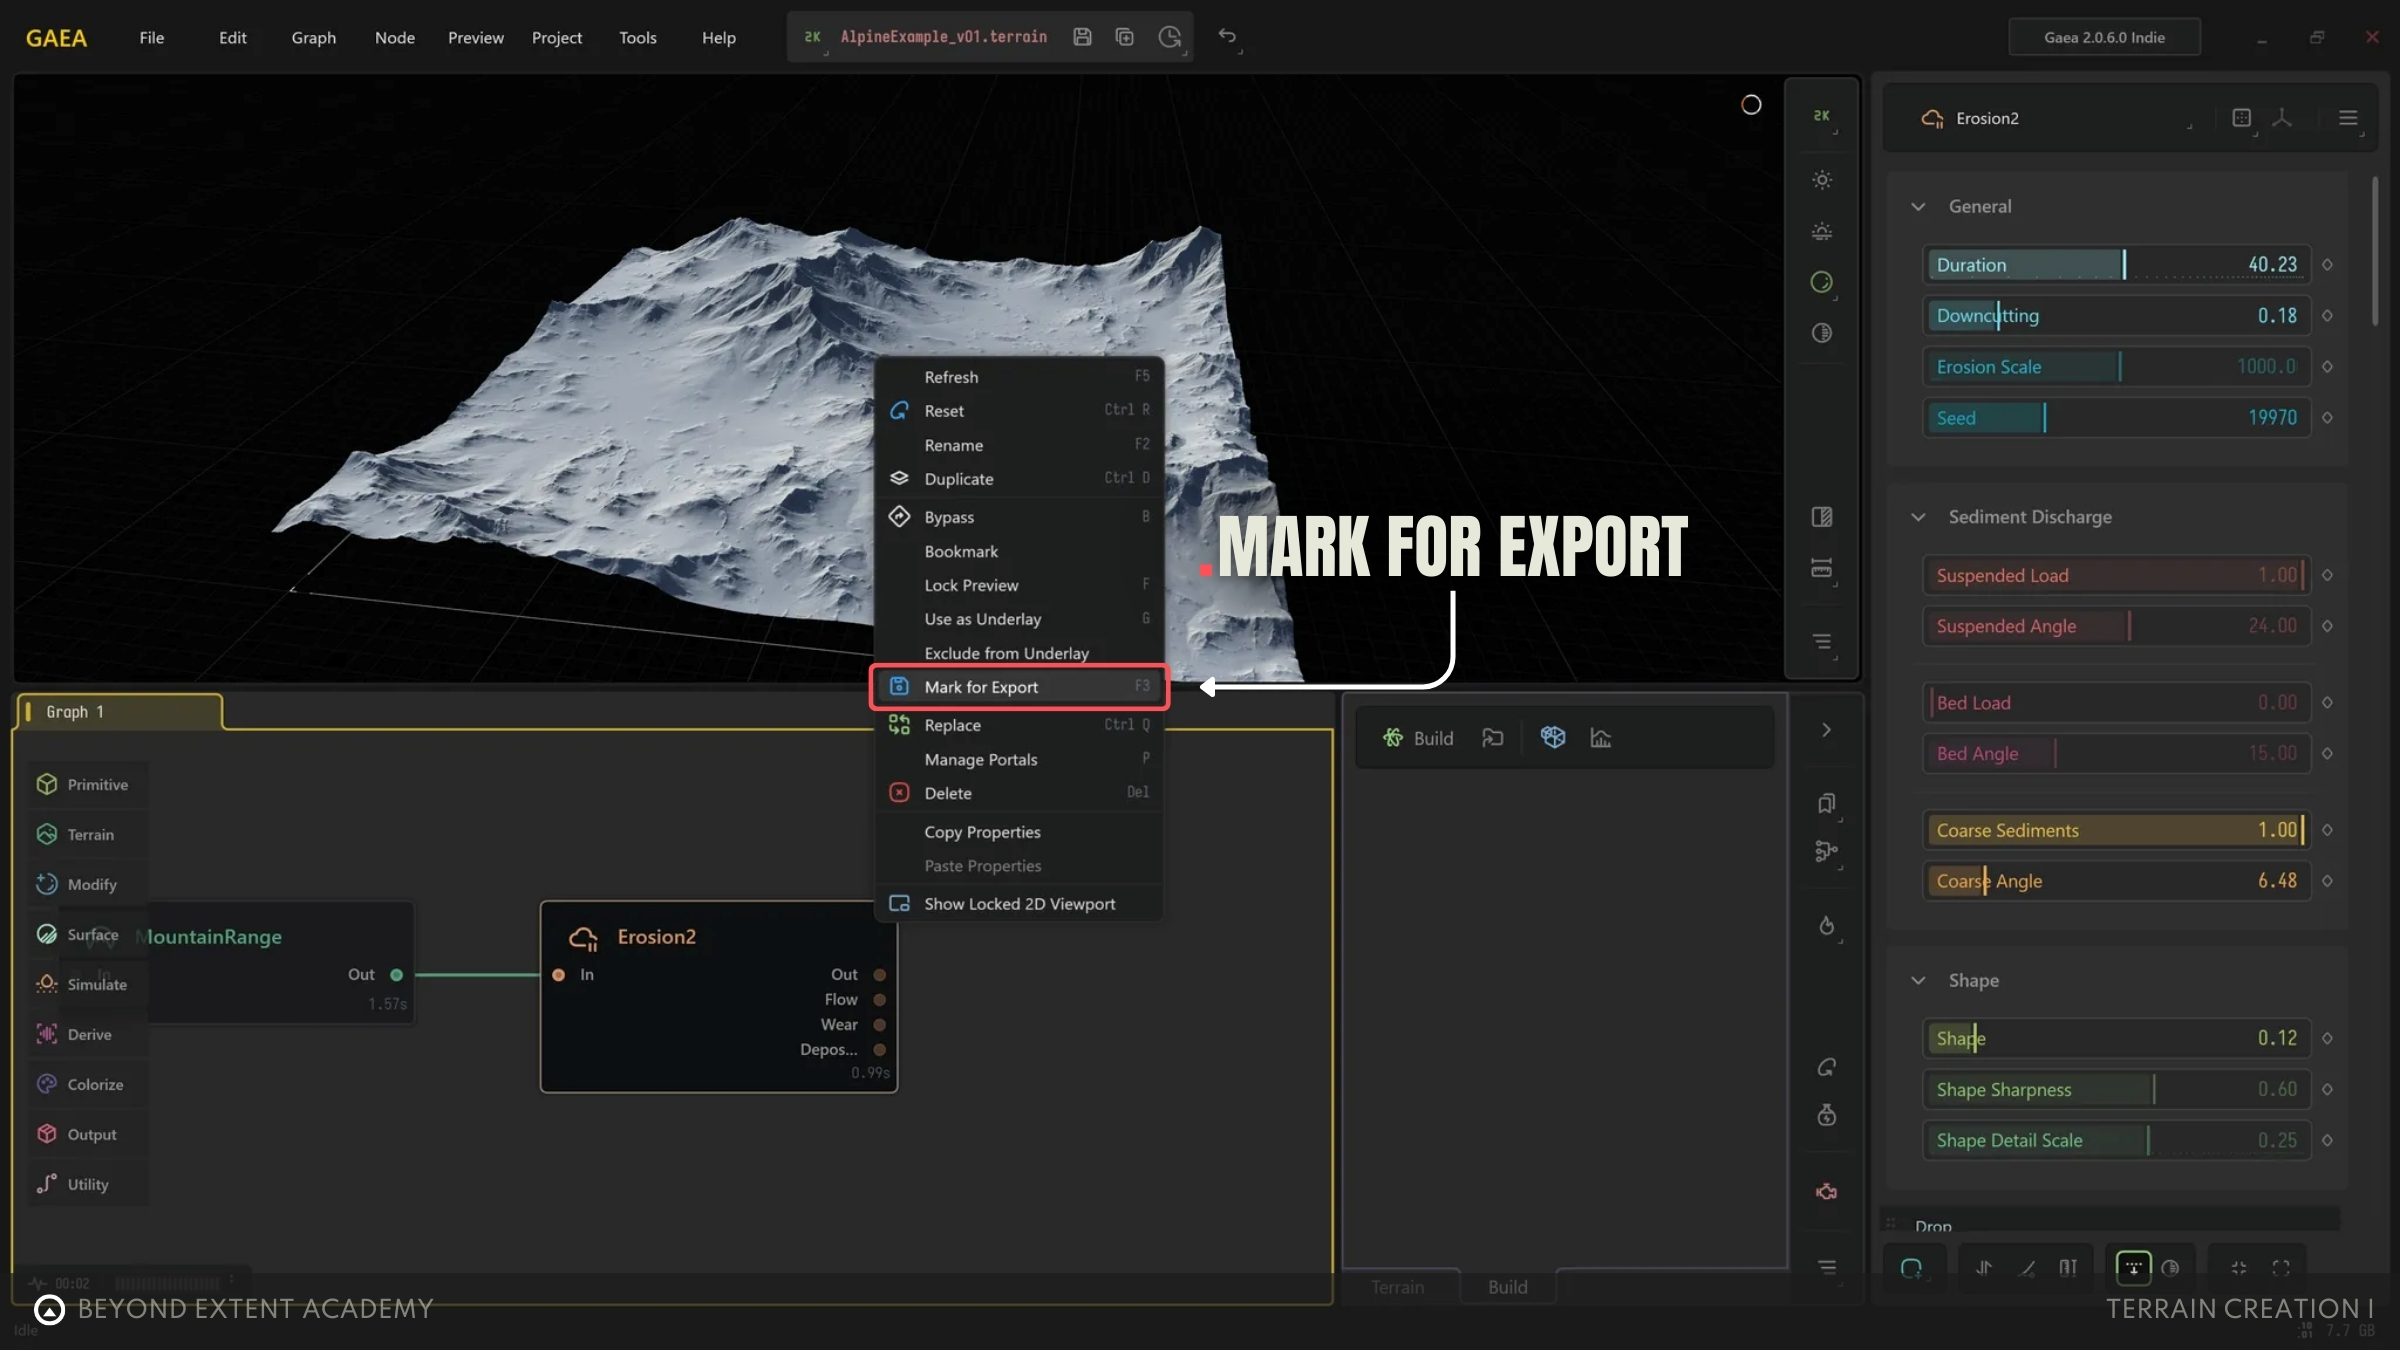
Marking for Export
Before you can export a heightmap in Gaea, you need to tell the program which end node you want to save. Luckily, it’s super simple! Just select your desired node and hit F3 on your keyboard, or right-click it and choose "Mark for Export." That’s it — your node is now ready to be processed and exported!
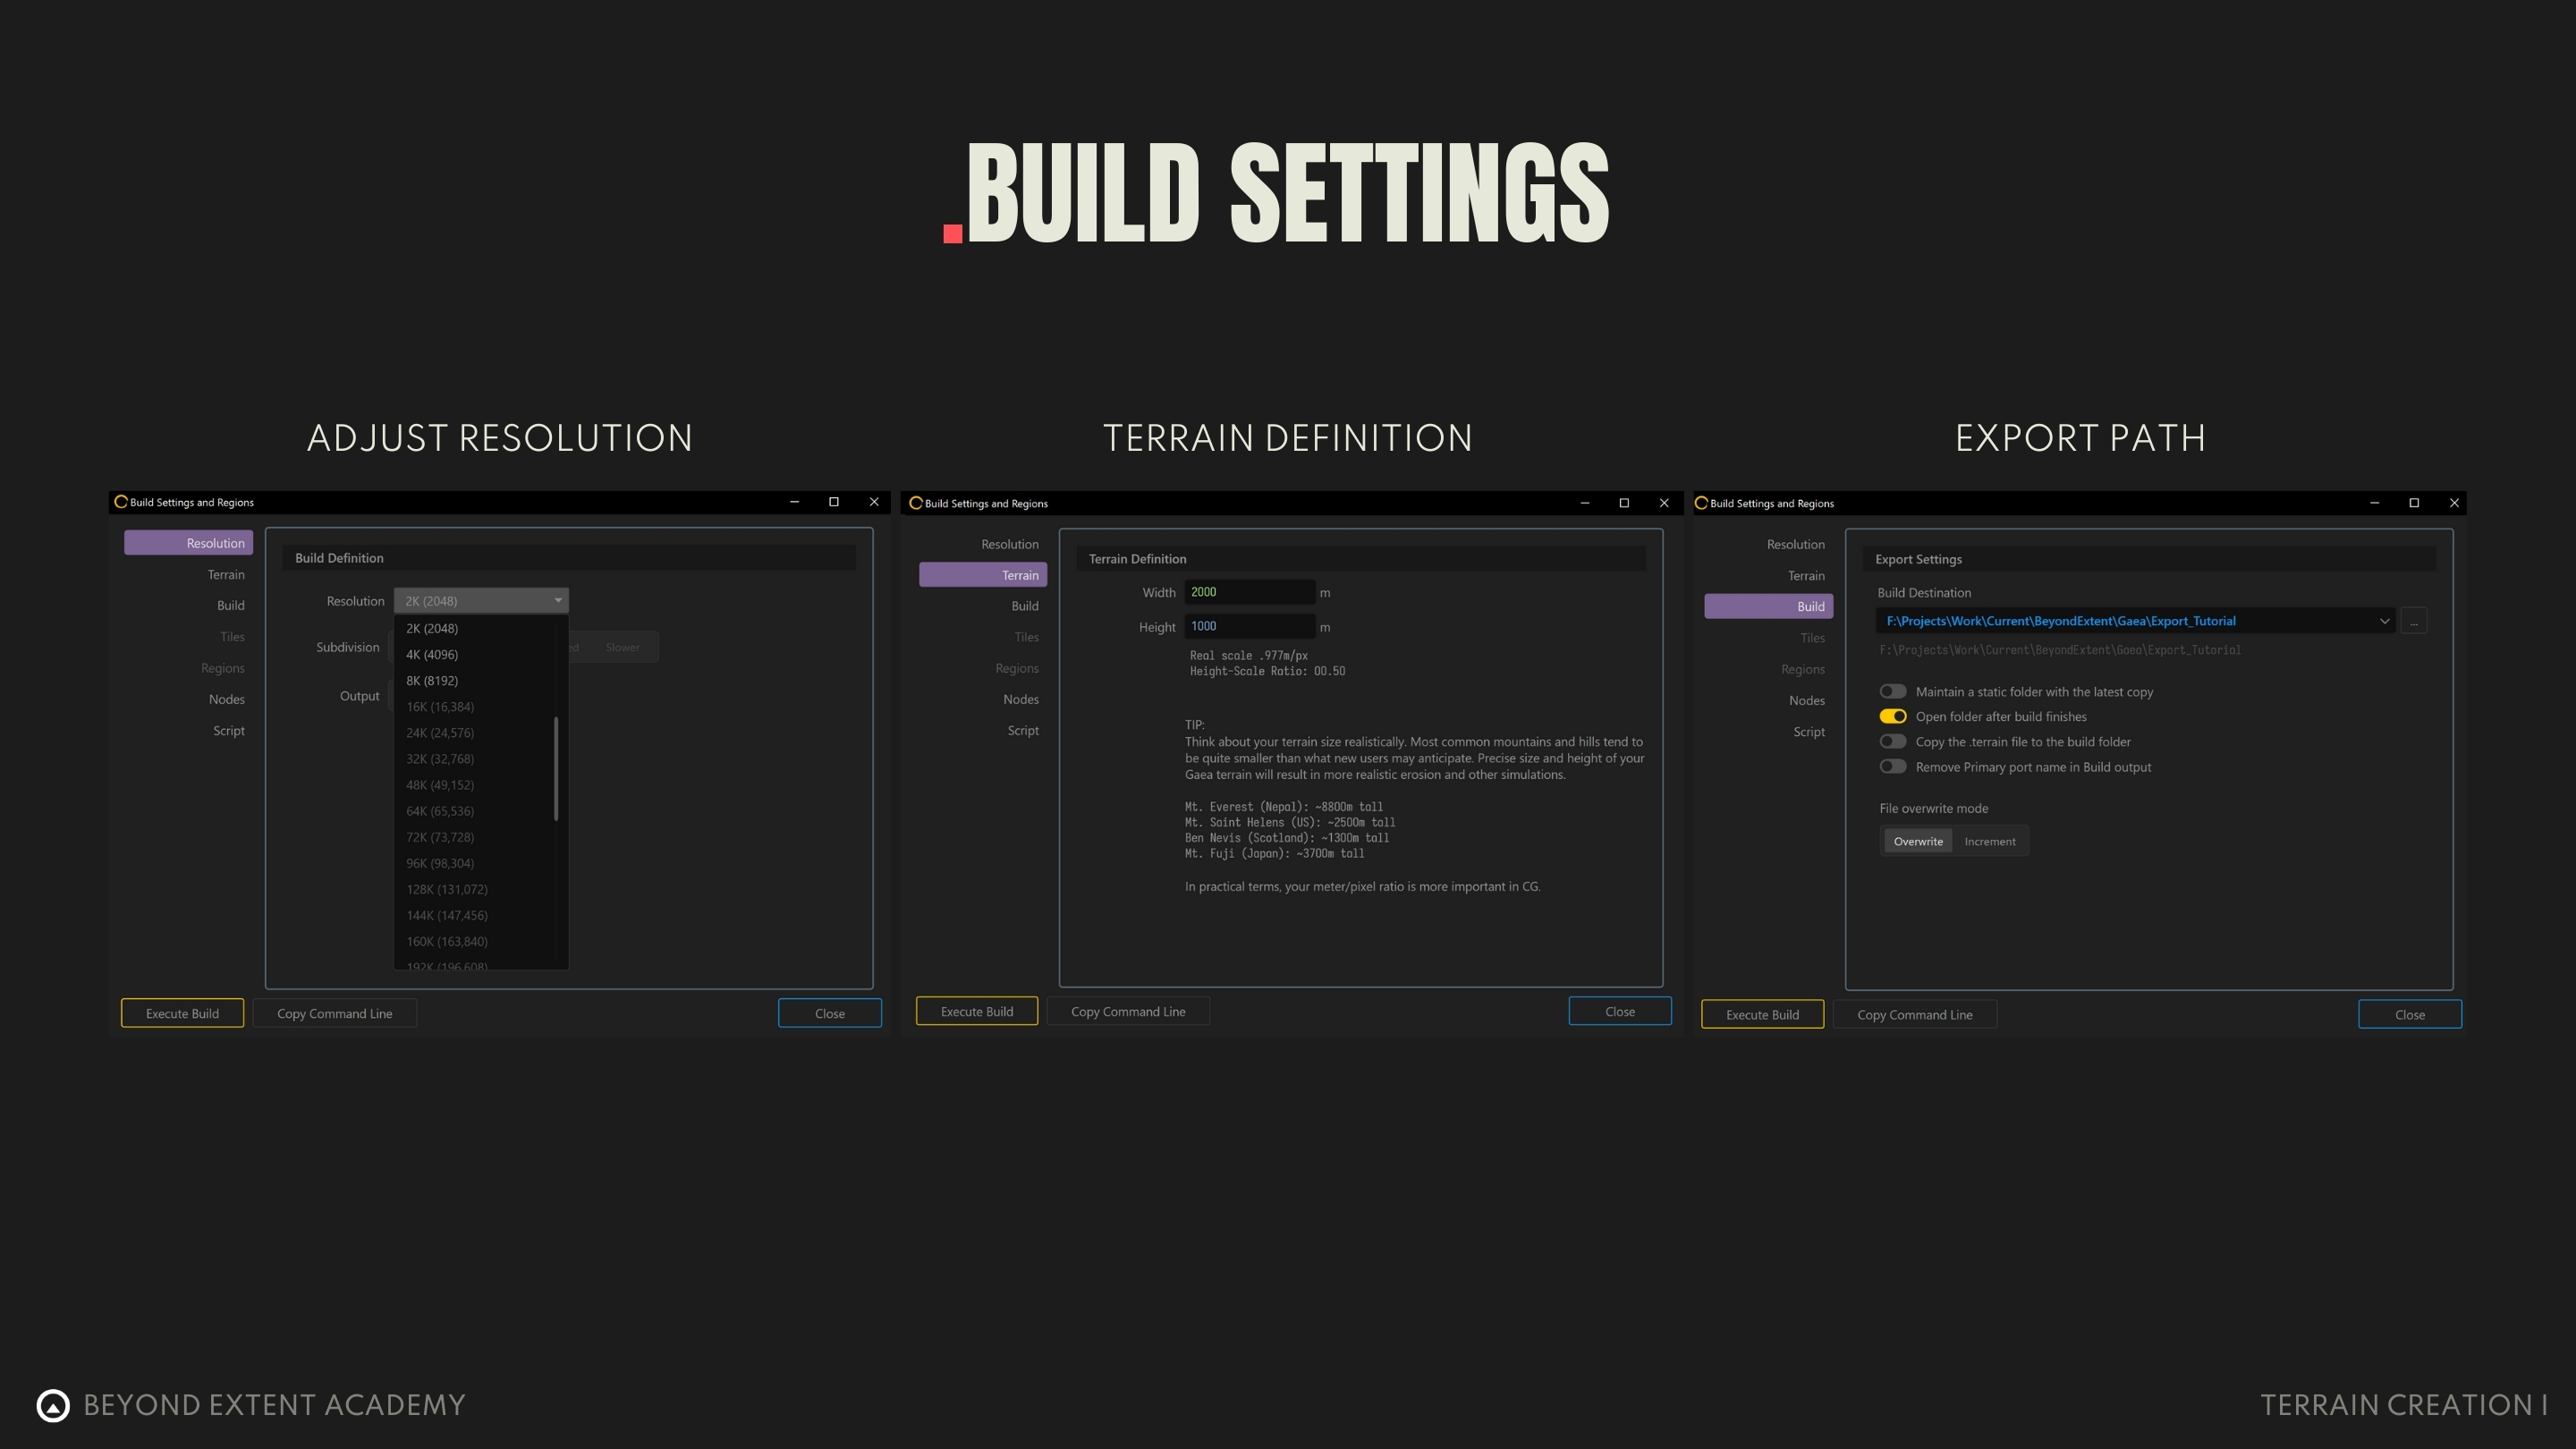
Build Settings
To open your Build Settings in Gaea, just press CTRL + B on your keyboard. You can also find it in the Build tab on the right side of the node graph or in the main toolbar under Project > Build Settings. Once you're in, you’ll be able to tweak your resolution, set your export path, and fine-tune your final output.

Inside the Build Settings, you can adjust the resolution, export path, and terrain definition. For Method 1, terrain definition only tells Gaea how erosion should be simulated on your terrain. Once you're happy with the settings, hit ‘Execute Build’ to start the export process!
IMPORTING WITHOUT PLUGIN
Switch to Landscape Mode! On the top left in the default UE5 UI layout you will find a dropdown menu allowing you to switch from Selection Mode to Landscape Mode.

After switching to Landscape Mode, use the left sidebar to tweak your import settings. For the first import, go to Manage > New > Import from File to load your heightmap. Once selected, adjust the import settings based on your image resolution and Unreal Engine’s Landscape Technical Guide for the best results.
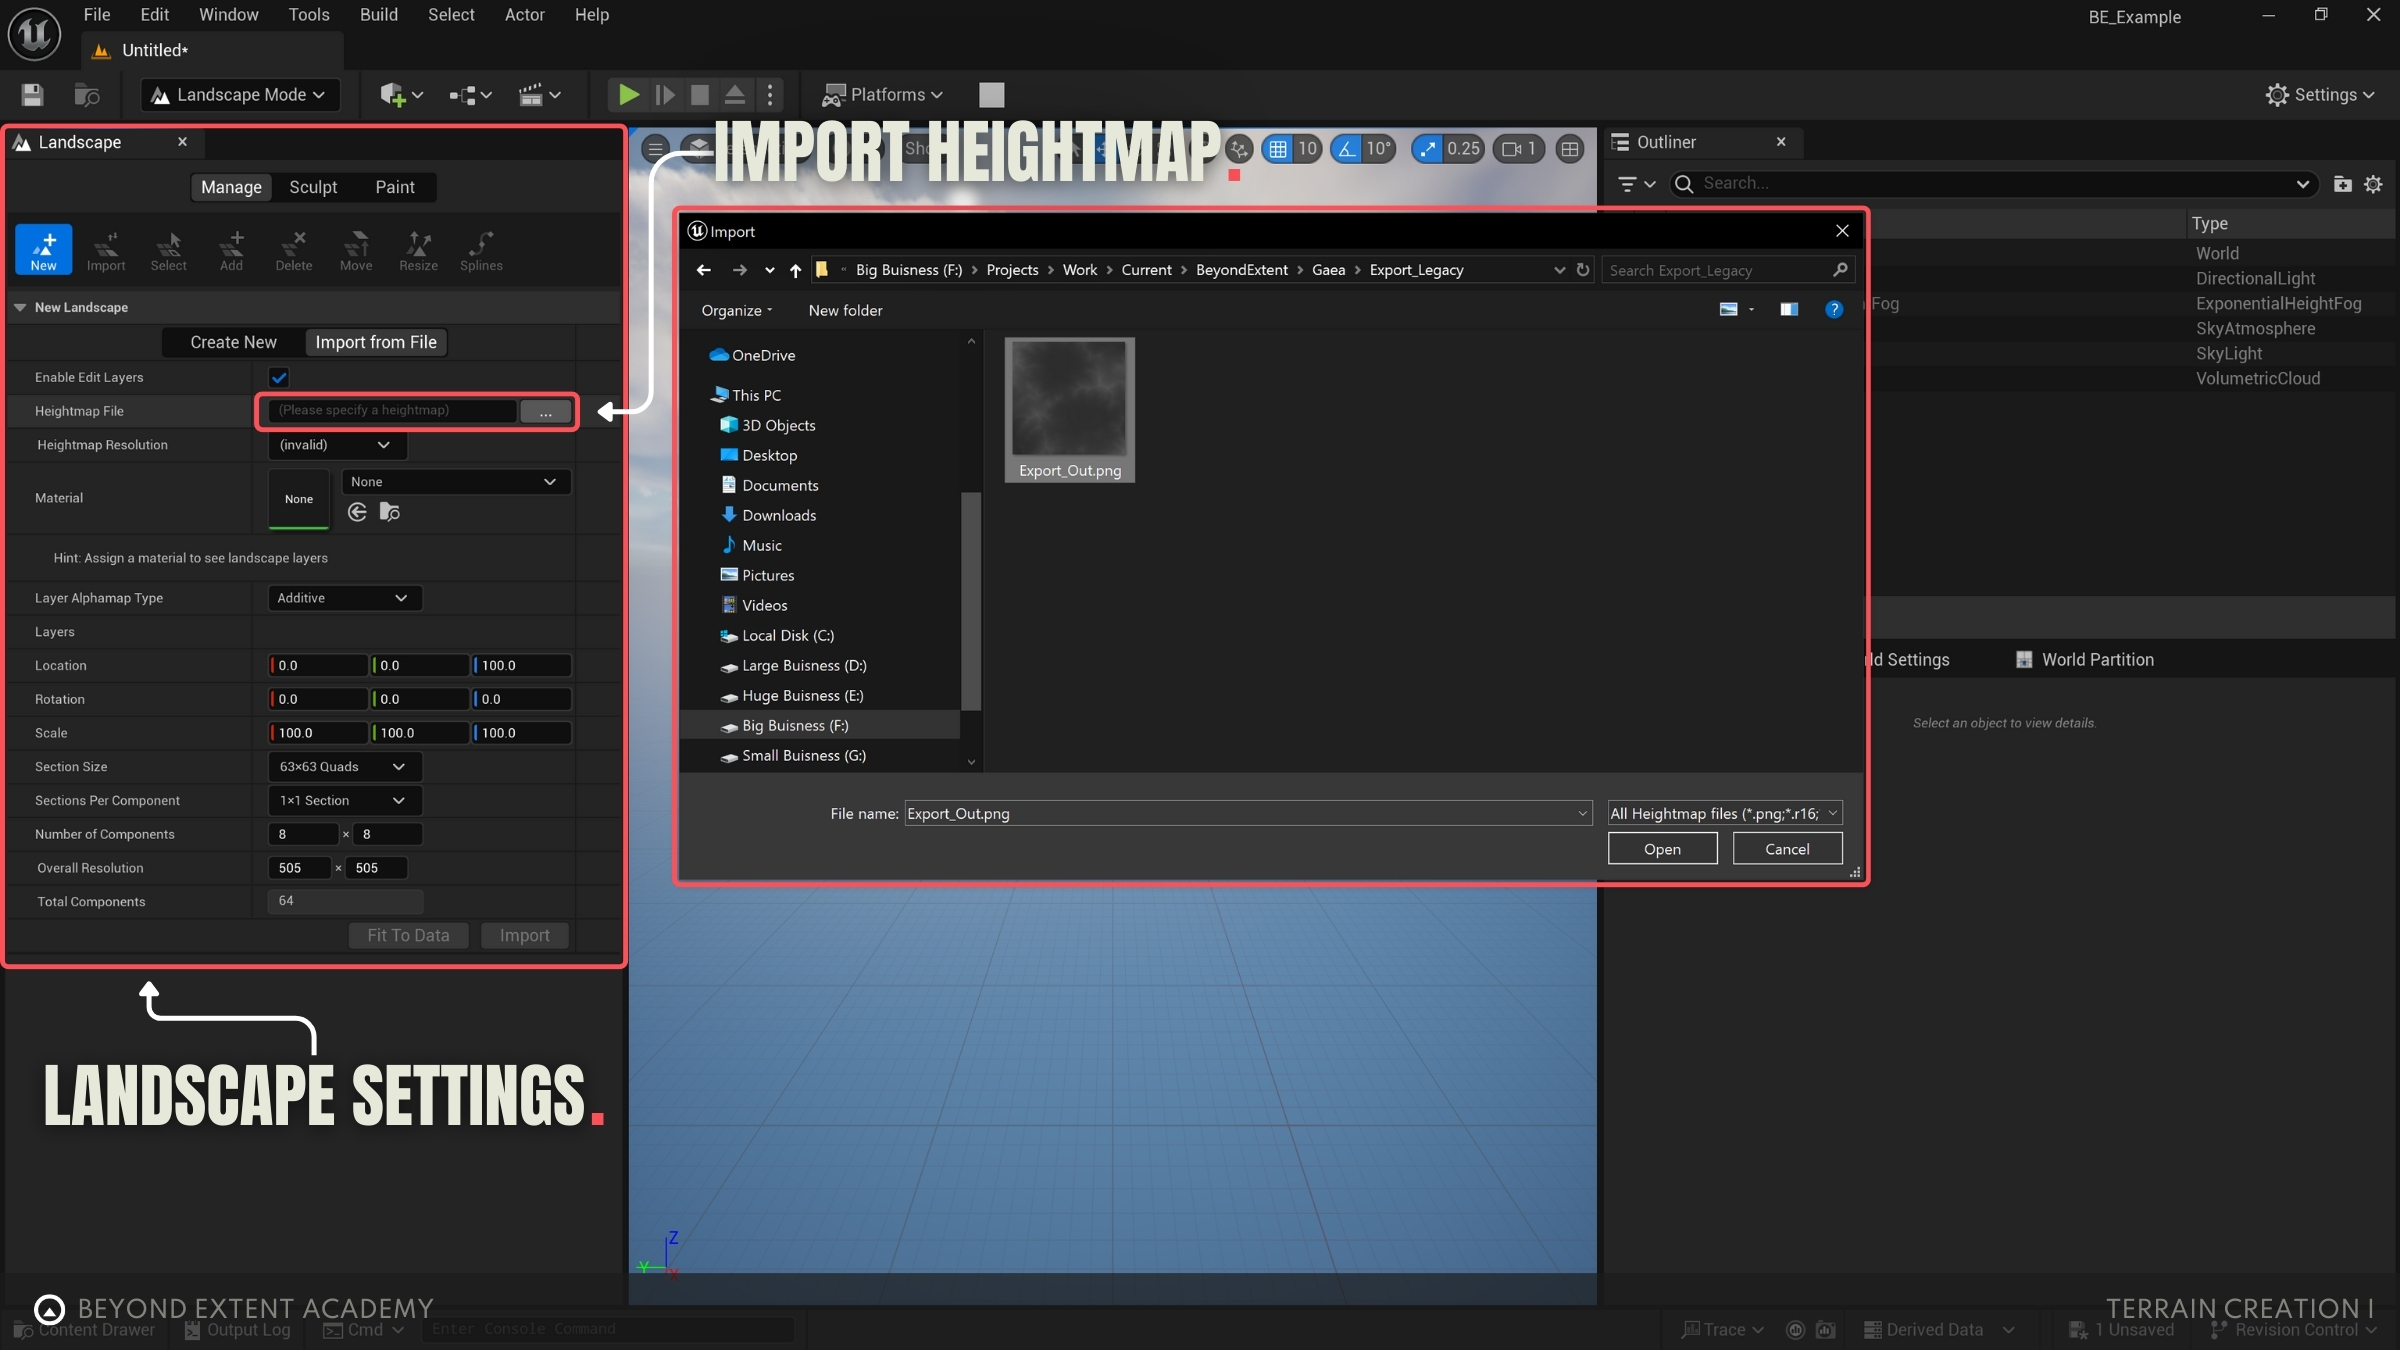
After finalizing your import settings, click Import, and Unreal will generate terrain according to your heightmap and adjustments!
EXPORTING WITH PLUGIN
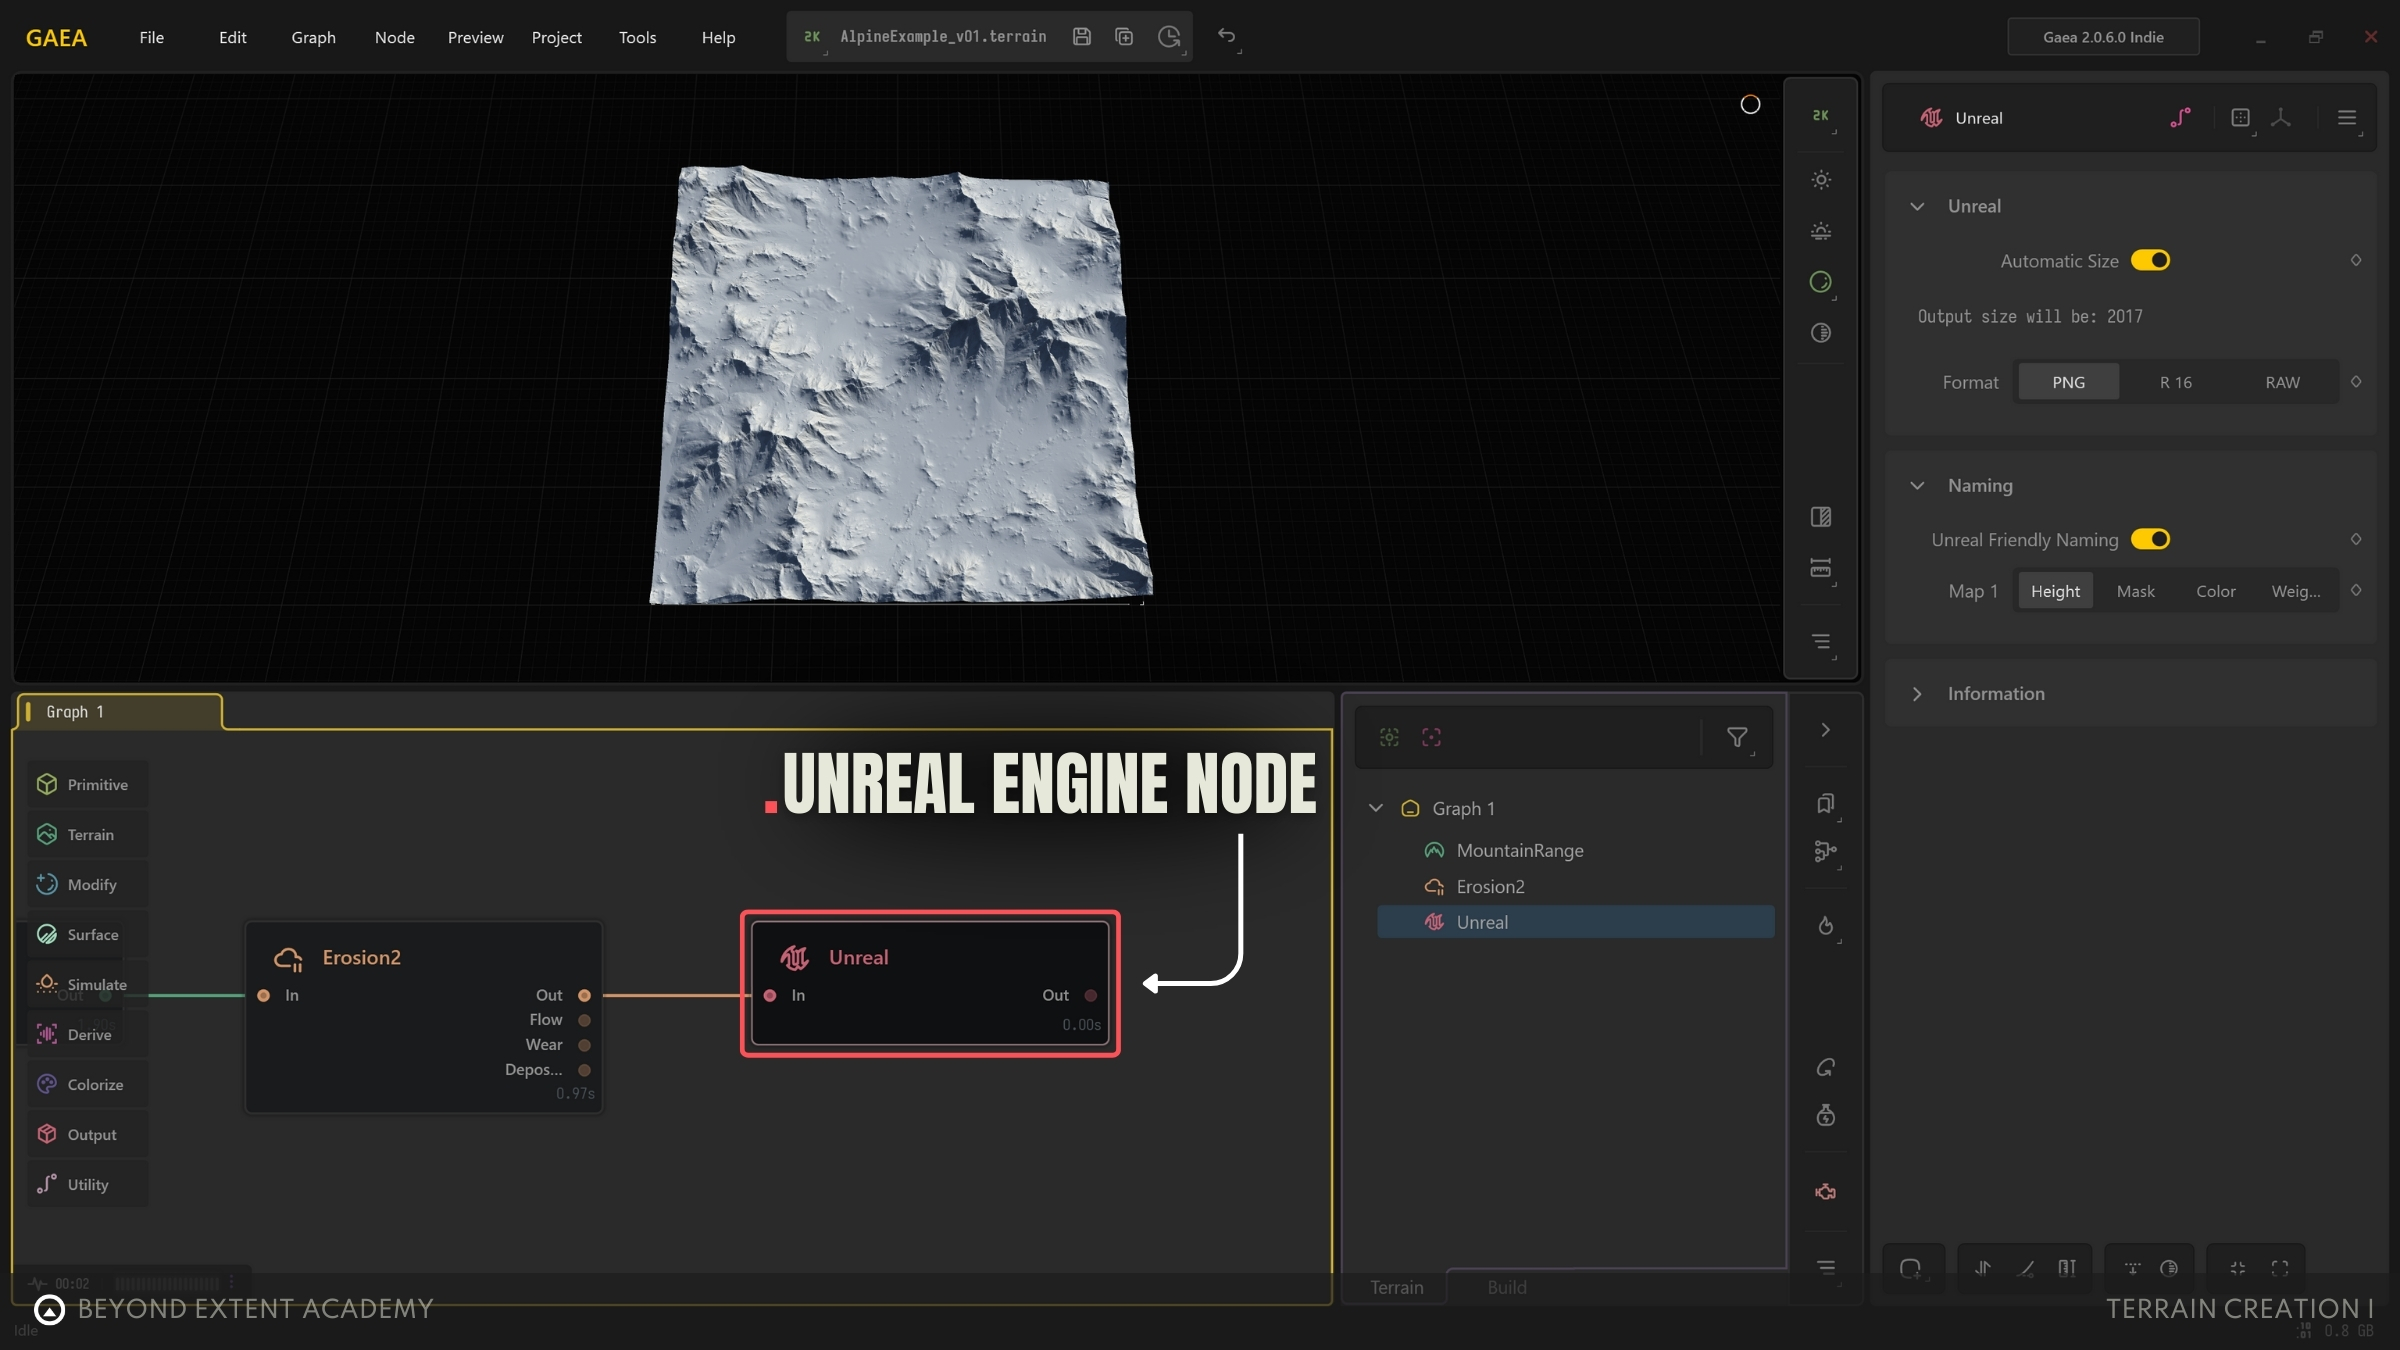
Unreal Node
When using the Unreal Node, simply add the node to the graph and wire your preferred node for exporting into the Unreal Node. With this method, we will not be marking anything for export as described in Method 1.
Build Settings
Pressing CTRL + B opens the Build Settings window, where you can tweak export parameters. You can also access it from the Build tab on the right of the node graph or via the main toolbar under Project > Build Settings.

In the Build Settings window, you can adjust the resolution, export path, and terrain definition. For this method, terrain definition not only affects how erosion is applied but also determines the terrain’s scale when imported into Unreal. Once you're happy with your settings, hit ‘Execute Build’ to start the export process.
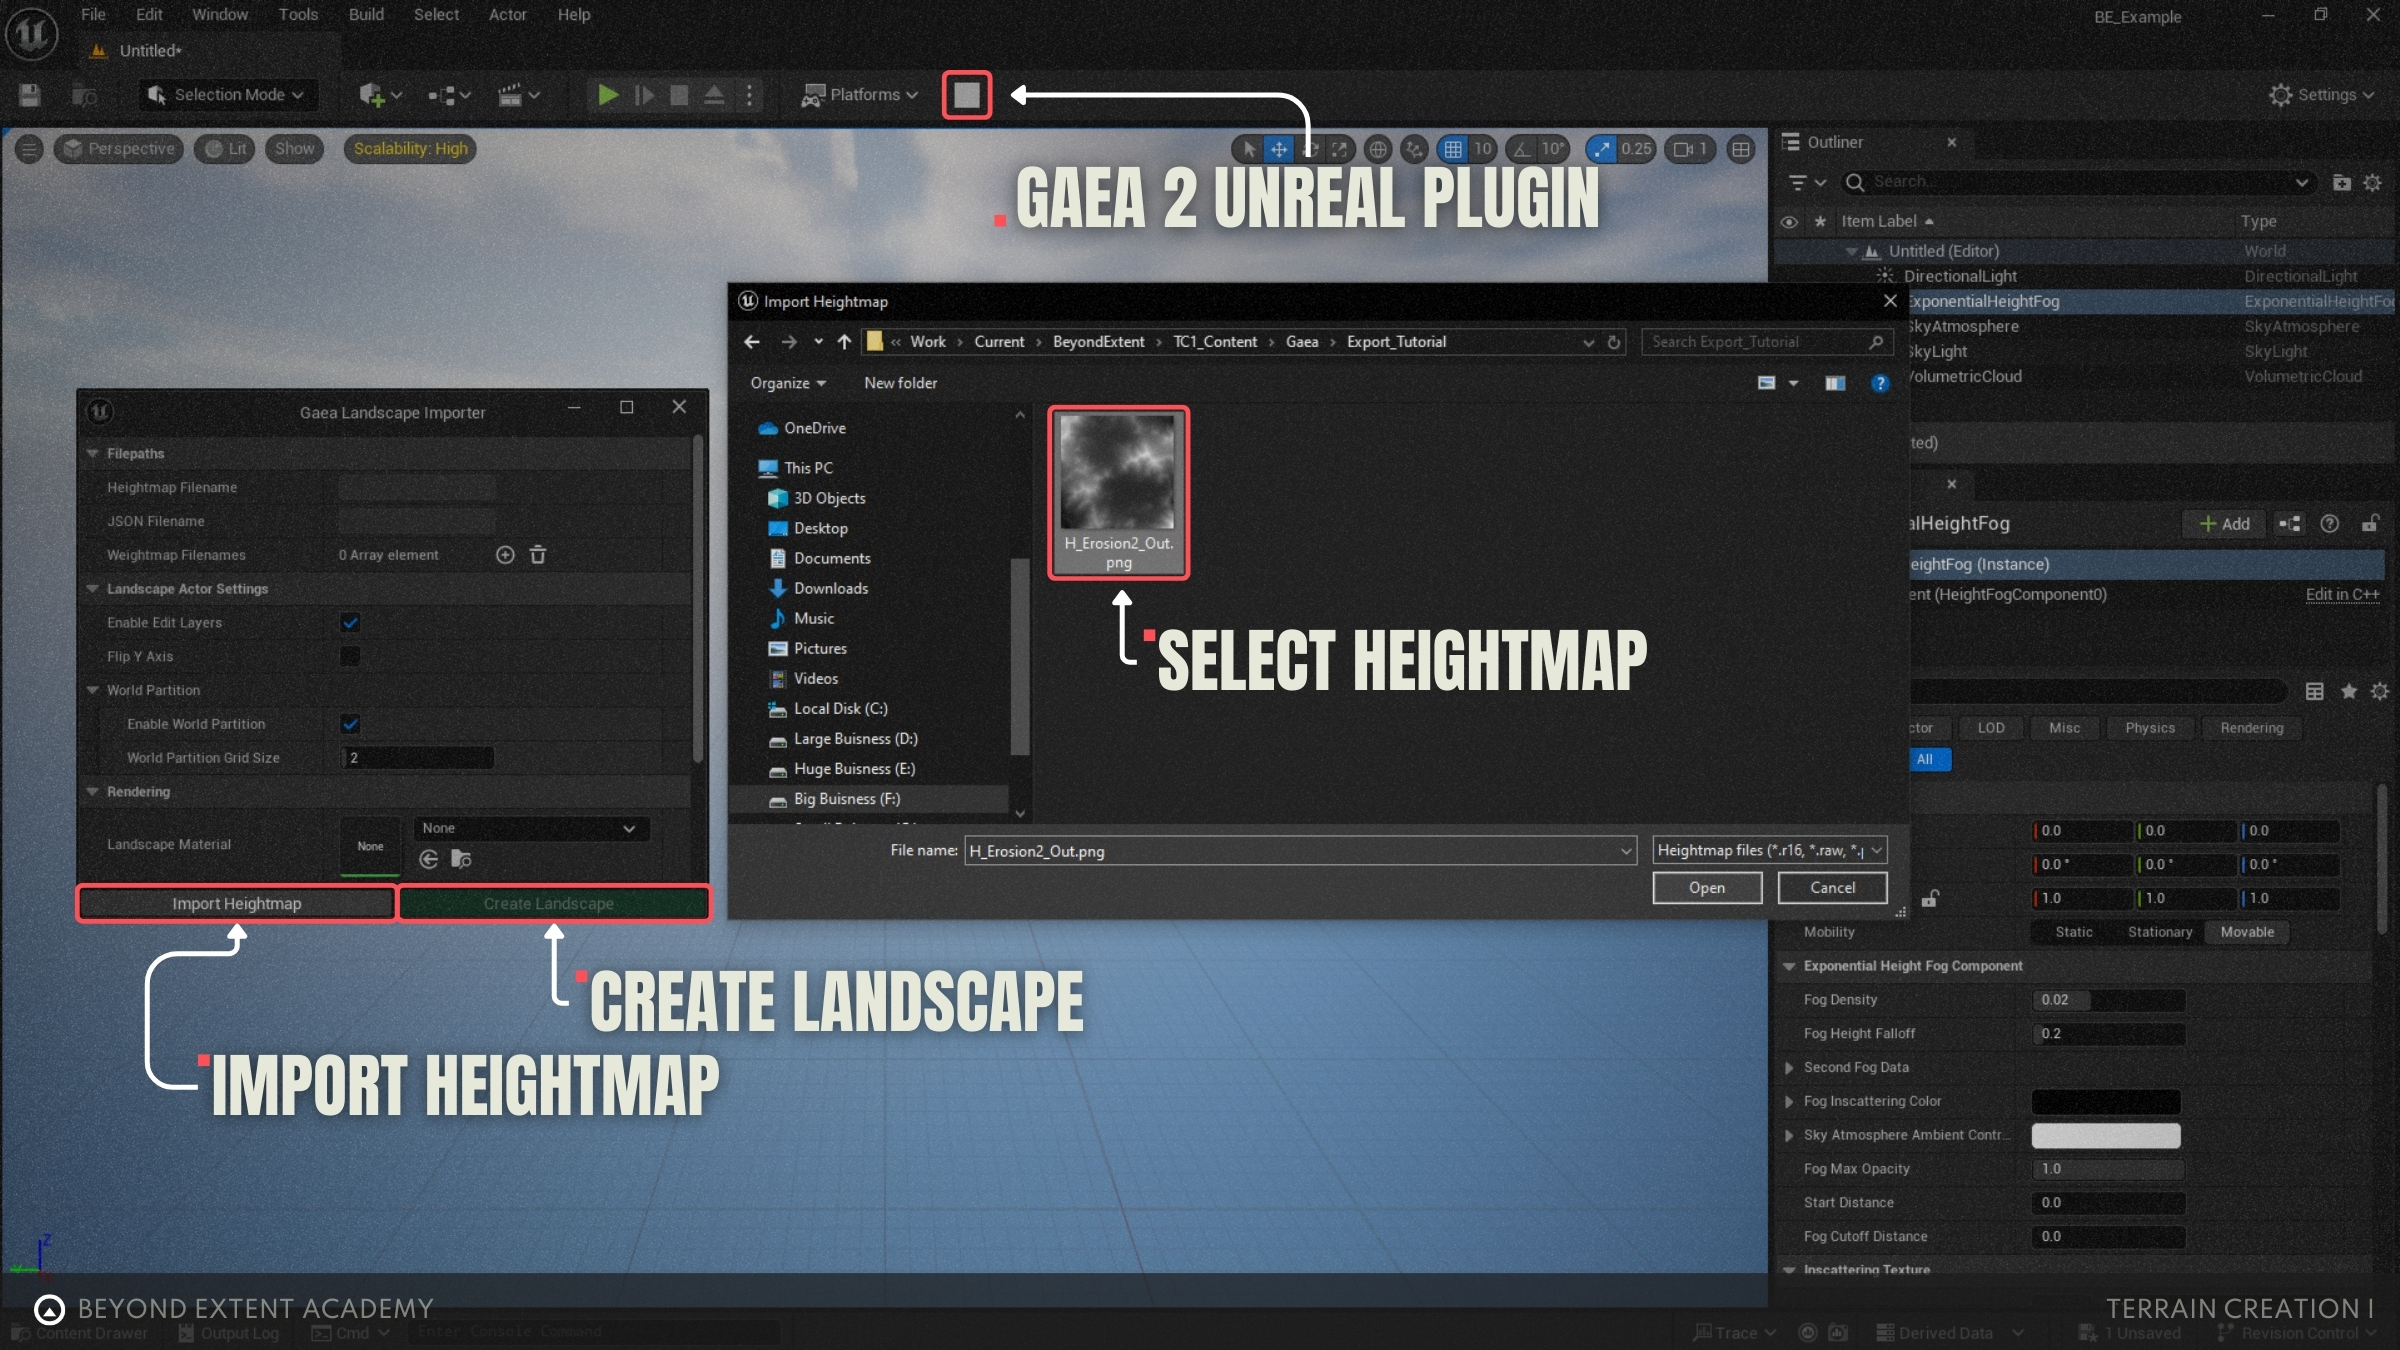
IMPORTING WITH PLUGIN
If you have the Gaea 2 Unreal Plugin installed, you’ll find a button above the viewport, next to the ‘Platforms’ dropdown. Clicking it opens the plugin interface in a new window. From there, hit ‘Import Heightmap’ at the bottom, browse for your file, and select your desired heightmap image.
Once you’ve tweaked the settings in the plugin window to match your needs, hit ‘Create Landscape’! The plugin will then import your terrain using the same scale you set in Terrain Definition when exporting from Gaea.
CONCLUSION
Now you’re all set to start working on your terrain within Unreal Engine! If you’re interested in learning more about terrain within Unreal Engine, stay tuned for our upcoming Terrain II lesson!


